- No category

advertisement

EPX Setup Utility for Ingenico
This document provides instructions for using the EPX Setup Utility to help you configure IP addresses for your Ingenico terminal device. The EPX Setup Utility runs on your POS computer and gathers IP address information for you so that you can then enter it in your Ingenico device. The Utility also enables you to send useful information to EPX support, should you have any problems when configuring your terminal.
Running the EPX Setup Utility
To use the EPX Setup Utility, do the following:
1. On your POS desktop, double-click Setup EPX
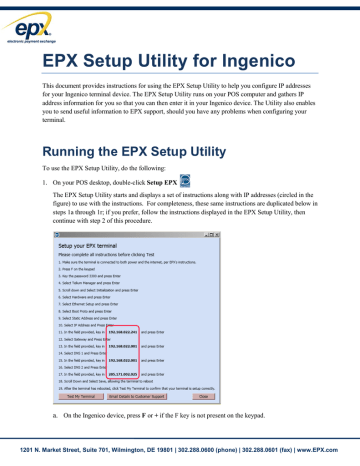
The EPX Setup Utility starts and displays a set of instructions along with IP addresses (circled in the figure) to use with the instructions. For completeness, these same instructions are duplicated below in
steps 1a through 1r; if you prefer, follow the instructions displayed in the EPX Setup Utility, then
continue with step 2 of this procedure.
a. On the Ingenico device, press F or + if the F key is not present on the keypad.
1201 N. Market Street, Suite 701, Wilmington, DE 19801 | 302.288.0600 (phone) | 302.288.0601 (fax) | www.EPX.com
b. Key in the admin password (3300), then press Enter ( ).
The Functions menu is displayed. c. Select Telium Manager.
The Telium Manager menu is displayed. d. Select Initialization.
The Initialization menu is displayed. e. Select Hardware.
The Configuration menu is displayed. f. Select Ethernet Setup.
The Ethernet Setup menu is displayed. g. Select Boot Proto.
The Boot Proto menu is displayed. h. Select Static Address, then press Enter ( ).
The Ethernet Setup menu is displayed. i. Select IP Address. j. In the field provided, key in the IP address displayed in the utility, then press Enter ( ).
Note: Each octet (segment) of the IP address requires 3 digits. Enter leading zeros exactly as they are displayed in the Utility. k. In the Ethernet Setup menu, select Gateway. l. In the field provided, key in the Gateway address displayed in the utility, then press Enter ( ). m. In the Ethernet Setup menu, select DNS 1. n. In the field provided, key in the DNS 1 address displayed in the utility, then press Enter ( ). o. In the Ethernet Setup menu, select DNS 2. p. In the field provided, key in the DNS 2 address displayed in the utility, then press Enter ( ). q. In the Ethernet Setup menu, scroll down and select Save. r. Allow the terminal to reboot.
2. Once the terminal has rebooted, in the EPX Setup Utility, click Test My Terminal.
2
1201 N. Market Street, Suite 701, Wilmington, DE 19801 | 302.288.0600 (phone) | 302.288.0601 (fax) | www.EPX.com
3
After a moment, the following message is displayed:
3. Click OK, then restart the GuestVision application to begin processing transactions with your terminal.
Note that if the either of the following messages is displayed instead, reboot the Ingenico terminal by holding down the yellow and # buttons simultaneously until the device beeps and a “:)” appears, then
release the keys and allow the terminal to reboot. Then repeat the Running the EPX Setup Utility
procedure. If the message is still displayed, contact EPX Customer Support as described in Emailing
Emailing Customer Support
If you encounter a problem during configuration and need to contact EPX Customer Support, in the EPX Setup Utility, click Email Customer Support. Details about your configuration are sent to EPX Customer Support. In the body of the email, be sure to include your phone number and your location, along with a brief indication of your problem.
1201 N. Market Street, Suite 701, Wilmington, DE 19801 | 302.288.0600 (phone) | 302.288.0601 (fax) | www.EPX.com
Technical Details
The Ingenico device has intentionally been configured to use a Static IP, regardless of whether the merchant’s environment uses Dynamic Host Configuration Protocol (DHCP) or a Static IP.
In all but the most extenuating circumstances, this configuration choice does not have a negative impact, and greatly simplifies the terminal setup procedure.
4
However, in rare cases, in DHCP environments, the IP address that was being used by the terminal is released and can no longer be used. As a result, communications to and from the terminal will fail. The user will need to re-run the Utility, which will ping the terminal again and cause it to acquire a new IP address. As before, the Utility displays this new IP address and the
user will have to configure the terminal as described in Running the EPX Setup Utility.
1201 N. Market Street, Suite 701, Wilmington, DE 19801 | 302.288.0600 (phone) | 302.288.0601 (fax) | www.EPX.com
advertisement
* Your assessment is very important for improving the workof artificial intelligence, which forms the content of this project
Related manuals
advertisement