- No category

advertisement

Nikon 950 Settings for use with Global Microscope
Peter D. Cancellier, D.D.S. [email protected]
www.cancellier.com
Directions for Nikon 950 are found on the Nikon 950 Reference Manuals CD. You will need Adobe Acrobat Reader to view the manual. It can be downloaded for free at http://www.adobe.com/products/acrobat/readstep.html
. Place CD in computer. Right click start menu. Select explorer. Scroll down left side until you find the CD icon. Double click it. Single click Pdf folder. Single click en folder. On right side of explorer double click
C95.rmen.pdf. Use this manual for general instructions and to supplement the following instructions.
1. Camera on/off lever set to second position called M-Rec (Manual).
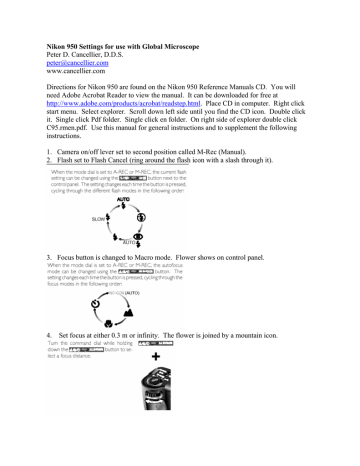
2. Flash set to Flash Cancel (ring around the flash icon with a slash through it).
3. Focus button is changed to Macro mode. Flower shows on control panel.
4. Set focus at either 0.3 m or infinity. The flower is joined by a mountain icon.
2
5. Set Image Quality and Size to XGA Fine by holding down the Qual button and turning the command dial. This gives you 19 1024x768 images with an 8 MB memory card.
You may elect to purchase a larger memory card.
6. Do not change Sensitivity as noise may be added to the image.
7. Set the Exposure Mode to S (Shutter Priority) by holding down the Mode button and turning the command dial. The S icon will show in the control panel and LCD screen.
8. Set the shutter speed to 1/125 by releasing the Mode button and turning the command dial. On some 950’s you will not see the numerator. 125 is 1/125 second. F-stop is controlled by the camera.
Important: If the shutter speed does not change when you rotate the command dial, press and release the Mode button and rotate the command dial again. The shutter speed will show in the control panel and LCD screen. If your light source is not powerful enough, you may have to use 1/60 in order to have bright enough images.
Another consideration is to use a Xenon light source and/or a 50/50 beamsplitter.
9. Set White Balance as directed in the pocket guide.
10. Menu settings. Press the menu button. If the menu does not appear, press the monitor button until the menu screen appears. Use zoom buttons to scroll through items. Press shutter release to select item and activate changes.
LCD brightness-as desired.
Sound-as desired.
LCD On/Off-ON&C-AF(default).
Controls: Use shutter release to turn on Flash Mode Save, Focus Mode Save,
Exposure Mode Save, Exposure Compensation Save,
Auto Off-No.
Set Time and Date.
Digital Tele-OFF.
B & W-NO.
AE Lock-OFF.
User Set-The goal here is to save your settings for metering and white balance.
Once in User Set, press the shutter release button to display a list of the settings saved under the selected settings number. The settings number can then be changed by pressing the zoom buttons. Use #2. After selecting the desired settings number, press the shutter release button. Select white balance and metering.
11. Set up a TV monitor to view image focus. The 950 connects to a TV with a supplied cable. The camera’s LCD screen is too small to use for accurate focus in the macro mode.
12. Do not use a remote. Frame your image by moving hand mirror to center image and with your right hand on camera, move the camera to properly frame the picture. Do this while looking in the monitor. Push the shutter release button. The processed image will show in the monitor.
13. Zoom is used to remove the black border outside of the light’s range.
Buy a USB Compact Flash Card Reader and an AC power supply for the Nikon. If everything is working properly, it should not be necessary to process the images with an image management software program. Hopefully you are using an endodontic software program that is capable of importing images to be used in reports for referring dentists..
advertisement
* Your assessment is very important for improving the workof artificial intelligence, which forms the content of this project