
advertisement

Deploy the ExtraHop Discover Appliance
1100
Published: 2016-12-21
The following procedures explain how to deploy an ExtraHop Discover appliance 1100.
System requirements
Your environment must meet the following requirements to deploy the EDA 1100:
• Power supply: 100-240v power source
• Network access: Two 10/100/1000 BASE-T network ports. One configured as the management port and the other configured as the monitoring port.
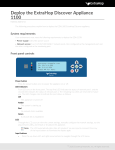
Front panel controls
Power button
Press the power button once to power the appliance on or off.
LED indicators
Four LEDs are on the front panel. The top (first) LED indicates the status of network port 1 and the second LED indicates the status of network port 2. The remaining two LEDs are reserved for future use. The LED changes color to indicate the port status, as follows:
Off
The appliance is turned off
Amber
The system is starting up
Red
No network link is available
Green
A network link is established
LCD
Through the LCD, you can view the current settings, manually configure the network settings, run the ping network utility, and restart or shutdown the appliance.
Note: The LCD automatically dims after 60 minutes if no user input is received. Press any of the input buttons to illuminate the display again.
Input buttons
• Press the up, down, left, and right arrow buttons to navigate through the LCD menu.
©
2017 ExtraHop Networks, Inc. All rights reserved.
• Press the green checkmark button to select a configuration setting and to save your changes.
• Press the red X button to cancel changes before saving and return to the home screen.
LCD menu layout
The table below represents the layout of the LCD menu controls.
Home Screen Main Menu
• Host name
• IP address
• Firmware
• Appliance info
• System serial
• Product key
• Network menu
• View net info
• DHCP
• IP
• Net
• GW
• DNS
• Mgmt MAC address
• Enable DHCP (Visible only if a static IP is set
• Set static IP
• Set DNS servers (Visible only if a static IP is set)
• Ping
• System
• Restart
• Shut down system
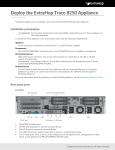
Rear panel ports
• One RS-232 serial port to connect a console device.
• One power port to connect the EDA 1100 to an AC power source.
• Two USB 3.0 ports to connect a keyboard.
• One DisplayPort to connect an external display.
• Four 10/100/1000 BASE-T network ports. Port 1 is the primary management port and port 2 is the primary monitor port.
Deploy the ExtraHop Discover Appliance 1100 2
Note: Ports 3 and 4 are reserved for future use and are disabled.
Set up the appliance
1.
Attach the four self-adhesive bumpers included in the package to the bottom of the appliance.
2.
Place the appliance on a flat surface near a suitable power source. To prevent overheating, leave at least 2 inches (5 cm) of clearance around the sides and top of the appliance. Optionally, you can mount the appliance to a wall.
3.
Connect an Ethernet cable from network port 1 on the back of the appliance to your management network.
4.
Connect an Ethernet cable from network port 2 on the back of the appliance to the mirror port on your switch.
5.
Connect the power cord to the power port on the back of the EDA 1100, and then plug the cord into a power outlet. The appliance powers on automatically.
Configure the management IP address
DHCP is enabled by default on the EDA 1100. When you power on the appliance, interface 1 attempts to acquire an IP address through DHCP. The IP address appears on the home screen of the LCD.
If your network does not support DHCP, you can configure a static IP address through the LCD menu on the front panel or through the command-line interface (CLI). If an IP address has not been configured, the home screen displays IP:(None) .
Complete the following steps to manually configure an IP address from the front panel.
1.
Press the checkmark button on the front of the EDA 1100.
2.
Press the down arrow button to select Network menu , and then press the checkmark button.
3.
Press the down arrow to select Set static IP , and then press the checkmark button.
4.
Press the left or right arrows to select the first digit to change, and then press the up or down arrows to change the digit to the desired number. Repeat this step for each digit you need to change. After you configure the desired IP address, press the checkmark button.
5.
On the Network mask screen, press the left or right arrows to select the first digit to change, and then press the up or down arrows to change the digit to the desired number. Repeat this step for each digit you need to change. After you configure the desired network mask, press the checkmark button.
6.
On the Default gateway screen, press the left or right arrows to select the first digit to change, and then press the up or down arrows to change the digit to the desired number. Repeat this step for each digit you need to change. After you configure the desired default gateway, press the checkmark button.
7.
Confirm your modified network settings on the Settings saved screen, and then press any button to return to the Network Menu .
8.
Press the down arrow and scroll to Set DNS servers , and then press the checkmark button.
9.
Press the left or right arrows on the DNS1 screen to select the first digit to change, and then press the up or down arrows to change the digit to the desired number. Repeat this step for each digit you need to change, and then press the checkmark button to continue to the DNS2 screen.
10. Optional: Repeat step 9 to configure a second DNS server.
11. Confirm the DNS settings on the Settings saved screen, confirm the DNS settings, and then press any button to return to the Network Menu .
Deploy the ExtraHop Discover Appliance 1100 3
(Optional) Configure a static IP address through the CLI
You can access the CLI by connecting a USB keyboard and SVGA monitor to the appliance or through an
RS-232 serial cable and a terminal-emulator program. The terminal emulator must be set to 115200 bps with 8 data bits, no parity, 1 stop bit (8N1), and hardware flow control should be disabled.
1.
Establish a connection to the ExtraHop appliance.
2.
At the login prompt, type shell and then press ENTER.
3.
At the password prompt, type the serial number, which is located on the bottom of the appliance and displayed in the Appliance info section of the LCD menu.
4.
Enable privileged commands by running the following command: enable
5.
At the password prompt, type the serial number, and then press ENTER.
6.
Enter configuration mode by running the following command: configure
7.
Enter the interface configuration mode by running the following command: interface
8.
Run the ip command and specify the IP address and DNS settings in the following format: ip ipaddr <ip_address> <netmask> <gateway> <dns_server>
For example: ip ipaddr 10.10.2.14 255.255.0.0 10.10.1.253
10.10.1.254
9.
Leave the interface configuration section: exit
10. Save the running config file: running_config save
11. Type y and then press ENTER.
Configure the Discover appliance
After you configure an IP address for the Discover appliance, you can log into the Discover Admin UI through the following URL: https://<discover_ip_address>/admin and complete the following recommended procedures.
•
Register the ExtraHop appliance
•
•
•
Connect the Discover appliance to any Explore, Trace or Command appliances
Register the ExtraHop appliance
Complete the following steps to apply a product key supplied by ExtraHop Support.
If you do not have a product key, contact [email protected]
.
Deploy the ExtraHop Discover Appliance 1100 4
Tip: To verify that your environment can resolve DNS entries for the ExtraHop licensing server, open a terminal application on your Windows, Linux, or Mac OS client and run the following command: nslookup -type=NS d.extrahop.com
If the name resolution is successful, output similar to the following appears:
Non-authoritative answer: d.extrahop.com nameserver = ns0.use.d.extrahop.com.
d.extrahop.com nameserver = ns0.usw.d.extrahop.com.
1.
In your browser, type the URL of the ExtraHop Admin UI, https://<extrahop_ip_address>/ admin .
2.
Review the license agreement, select I Agree , and then click Submit .
3.
On the login screen, type setup for the username.
4.
For the password, select from the following options:
• For 1U and 2U appliances, type the service tag number found on the pullout tab on the front of the appliance.
• For the EDA 1100, type the serial number displayed in the Appliance info section of the LCD menu. The serial number is also printed on the bottom of the appliance.
• For a virtual appliance, type default .
5.
Click Log In .
6.
In the Appliance Settings section, click License .
7.
Click Manage License .
8.
Click Register .
9.
Enter the product key and then click Register .
10. Click Done .
Configure the system time
The default time server setting is pool.ntp.org
. If you want to maintain the default setting, skip this procedure and go to the next section.
1.
In the Appliance Settings section, click System Time .
2.
Click Configure Time .
3.
Click the Time Zone drop-down list and select a time zone.
4.
Click Save and Continue .
5.
On the Time Setup page, select one of the following options:
• Set time manually
Note: You cannot manually set the time if the Discover appliance is managed by a
Command appliance.
• Set time with NTP server
6.
Select the Set time with NTP server radio button, then click Select .
The pool.ntp.org
public time server appears in the Time Server #1 field by default.
7.
Type the IP address or fully qualified domain name (FQDN) for the time servers in the Time Server fields. You can add a maximum of nine time servers.
Tip: After adding the fifth time server, click Add Server to display up to four additional time server fields.
8.
Click Save , and then click Done .
Deploy the ExtraHop Discover Appliance 1100 5
The NTP Status table displays a list of NTP servers that keep the system clock in sync. To sync the current system time a remote server, click the Sync Now button.
Configure email settings
You must configure an email server and sender before the ExtraHop appliance can send notifications about system alerts by email.
1.
In the Network Settings section, click Notifications .
2.
Click Email Server and Sender .
3.
Type the IP address or hostname for the outgoing SMTP mail server in the SMTP Server field.
Note: The SMTP server should be the fully qualified domain name (FQDN) or IP address of an outgoing mail server that is accessible from the ExtraHop management network. If the DNS server is set, then the SMTP server can be a FQDN, otherwise it needs to be an IP address.
4.
Type the port number for SMTP communication in the SMTP Port field. The default port number is 25 .
5.
Select one of the following encryption methods from the Encryption drop-down list:
• None . SMTP communication is not encrypted.
• SSL/TLS . SMTP communication is encrypted through the Secure Socket Layer/Transport Layer
Security protocol.
• STARTTLS . SMTP communication is encrypted through STARTTLS.
6.
Type the email address for the notification sender in the Sender Address field.
Note: The displayed sender address might be changed by the SMTP server. When sending through a Google SMTP server, for example, the sender email is changed to the username supplied for authentication, instead of the originally entered sender address.
7.
Select Validate SSL Certificates to enable certificate validation. If you select this option, the certificate on the remote endpoint is validated against the root certificate chains specified by the trusted certificates manager. You must configure which certificates you want to trust on the Trusted
Certificates page. For more information, see Add a trusted certificate to your ExtraHop appliance .
8.
Type the email address for the report sender in the Report Sender Address field.
9.
Select the Enable SMTP authentication checkbox and then type the SMTP server setup credentials in the Username and Password fields.
10. Click Save .
Add an email notification group
Email notification groups are assigned to alerts to designate who should receive an email when that alert becomes active. Although you can specify individual email addresses to receive emails for alerts, email groups are the most effective way to manage your alert recipient list.
1.
In the Network Settings section, click Notifications .
2.
Click Email Notification Groups .
3.
Click Add Group .
4.
In the Group Info section, enter the following information:
• Name: The name of the email group.
• System Health Notifications: Select this checkbox if you want to send system storage alerts to the email group. These alerts are sent under the following conditions:
• A virtual disk is in a degraded state.
• A physical disk is in a degraded state.
• A physical disk has an increasing error count.
• A necessary role is missing, such a firmware, datastore, or packet capture.
Deploy the ExtraHop Discover Appliance 1100 6
5.
In the Email Addresses text box, type the recipient email addresses for the team members that you want to receive the alert emails for this group. Email addresses can be entered one per line or separated by a comma, semicolon, or space. Email addresses are checked only for
[name]@[company].[domain] format validation. There must be at least one email address in this text box for the group to be valid.
6.
Click Save .
Connect the Discover appliance to any Explore, Trace or Command appliances
If you have any ExtraHop Explore, Trace or Command appliances in your environment, you can connect the Discover appliance to the Command appliance or join the Discover appliance to an Explore or Trace appliance. For more information, see the ExtraHop Admin UI Guide .
Deploy the ExtraHop Discover Appliance 1100 7
advertisement
* Your assessment is very important for improving the workof artificial intelligence, which forms the content of this project
Related manuals
advertisement