advertisement

UnDermoUnt StAInleSS Steel SInk
InStAllAtIon InStrUCtIonS
FOR MODELS: BFM108, BFM108RV, BFM208, BFM308, BFM308RV, BFM3218LD, BFM408, BFSB3121, BFSB508, BFSB608, BFSB708, BFSB908
BFM208 BFSB3121
BFSB508 BFSB708
Before You Start
• Belle Forêt recommends that all undermount sinks be installed by an experienced, professional installer.
• ImPortAnt: the enclosed cutout template will create a countertop opening with a minimal (1/8” or less) reveal. It is recommended that you discuss this with your installer and agree that this finished appearance is the desired effect. Belle Forêt is not responsible for improper sink or countertop installations.
• ImPortAnt: the cabinet must be installed, secured, plumb, and level. Failure of this step can lead to product damage.
• Belle Forêt undermount sinks should only be fastened to a solid surface countertop (i.e. granite, Corian® or Silestone®).
• Belle Forêt is not responsible for sink or countertop if damaged during installation. Be sure to inspect the sink for damage prior to beginning installation.
• Metal edges may be sharp – use caution when handling.
• Follow all local plumbing and building codes.
Recommended Tools & Materials (Not Included)
o tape measure o Safety Glasses o Painter’s tape o level o Framing Square o Pencil (not permanent marker) o Shims or Cabinet Fillers o Denatured Alcohol o Clamps o Construction Adhesive o Silicone Sealant o Screws (recommended by countertop manufacturer)
Contact Belle Forêt at (800) 880-8164. Copyright ©2014, World Imports Decorative Plumbing. All rights reserved.
Page 1
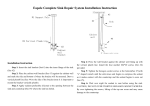
oUtlIne For UnDermoUnt
SInk CUtoUt moUntInG BrACket
InverteD CoUntertoP
FAStener
UnDermoUnt StAInleSS Steel SInk
InStAllAtIon InStrUCtIonS
1. Position the template (provided with your sink) front to rear so the sink will not interfere with the cabinet; secure with tape.
2. Trace the template and remove. Dry fit the sink to verify the measurements.
4. Following the countertop manufacturer’s instructions, carefully cut the countertop on the inside of the traced line.
5. Locate and drill the mounting holes, following the countertop manufacturer’s instructions. Holes should allow even spacing of mounting brackets around the sink.
6. With the countertop inverted (upside down), fasten the mounting brackets to the countertop loosely.
d
IMPORTANT: The cabinet must be installed, secured, plumb, and level
BEFORE installing the sink.
d
IMPORTANT: Belle Forêt undermount sinks should only be fastened to a solid surface countertop (i.e. granite, Corian® or Silestone®).
APPlY SIlICone SeAlAnt AFter CleAnInG tHe
SInk eDGe AnD CoUntertoP verIFY SInk IS CentereD WItHIn tHe CoUntertoP oPenInG BeFore tIGHtenInG FAStenerS.
1. Clean the bottom of the countertop and the top flange (or lip) of the sink with denatured alcohol.
2. Apply a narrow bead of silicone adhesive sealant evenly all around the top of the sink flanges.
3. Position and align the sink over the countertop opening. Press silicone onto countertop.
4. Tighten fasteners until mounting brackets are snug against sink. Check alignment of sink to the countertop opening.
5. Tighten down fasteners evenly. Be careful not to over-tighten.
6. Immediately remove excess sealant.
d
IMPORTANT: The enclosed cutout template will create a countertop opening with a minimal (1/8” or less) reveal. It is recommended that you discuss this with your installer and agree that this finished appearance is the desired effect. Belle Forêt is not responsible for improper sink or countertop installations.
d
IMPORTANT: Belle Forêt is not responsible for sink or countertop if damaged during installation. Be sure to inspect the sink for damage prior to beginning installation.
1. Following all local plumbing and building codes, install the faucet according to the manufacturer’s instructions.
2. Connect the drain and piping.
3. Run water into the sink and check all connections for leaks. d
IMPORTANT: For additional information or warranty issues contact Belle Forêt directly at:
Belle Forêt Warranty Dept, World Imports Decorative Plumbing
3074 Chastain Meadows Parkway
Marietta, GA 30066
(800) 880-8164
Contact Belle Forêt at (800) 880-8164. Copyright ©2014, World Imports Decorative Plumbing. All rights reserved.
Page 2
FreGADero De ACero InoxIDABle De InStAlACIón BAjo CUBIertA
InStrUCCIoneS De lA InStAlACIón
PARA LOS MODELOS: BFM108, BFM108RV, BFM208, BFM308, BFM308RV, BFM3218LD, BFM408, BFSB3121, BFSB508, BFSB608, BFSB708, BFSB908
BFM208 BFSB3121
Contact Belle Forêt at (800) 880-8
BFSB508 BFSB708
antes de comenzar
• Belle Forêt recomienda que todos los fregaderos de instalación bajo cubierta sean instalados por profesionales experimentados.
• IMPORTANTE: La plantilla incluida creará una abertura de mostrador con una exposición mínima (1/8” o menos). Se recomienda que discutas esto con tu instalador y acuerdes si esta apariencia del acabado es el efecto que deseas. Belle Forêt no será responsable por la instalación inapropiada de fregaderos ni mostradores.
• ImPortAnte: el gabinete debe instalarse, sujetarse, colocarse a plomo y nivelarse. no seguir este paso puede causar daños al producto.
• El fregadero de instalación bajo cubierta Belle Forêt sólo debe sujetarse a mostradores de superficie sólida (como granito, Corian® o Silestone®).
• Belle Forêt no será responsable por la instalación inapropiada de fregaderos ni mostradores. Asegúrate de inspeccionar que el fregadero no tenga daños antes de comenzar la instalación.
• Los bordes de metal pueden estar afilados, ten cuidado al manipularlos.
• Sigue todos los códigos de plomería y construcción.
Herramientas y materiales recomendados (no incluidos)
o Cinta de medir o Cuñas o rellenos de gabinete o Gafas de seguridad o Cinta adhesiva para pintar o nivel o escuadra de enmarcado o lápiz (no marcador permanente) o Alcohol desnaturalizado o Abrazaderas o Adhesivo para construcción o Sellador de silicona o tornillos (recomendados por el fabricante del mostrador)
Comunícate con Belle Forêt al (800) 880-8164. Copyright © 2014, World Imports Decorative Plumbing. Todos los derechos reservados.
PágINa 3
SoPorte De InStAlACIón moStrADor InvertIDo
FreGADero De ACero InoxIDABle De InStAlACIón BAjo CUBIertA
InStrUCCIoneS De lA InStAlACIón lA PlAntIllA Del FreGADero DeFIne el ÁreA
De InStAlACIón
SUjetADor
1. Coloca la plantilla (incluido con tu fregadero) del frente a la parte posterior de manera que el fregadero no interfiera con el gabinete y asegúrala con cinta adhesiva.
2. Traza la plantilla y retírala. Comprueba el ajuste del fregadero para verificar las medidas.
3. siguiendo las instrucciones del fabricante del mostrador, corta cuidadosamente por la parte interior de la línea trazada.
4. Ubica y taladra los orificios de instalación, siguiendo las instrucciones del fabricante del mostrador. Los orificios deben permitir una separación uniforme de los soportes de instalación alrededor del fregadero.
5. Con el mostrador invertido (cabeza abajo), sujeta los soportes de instalación al mostrador, sin apretarlos.
d
IMPORTANTE: El gabinete debe instalarse, sujetarse, colocarse a plomo y nivelarse ANTES de instalar el fregadero.
d
IMPORTANTE: El fregadero de instalación bajo cubierta Belle Forêt sólo debe asegurarse a mostradores de superficie sólida (como granito, Corian® o
Silestone®).
APlICA el SellADor De SIlIConA DeSPUÉS
De lImPIAr el BorDe Del FreGADero Y el moStrADor verIFICA qUe el FreGADero eStÉ CentrADo
Dentro De lA ABertUrA Del moStrADor AnteS
De APretAr loS SUjetADoreS.
1. Limpia la parte inferior del mostrador y la brida superior (o pestaña) del fregadero con alcohol desnaturalizado.
2. Aplica una línea delgada de adhesivo sellador de silicona de manera uniforme alrededor de toda la parte superior del fregadero.
3. Coloca y alinea el fregadero sobre la abertura del mostrador. Presiona la silicona sobre el mostrador.
4. Aprieta los sujetadores hasta que los soportes de instalación estén ajustados contra el fregadero. Verifica la alineación del fregadero con la abertura del mostrador.
5. Aprieta de manera uniforme los sujetadores. Cuida de no apretar demasiado.
6. elimina inmediatamente el exceso de sellador.
d
IMPORTANTE: La plantilla incluida creará una abertura de mostrador con una exposición mínima (1/8” o menos). Se recomienda que discutas esto con tu instalador y acuerdes si esta apariencia del acabado es el efecto que deseas. Belle Forêt no será responsable por la instalación inapropiada de fregaderos ni mostradores.
d
IMPORTANTE: Belle Forêt no será responsable por la instalación inapropiada de fregaderos ni mostradores. Asegúrate de inspeccionar que el fregadero no tenga daños antes de comenzar la instalación.
1. siguiendo todos los códigos de plomería y construcción, instala el grifo de acuerdo a las instrucciones del fabricante.
2. Conecta el desagüe y las tuberías.
3. Abre el agua del fregadero y revisa que no haya fugas en ninguna de las conexiones. d
IMPORTANTE: Para información adicional o asuntos de garantía, comunícate directamente con Belle Forêt a:
Belle Forêt Warranty Dept, World Imports Decorative Plumbing
3074 Chastain Meadows Parkway
Marietta, GA 30066
(800) 880-8164
Comunícate con Belle Forêt al (800) 880-8164. Copyright © 2014, World Imports Decorative Plumbing. Todos los derechos reservados.
PágINa 4
advertisement
* Your assessment is very important for improving the workof artificial intelligence, which forms the content of this project