advertisement

Operation
1
Operating the palm sander
□ This Palm Sander is designed to operate on 90 PSIG .
Lower pressure (below 90 PSIG) will reduce performance of the tool . Higher air pressure (over 90 PSIG) raises the performance of the tool beyond its rated capacity and could cause serious damage to the tool and the user .
2
Installing the backing pad and sanding disc
WARNING: Disconnect the tool from the air source before servicing or changing any accessories .
□ Remove the air supply from the palm sander .
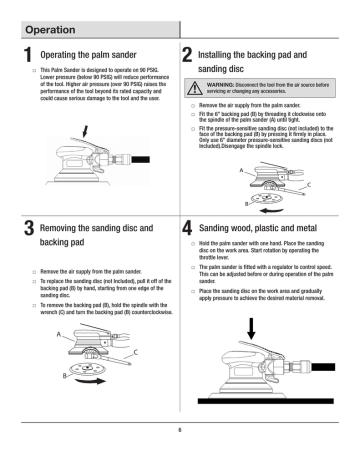
□ Fit the 6” backing pad (B) by threading it clockwise onto the spindle of the palm sander (A) until tight .
□ Fit the pressure-sensitive sanding disc (not included) to the face of the backing pad (B) by pressing it firmly in place .
Only use 6” diameter pressure-sensitive sanding discs (not
Included) .Disengage the spindle lock .
A
C
3
Removing the sanding disc and backing pad
□ Remove the air supply from the palm sander .
□ To replace the sanding disc (not Included), pull it off of the backing pad (B) by hand, starting from one edge of the sanding disc .
□ To remove the backing pad (B), hold the spindle with the wrench (C) and turn the backing pad (B) counterclockwise .
B
4
Sanding wood, plastic and metal
□ Hold the palm sander with one hand . Place the sanding disc on the work area . Start rotation by operating the throttle lever .
□ The palm sander is fitted with a regulator to control speed .
This can be adjusted before or during operation of the palm sander .
□ Place the sanding disc on the work area and gradually apply pressure to achieve the desired material removal .
A
C
B
6
advertisement
* Your assessment is very important for improving the workof artificial intelligence, which forms the content of this project