advertisement

Î
GE Fanuc Automation
Programmable Control Products
Series 90
t-70
Programmable
Controller
User’s Guide to Integration of 3rd Party VME Modules
GFK-0448E December 1997
GFL–002
Warnings, Cautions, and Notes as Used in this Publication
Warning
Warning notices are used in this publication to emphasize that hazardous voltages, currents, temperatures, or other conditions that could cause personal injury exist in this equipment or may be associated with its use.
In situations where inattention could cause either personal injury or damage to equipment, a Warning notice is used.
Caution
Caution notices are used where equipment might be damaged if care is not taken.
Note
Notes merely call attention to information that is especially significant to understanding and operating the equipment.
This document is based on information available at the time of its publication. While efforts have been made to be accurate, the information contained herein does not purport to cover all details or variations in hardware or software, nor to provide for every possible contingency in connection with installation, operation, or maintenance.
Features may be described herein which are not present in all hardware and software systems. GE Fanuc Automation assumes no obligation of notice to holders of this document with respect to changes subsequently made.
GE Fanuc Automation makes no representation or warranty, expressed, implied, or statutory with respect to, and assumes no responsibility for the accuracy, completeness, sufficiency, or usefulness of the information contained herein. No warranties of merchantability or fitness for purpose shall apply.
The following are trademarks of GE Fanuc Automation North America, Inc.
Alarm Master
CIMPLICITY
CIMPLICITY Control
CIMPLICITY PowerTRAC
CIMPLICITY 90-ADS
CIMSTAR
Field Control
GEnet
Genius
Genius PowerTRAC
Helpmate
Logicmaster
Modelmaster
Motion Mate
PowerMotion
ProLoop
PROMACRO
Series Five
Copyright 1991 - 1997 GE Fanuc Automation North America, Inc.
All Rights Reserved
Series 90
Series One
Series Six
Series Three
VuMaster
Workmaster
Preface
This manual provides the information necessary for evaluation of 3rd party VME modules for integration into a Series 90 t-70 Programmable Logic Controller system.
Revisions to This Manual
Revisions have been made to this manual to make additions, deletions, and corrections where necessary. Following is a list of the revisions to this manual as compared to the previous version, GFK-0448D.
H References have been made, where applicable, to programming and configuration of the Series 90-70 PLC using windows-based CIMPLICITY r Control programming software.
H Page 3-6, added information under VME Interrupts regarding the use of 3rd Party
VME Interrupts in a Series 90-70 PLC system.
H Page 3-21 – 3-23, added information on Interrupting the PLC CPU.
GFK-0448E iii
Preface
Content of this Manual
This manual contains the following information:
Chapter 1. Introduction to the VMEbus Standard:
Provides a definition of the VMEbus standard including mechanical, electrical, and functional requirements.
Chapter 2. Guidelines for Selection of 3rd Party VME Modules:
Describes the guidelines for successful integration of 3rd party VME modules in the Series 90-70 PLC.
Chapter 3. Configuration of VME Modules:
Describes configuration requirements for addressing of VME modules in a Series 90-70 PLC system.
Chapter 4. Installation of VME Modules:
Describes installation requirements for VME modules which must be adhered to when they are installed in a Series 90-70 PLC system.
Chapter 5. Programming Requirements:
Describes the programming functions available with Logicmaster 90 software that allows the Series 90-70 PLC to communicate with 3rd Party VME modules.
Appendix A. Commonly Used Acronyms and Abbreviations:
Provides a list of acronyms used throughout this guide, and their derivation.
Appendix B. Why Do Restrictions Exist?:
Describes the reasons that some of the restrictions described in this guide exist for those who may require further explanation.
Appendix C. Configuration Examples:
Provides examples of configuring 3rd Party
VME Modules.
Appendix D. Quick Compatibility Checklist:
Provides a checklist of key items to help you determine if a 3rd Party VME Module is compatible with the Series 90-70 PLC system.
Appendix E. VMEbus International Trade Association:
Describes two documents which provide more information for users of VME-based products.
Appendix F. VME Integrator Racks:
Data sheet providing detailed information about the GE Fanuc VME Integrator Racks.
Appendix G. Application Bulletins:
Provides examples of applications using 3rd party
VME modules into the Series 90-70 PLC system.
Appendix H. Related VME Products:
Listing of VME products qualified by GE Fanuc for use with Series 90-70 PLC systems.
iv User’s Guide to Integration of 3rd Party VME Modules - December 1997 GFK-0448E
Preface
Related Publications:
GFK-0262: Series 90
t-70 Programmable Controller Installation Manual. Describes system hardware components and provides installation and field wiring information for system planning and actual installation.
GFK-0263: Logicmaster
t 90 Programming Software User’s Manual. Explains use of
Logicmaster 90 software to configure a Series 90-70 Programmable Logic Controller and create application programs.
GFK-0265: Series 90
t-70 Programmable Controller Reference Manual. Describes the programming instructions used to create application programs for the Series 90-70
Programmable Logic Controller, system operation, fault explanations and corrections, and provides CPU performance data.
GFK-0401: Workmaster
R II PLC Programming Unit Guide to Operation. Describes installation and operation of the Workmaster II computer, specifically when used as the programming device for a Series 90 Programmable Logic Controller.
GFK-0552: VME Option Kit. This is a data sheet describing the GE Fanuc VME Option Kit which is an accessory kit containing hardware for installing a J2 backplane.
GFK-0637: Rack Fan Assembly. This is a data sheet describing the GE Fanuc Rack Fan
Assembly which is an option to provide forced air cooling for racks if required.
GFK-0684: VME Integrator Racks - Front and Rear Mount. This is a data sheet describing the GE Fanuc VME Integrator Racks for use with the Series 90-70 Programmable Logic
Controller. The content of this data sheet is included in this manual as Appendix F.
GFK-1179: Installation Requirements for Conformance to Standards. Describes installation requirements for programmable control products used in industrial environments, specifically, in situations where more stringent requirements must be followed.
GFK-1295: Using CIMPLICITY
r Control. Describes the features that are used to program the Series 90-70 PLCs using CIMPLICITY Control, which is a programming and configuration package that runs under either the Windows NT r (3.51 or 4.0) or
Windows r 95 environments.
At GE Fanuc Automation, we strive to produce quality technical documentation. After you have used this manual, please take a few moments to complete and return the
Reader ’s Comment Card located on the next page.
Henry A. Konat
Senior Technical Writer
GFK-0448E
Preface v
Preface
This page intentionally left blank.
vi User’s Guide to Integration of 3rd Party VME Modules - December 1997 GFK-0448E
Contents
Chapter 1 Introduction to the VMEbus Standard . . . . . . . . . . . . . . . . . . . . . . . . .
VMEbus Standard Definitions
Mechanical Structure
. . . . . . . . . . . . . . . . . . . . . . . . . . . . . . . . . . .
. . . . . . . . . . . . . . . . . . . . . . . . . . . . . . . . . . . . . . . . . . .
Power Supplies . . . . . . . . . . . . . . . . . . . . . . . . . . . . . . . . . . . . . . . . . . . . . . . .
References . . . . . . . . . . . . . . . . . . . . . . . . . . . . . . . . . . . . . . . . . . . . . . . . . . . .
Chapter 2 Guidelines for Selection of
3rd Party VME Modules . . . . . . . . . . . . . . . . . . . . . . . . . . . . . . . . . . . . .
Environmental Considerations . . . . . . . . . . . . . . . . . . . . . . . . . . . . . . . . . . .
Use of Fans for Temperature Rating
Power Supply
. . . . . . . . . . . . . . . . . . . . . . . . . . . . . .
. . . . . . . . . . . . . . . . . . . . . . . . . . . . . . . . . . . . . . . . . . . . . . . . .
Backplane Voltage Isolation . . . . . . . . . . . . . . . . . . . . . . . . . . . . . . . . . . . . .
Mechanical Restrictions . . . . . . . . . . . . . . . . . . . . . . . . . . . . . . . . . . . . . . . . .
VME Backplanes . . . . . . . . . . . . . . . . . . . . . . . . . . . . . . . . . . . . . . . . . . . . . . .
Series 90-70 PLC Support of Multi-Master Subsystems
Categorization of Candidate Modules
. . . . . . . . . . . . . .
. . . . . . . . . . . . . . . . . . . . . . . . . . . .
Bus Width . . . . . . . . . . . . . . . . . . . . . . . . . . . . . . . . . . . . . . . . . . . . . . . . . . . .
Auxiliary VME Rack Capability . . . . . . . . . . . . . . . . . . . . . . . . . . . . . . . . . .
Chapter 3 Configuration of VME Modules . . . . . . . . . . . . . . . . . . . . . . . . . . . . . .
VME System Overview . . . . . . . . . . . . . . . . . . . . . . . . . . . . . . . . . . . . . . . . .
Third Party Module Address Allocation . . . . . . . . . . . . . . . . . . . . . . . . . . .
GE Fanuc Series 90-70 Module Address Allocation
Expansion Rack Considerations
. . . . . . . . . . . . . . . . . .
. . . . . . . . . . . . . . . . . . . . . . . . . . . . . . . . . .
Bus Width Compatibility . . . . . . . . . . . . . . . . . . . . . . . . . . . . . . . . . . . . . . . .
VMEbus Clock and System Functions . . . . . . . . . . . . . . . . . . . . . . . . . . . . .
VME Interrupts . . . . . . . . . . . . . . . . . . . . . . . . . . . . . . . . . . . . . . . . . . . . . . .
Slot Location Considerations for VME Modules . . . . . . . . . . . . . . . . . . . .
VME Module Configuration . . . . . . . . . . . . . . . . . . . . . . . . . . . . . . . . . . . . .
Configuring 3rd Party Modules with Logicmaster 90-70 . . . . . . . . . . . . .
Configuring a VME Module . . . . . . . . . . . . . . . . . . . . . . . . . . . . . . . . . . . . .
Selecting the Configuration Mode . . . . . . . . . . . . . . . . . . . . . . . . . . . . . . . .
None Mode . . . . . . . . . . . . . . . . . . . . . . . . . . . . . . . . . . . . . . . . . . . . . . . . . . .
Interrupt Only Mode . . . . . . . . . . . . . . . . . . . . . . . . . . . . . . . . . . . . . . . . . . .
Bus Interface Mode
Full Mail Mode
. . . . . . . . . . . . . . . . . . . . . . . . . . . . . . . . . . . . . . . . . . . .
. . . . . . . . . . . . . . . . . . . . . . . . . . . . . . . . . . . . . . . . . . . . . . . .
Reduced Mail Mode . . . . . . . . . . . . . . . . . . . . . . . . . . . . . . . . . . . . . . . . . . . .
I/O Scan Mode . . . . . . . . . . . . . . . . . . . . . . . . . . . . . . . . . . . . . . . . . . . . . . . .
Interrupting the PLC CPU . . . . . . . . . . . . . . . . . . . . . . . . . . . . . . . . . . . . . .
Chapter 4 Installation of VME Modules . . . . . . . . . . . . . . . . . . . . . . . . . . . . . . . . .
Cooling for Optimum Operation . . . . . . . . . . . . . . . . . . . . . . . . . . . . . . . . .
Rack Standoffs for J2 Backplane Requirements
Grounding Requirements
. . . . . . . . . . . . . . . . . . . . .
. . . . . . . . . . . . . . . . . . . . . . . . . . . . . . . . . . . . . . .
Module Location in Racks . . . . . . . . . . . . . . . . . . . . . . . . . . . . . . . . . . . . . . .
3-1
3-5
3-6
3-7
3-8
3-9
3-1
3-1
3-2
3-4
3-5
3-10
3-11
3-11
3-12
3-13
3-15
3-17
3-19
3-21
4-1
4-1
4-1
4-1
4-1
2-1
2-5
2-6
2-7
2-7
2-1
2-2
2-2
2-3
2-3
2-4
1-1
1-1
1-1
1-3
1-4
GFK-0448E User’s Guide to Integration of 3rd Party VME Modules - December 1997 vii
Contents
Chapter 5 Programming Considerations . . . . . . . . . . . . . . . . . . . . . . . . . . . . . . . . . 5-1
Programming Functions for Communicating with 3rd Party VME Modules . . . .
5-1
Byte Significance Convention . . . . . . . . . . . . . . . . . . . . . . . . . . . . . . . . . . . .
VME READ (VMERD) . . . . . . . . . . . . . . . . . . . . . . . . . . . . . . . . . . . . . . . . . .
5-1
5-2
VME WRITE (VMEWRT) . . . . . . . . . . . . . . . . . . . . . . . . . . . . . . . . . . . . . . .
VME READ/MODIFY/WRITE (VMERMW)
VME TEST AND SET (VMETST)
. . . . . . . . . . . . . . . . . . . . . . . .
. . . . . . . . . . . . . . . . . . . . . . . . . . . . . . . . .
5-5
5-8
5-11
VME_CFG_RD . . . . . . . . . . . . . . . . . . . . . . . . . . . . . . . . . . . . . . . . . . . . . . . .
VME_CFG_WRT . . . . . . . . . . . . . . . . . . . . . . . . . . . . . . . . . . . . . . . . . . . . . . .
SWAP . . . . . . . . . . . . . . . . . . . . . . . . . . . . . . . . . . . . . . . . . . . . . . . . . . . . . . . .
5-14
5-16
5-18
Appendix A Commonly Used Acronyms and Abbreviations . . . . . . . . . . . . . . . . . A-1
Appendix B Why Do Restrictions Exist?
. . . . . . . . . . . . . . . . . . . . . . . . . . . . . . . . . . .
Interrupts and a 3rd Party Interrupt Handler . . . . . . . . . . . . . . . . . . . . . .
AM Codes and Expansion Racks . . . . . . . . . . . . . . . . . . . . . . . . . . . . . . . . .
Restrictions for AM Code 29H
Restrictions for AM Code 39H
. . . . . . . . . . . . . . . . . . . . . . . . . . . . . . . . . . .
. . . . . . . . . . . . . . . . . . . . . . . . . . . . . . . . . . .
Restrictions for AM Codes 0DH and 09H . . . . . . . . . . . . . . . . . . . . . . . . . .
Restrictions for AM Code 2DH . . . . . . . . . . . . . . . . . . . . . . . . . . . . . . . . . . .
B-1
B-1
B-1
B-1
B-2
B-2
B-2
Appendix C Configuration Examples . . . . . . . . . . . . . . . . . . . . . . . . . . . . . . . . . . . . .
Example 1 - Single Slot Module Located in the Main Rack . . . . . . . . . . .
Example 2 - Single Slot Module Located in an Expansion Rack . . . . . . .
C-1
C-1
C-3
Appendix D Quick Compatibility Checklist . . . . . . . . . . . . . . . . . . . . . . . . . . . . . . . D-1
Appendix E VMEbus International Trade Association . . . . . . . . . . . . . . . . . . . . . . E-1
Appendix F VME Integrator Racks . . . . . . . . . . . . . . . . . . . . . . . . . . . . . . . . . . . . . . .
Default Jumper Configurations . . . . . . . . . . . . . . . . . . . . . . . . . . . . . . . . . .
F-1
F-6
Appendix G Application Bulletins . . . . . . . . . . . . . . . . . . . . . . . . . . . . . . . . . . . . . . . . G-1
Appendix H Related VME Products . . . . . . . . . . . . . . . . . . . . . . . . . . . . . . . . . . . . . . . H-1
GFK-0448E User’s Guide to Integration of 3rd Party VME Modules - December 1997 viii
Contents
Figure 3-1. VME Interrupts between 3rd Party Modules . . . . . . . . . . . . . . . . . . . . . . . . . . . . . . . . . . . . .
Figure 3-2. VME Interrupts from 3rd Party Modules . . . . . . . . . . . . . . . . . . . . . . . . . . . . . . . . . . . . . . . .
Figure F-1. VME Integrator Rack . . . . . . . . . . . . . . . . . . . . . . . . . . . . . . . . . . . . . . . . . . . . . . . . . . . . . . . . .
Figure F-2. VME Integrator Rack Dimensions for Rear (Panel) Mount Installation . . . . . . . . . . . . . . .
Figure F-3. VME Integrator Rack Dimensions for Front (Rack) Mount Installation . . . . . . . . . . . . . . .
Figure F-4. Example of Jumper Locations on Backplane . . . . . . . . . . . . . . . . . . . . . . . . . . . . . . . . . . . . . .
Figure F-5. Rack Number Jumpers . . . . . . . . . . . . . . . . . . . . . . . . . . . . . . . . . . . . . . . . . . . . . . . . . . . . . . . .
Figure F-6. Fan Assembly Mounted on Rack . . . . . . . . . . . . . . . . . . . . . . . . . . . . . . . . . . . . . . . . . . . . . . .
3-6
3-21
F-2
F-3
F-3
F-5
F-9
F-11
GFK-0448E User’s Guide to Integration of 3rd Party VME Modules - December 1997 ix
Contents
Table 2-1. Important Environmental Specifications . . . . . . . . . . . . . . . . . . . . . . . . . . . . . . . . . . . . . . . . . .
Table 2-2. Series 90-70 PLC Power Supply Ratings . . . . . . . . . . . . . . . . . . . . . . . . . . . . . . . . . . . . . . . . . . .
Table 2-3. VME Option Kit (IC697ACC715) . . . . . . . . . . . . . . . . . . . . . . . . . . . . . . . . . . . . . . . . . . . . . . . . .
Table 3-1. AM Code Types . . . . . . . . . . . . . . . . . . . . . . . . . . . . . . . . . . . . . . . . . . . . . . . . . . . . . . . . . . . . . . .
Table 3-2. GE Fanuc Series 90-70 Module Address Allocation for
Short Access AM Codes - 29H and 2DH . . . . . . . . . . . . . . . . . . . . . . . . . . . . . . . . . . . . . . . . .
Table 3-3. GE Fanuc Series 90-70 Module Address Allocation for
Standard Access AM Code - 39H . . . . . . . . . . . . . . . . . . . . . . . . . . . . . . . . . . . . . . . . . . . . . . .
Table 3-4. Programmed AM Codes for Short Non-Privileged Access code 29H . . . . . . . . . . . . . . . . . . .
Table 3-5. Programmed AM Codes for Short Supervisory Access AM Code 2DH . . . . . . . . . . . . . . . . .
Table 3-6. Modes of Configuration for 3rd Party VME Modules . . . . . . . . . . . . . . . . . . . . . . . . . . . . . . .
Table 3-7. Third Party VME Features vs. Configuration Modes . . . . . . . . . . . . . . . . . . . . . . . . . . . . . . . .
Table 3-8. Parameters for INTERRUPT ONLY Configuration Mode . . . . . . . . . . . . . . . . . . . . . . . . . . . .
Table 3-9. Parameters for BUS INTERFACE Configuration Mode . . . . . . . . . . . . . . . . . . . . . . . . . . . . . .
Table 3-9. Parameters for BUS INTERFACE Configuration Mode – Continued . . . . . . . . . . . . . . . . . .
Table 3-10. Parameters for FULL MAIL Configuration Mode . . . . . . . . . . . . . . . . . . . . . . . . . . . . . . . . . .
Table 3-11. Parameters for REDUCED MAIL Configuration Mode . . . . . . . . . . . . . . . . . . . . . . . . . . . . .
Table 3-12. Parameters for I/O Scan Configuration Mode . . . . . . . . . . . . . . . . . . . . . . . . . . . . . . . . . . . . .
Table C-1. Example 1 - Series 90-70 Configuration 1 . . . . . . . . . . . . . . . . . . . . . . . . . . . . . . . . . . . . . . . . .
Table C-2. Example 1 - Series 90-70 Configuration 2 . . . . . . . . . . . . . . . . . . . . . . . . . . . . . . . . . . . . . . . . .
Table C-3. Example 1 - Configuration 1 Available Address Range . . . . . . . . . . . . . . . . . . . . . . . . . . . . . .
Table C-4. Example 1 - Configuration 2 Available Address Range . . . . . . . . . . . . . . . . . . . . . . . . . . . . . .
Table C-5. Example 2 - Series 90-70 Expansion Rack Configuration . . . . . . . . . . . . . . . . . . . . . . . . . . . .
Table C-6. Example 2 - Available Address Range . . . . . . . . . . . . . . . . . . . . . . . . . . . . . . . . . . . . . . . . . . . .
Table F-1. VME Integrator Rack Jumper Location and Function . . . . . . . . . . . . . . . . . . . . . . . . . . . . . . .
Table F-2. VME Integrator Rack Specifications . . . . . . . . . . . . . . . . . . . . . . . . . . . . . . . . . . . . . . . . . . . . . .
Table F-3. VME Integrator Rack Ordering Information . . . . . . . . . . . . . . . . . . . . . . . . . . . . . . . . . . . . . .
3-9
3-12
3-13
3-14
3-3
3-4
3-5
3-8
3-16
3-18
3-20
C-3
C-3
F-7
F-12
F-12
C-1
C-1
C-2
C-2
2-1
2-3
2-5
3-1
3-2
GFK-0448E User’s Guide to Integration of 3rd Party VME Modules - December 1997 x
restart lowapp ARestart oddapp: ARestarts for autonumbers that do not restart in each chapter. figure bi level 1, reset table_big level 1, reset chap_big level 1, reset1
Lowapp Alwbox restart evenap:A1app_big level 1, resetA figure_ap level 1, reset table_ap level 1, reset figure level 1, reset table level 1, reset these restarts oddbox reset: 1evenbox reset: 1must be in the header frame of chapter 1. a:ebx, l 1 resetA a:obx:l 1, resetA a:bigbx level 1 resetA a:ftr level 1 resetA c:ebx, l 1 reset1 c:obx:l 1, reset1 c:bigbx level 1 reset1 c:ftr level 1 reset1 Reminders for autonumbers that need to be restarted manually (first instance will always be 4) let_in level 1: A. B. C. letter level 1:A.B.C. num level 1: 1. 2. 3. num_in level 1: 1. 2.
3. rom_in level 1: I. II. III. roman level 1: I. II. III. steps level 1: 1. 2. 3.
Chapter
1
Introduction to the VMEbus Standard
1
VMEbus is an architecture for connecting and interfacing microcomputer based modules. Originally defined by Motorola, Mostek and Signetics corporations, it is now a recognized international standard:
IEEE/ANSI STD 1014-1987
IEC 821 and 297
The abbreviation VME stands for VERSA Module Eurocard. When the first VMEbus specification was under development, the Eurocard format for printed circuit boards and racks was well established in Europe, with many sources for this hardware.
VMEbus Standard Definitions
The VMEbus standard defines the mechanical and functional characteristics of the interconnection. It does not ensure the operating compatibility of VMEbus modules.
There are many options to the VMEbus that may cause two VMEbus modules, both of which adhere to the standard, to be incompatible with each other.
VMEbus features and options include:
H 16, 24, and 32 bit address bus options
H 8, 16, and 32 bit data bus options
H up to seven interrupt levels
H a master-slave architecture
H multiple masters
H two heights of modules and racks
H one or two backplanes
H high data transfer rate between modules
H asynchronous data transfers - no clocks required to transfer data
H non-multiplexed bus - separate address and data pins.
Mechanical Structure
The VMEbus mechanical structure consists of backplanes, boards or modules, slots and racks.
H two board and rack heights, designated as 3U and 6U
H up to 21 modules per rack
H slots on 0.8 inch centers
H maximum bus signal length of 19.37 inches (500 mm)
GFK-0448E 1-1
1
1-2
Backplanes
All VME racks contain the J1 (upper) backplane. This backplane allows 16 and 24 bit addresses, and 8 and 16 bit data transfers. 3U (5.25 inch) high racks have only the J1 backplane and support only 3U size boards. 3U modules connect only to the J1 backplane.
6U (10.5 inch) high racks have the J1 backplane and, optionally, the J2 (lower) backplane.
The J2 backplane provides additional standard lines for 32 bit addressing, 32 bit data and additional DC power. The J2 backplane also has unused lines which many manufacturers use for other busses or I/O.
6U modules are more popular than 3U modules. Like 3U high modules, they connect to the J1 backplane. In addition, 6U modules may connect to the J2 backplane. 6U modules which use 32 bit addressing or data, must be in a rack with a J2 backplane.
The connector on a module which plugs into the J1 backplane is referred to as P1; the connector on a module which plugs into the J2 backplane is referred to as P2. Racks may have up to 21 slots. The VMEbus standard refers to the mechanical structure containing the backplane(s) and slots as a subrack.
up to 19 inches
J1 backplane optional J2 backplane
↑
10.5 inches
↓
6U VME Rack
up to 19 inches
J1 backplane
↑
5.25 inches
↑
3U VME Rack
H Functional Structure
The VMEbus contains numerous functional modules, only some of these are defined here. The VMEbus consists of four subbuses:
H Data Transfer Bus (DTB)
H Data Transfer Arbitration Bus
H Priority Interrupt Bus
H Utility Bus.
User’s Guide to Integration of 3rd Party VME Modules - December 1997 GFK-0448E
1
Data Transfer Bus (DTB)
The Data Transfer Bus contains 32 data bits and 32 address bits. Associated with an address is a six-bit Address Modifier (AM) code. The AM code indicates the type and size of the address. An address may be one of three types:
H Short: 16 address bits
H Standard: 24 address bits
H Extended: 32 address bits.
A bus timer function is active during each Data Transfer Cycle. The bus timer monitors the time consumed by the transfer and terminates the cycle if the time becomes unreasonably long. The bus timer is typically located in the module in slot 1 (also called the slot 1 controller).
Data Transfer Arbitration Bus
A functional module, the arbiter, determines which requesting module will be granted use of the DTB. This function is always located on the module in slot 1 (also called the
slot 1 controller).
Master modules initiate data transfer cycles. Slave modules receive data transfer requests and respond to them. A module may act as a master sometimes and as a slave at other times. Or it may be strictly a master or strictly a slave. Slave boards look like memory to the VMEbus.
Interrupt Priority Bus
The VMEbus standard defines up to seven interrupt priority levels. An interrupter asserts one of the interrupts lines - designated IRQ1 through IRQ7. An interrupt handler acknowledges the interrupt and takes some action based upon the interrupt.
Interrupt handlers are usually found on CPU-type modules.
Interrupts are acknowledged via a daisy chained IACK line. Because this line is daisy chained, interrupts cannot function if there is an empty slot (J1 connector) between the interrupt requestor and the interrupt handler.
Utility Bus
The Utility Bus contains power, ground, a system clock and signals for coordinating system reset, system failure and loss of power. Refer to VMEbus specifications for details see Appendix E).
Power Supplies
There is no VME standard for interconnection of power supplies and backplanes. Power supplies for VMEbus systems come in both Eurocard and open frame form factors.
Eurocard type supplies reside in the VME rack but do not have a direct backplane plug-in connection. They are instead cabled from the back of the supply to terminals on the rear of the backplane(s). Open frame supplies mount external to the rack, and are also cabled to the rear of the VME backplane(s).
VME-based systems can have high power requirements. Power supplies of 400 watts output per rack are not unusual. Most VME-based systems require cooling fans, often
GFK-0448E Chapter 1 Introduction to the VMEbus Standard 1-3
1
for operation even at room (ambient) temperatures. A Rack Fan Assembly (catalog number IC697ACC721 for 120 VAC power source or IC697ACC724 for 240 VAC power source) is available from GE Fanuc for those applications which require additional cooling. These fans are available in fan trays which rack mount directly below the VME rack. Systems that include only GE Fanuc products do not need additional cooling over the specified temperature range, 0
_
to 60
_
C (32
_
to 140
_
F).
The VMEbus signals SYSRESET and ACFAIL are used for generating system reset at power up and for providing advance warning of power failure. These signals are provided either directly from the power supply, or from a separate power monitor module in the rack.
The optional SYSFAIL signal is user-defined in its causes and system response.
References
Useful reference information on the VMEbus is available from several publications. All of these publications are available from the VMEbus International Trade Association
(VITA). Refer to Appendix E for more information and the address of VITA.
The VMEbus Handbook
An informative collection of useful information on VME, which is much easier reading than the VMEbus Specification.
VMEbus Specification
This is the IEEE 1014-87 standard.
VME Compatible Products Directory
Lists over 3000 boards (racks, software, etc.) from over 300 manufacturers, with capsule descriptions of each. Includes a fairly comprehensive cross reference. This directory is updated twice per year.
1-4 User’s Guide to Integration of 3rd Party VME Modules - December 1997 GFK-0448E
Chapter
2
Guidelines for Selection of
2
3rd Party VME Modules
section level 1 1 figure bi level 1 table_big level 1
This chapter describes the guidelines for successful integration of 3rd party VME modules in the Series 90 t-70 PLC. VME is an international standard which defines physical board size, electrical and busing structure using standard DIN connectors for the interconnect of 8, 16, and 32 bit microprocessors.
Successful integration of 3rd party VME modules in the Series 90 t-70 PLC is guided by the following criteria:
H The module selected must comply with the VMEbus Specification REV C.1 (October
1985). No earlier version of this specification may be used.
H The module selected must be compatible with the particular characteristics of the
Industrialized VMEbus (VME-I) as implemented on the GE Fanuc Series 90-70 PLC.
H The module selected must not interfere with the normal operation of the Series
90-70 PLC system.
H Bus slaves rather than bus masters are preferred, as they are easier to integrate into the Series 90-70 PLC system.
H No more than three 3rd Party VME modules may be placed in a standard Series
90-70 PLC rack.
H 3rd Party VME modules cannot be used in a remote Series 90-70 rack controlled by a
Series 90-70 Remote I/O Scanner module.
Also refer to the checklist in Appendix D.
Environmental Considerations
In selecting a VME module for operation with the Series 90-70 PLC system, it is necessary to pay close attention to the environmental ratings of the module since these individual module ratings may limit overall system rating. The specifications which need to be determined are listed below along with the corresponding Series 90-70 PLC ratings for each specification. For more detailed information on product agency approvals, standards, and general specifications for Series 90-70 products refer to data sheet GFK-0867.
Table 2-1. Important Environmental Specifications
Specification Series 90-70 PLC Rating
Operating Temperature
0
°
to 60
°
C (32
°
to 140
°
F), (inlet air at bottom of rack)
Storage Temperature
–40
°
to 85
°
C (–40
°
to 185
°
F)
Humidity
Vibration
5% to 95% (non-condensing)
1G @40-150Hz, 0.012in p-p @10-40Hz
Shock
15 g’s for 11 msec
GFK-0448E 2-1
2
In selecting VME modules, consideration must be given to maintaining acceptable component temperature when the VME module has other modules on either side of it, each dissipating up to 17 watts. The VME module itself should not exceed 17 Watts if this specification is to be met.
Use of Fans for Temperature Rating
A characteristic of the Series 90-70 PLC Industrialized VMEbus (VME-I), is that low power technology is employed in order to achieve the full temperature rating for Series
90-70 PLC modules without the use of fans. When selecting VME modules from other vendors for use in the Series 90-70 PLC, it must be determined whether fans are required to achieve the specified VME module temperature rating in a Series 90-70 PLC installation. If fans are needed, an optional Rack Fan Assembly is available from GE
Fanuc.
Power Supply
The VMEbus includes both a +5 volt bus and " 12 volt busses; however, not all Series
90-70 PLC power supplies have a " 12 volt output, and the output current rating of the
+5 volt bus depends on the model of Series 90-70 PLC power supply chosen. Also, a
Two Rack Power Cable is available which allows two racks to be operated from a single
Series 90-70 PLC power supply. The following limitations apply to power supplies:
H Only modules which use +5 volts may be used in the rack (second rack) without the power supply (the " 12 volt busses are not carried in the Two Rack Power Cable).
H Current rating of the +5 volt bus in the second rack (without power supply) is limited to 5.2 amperes or less.
H None of the Series 90-70 PLC power supplies fully support the +5 volt standby bus.
The 55 Watt supply has no connection between the +5 volt standby backplane line and the +5 volt power bus. If +5 volt standby power is required by a VME module, a method must be supplied by the user to route power to that backplane line if the 55 watt power supply is being used. The other supplies connect the +5 volt standby power to the +5 volt bus during operation, but are electrically isolated from it following power down.
H Series 90-70 AC power supplies will ride through a 1 cycle loss of AC input power without system interruption. If the loss exceeds 1 cycle, the ACFAIL signal will be asserted and a shutdown procedure will begin after a 5 millisecond holdup time of backplane power busses.
Note
The maximum current required for any single VME module is restricted to 4.5 amperes or less (worst case) on the +5 volt bus (3 amps recommended maximum) due to the J1 backplane connector capacity. If additional capacity is required some modules allow a J2 connector to carry additional current to the module.
Power supply ratings for the Series 90-70 PLC power supplies are listed below.
2-2 User’s Guide to Integration of 3rd Party VME Modules - December 1997 GFK-0448E
2
Table 2-2. Series 90-70 PLC Power Supply Ratings
Catalog Number
IC697PWR710
IC697PWR711
IC697PWR724
IC697PWR748
Description
Power Supply, 120/240 VAC or 125 VDC, 55W
Power Supply, 120/240 VAC or 125 VDC, 100W
Power Supply, 24 VDC, 90W
Power Supply, 48 VDC, 90W
Current Rating (Amps)
+5 VDC +12 VDC –12 VDC
11
20
18
18 n/a
2.0
1.5
1.5
n/a
1.0
1.0
1.0
n/a = not available
Note
For multiple output power supplies, the current ratings given are individual bus maximums. The total power of all three must not exceed the wattage rating of the power supply.
Backplane Voltage Isolation
Series 90-70 PLC Discrete and Analog I/O modules (called Model 70 I/O) provide 1500V opto-isolation between user (field) connections and the Series 90-70 PLC backplane to prevent system misoperation or damage in the event of transients which occur on user wiring to the modules. In selecting VME modules, preference should be given to those modules which provide such isolation.
Note
If no isolation from PLC backplane to field connections is provided, system noise immunity may be compromised.
Mechanical Restrictions
The standard Series 90-70 PLC racks (IC697CHS750/790/791) accommodate modules on
1.6
I centers (double VME width). VME modules which are single width (0.8I) require a cover plate for the unused half of the rack opening to keep out foreign objects. A cover plate made of non-conductive material is available from GE Fanuc. DO NOT use metal cover plates since they can short to the back of GE Fanuc I/O modules (which have electrically hot field wiring) as they are removed from or inserted into the rack.
VME Integrator racks (IC697CHS782/783) are available that have 17 slots and will accept
3rd Party VME modules in each slot which require 0.8
I spacing. These racks also accept
Series 90-70 modules which require two of these VME slots (1.6
I spacing).
Certain VME modules have more than one PC board, each with a connection to the backplane. Modules having this type of construction in which the PC boards are on single-slot (0.8
I) spacing CANNOT be used with standard racks since the standard Series
90-70 PLC backplane has slots (card guides and connectors) on 1.6
I centers only. These
VME modules can be used when installed in a VME Integrator rack which has slots on
0.8
I centers.
The Series 90-70 PLC rack accepts double-high modules designated as 6U in the VMEbus
Compatible Products Directory in the Compatibility column. No direct provision is made for single high VME modules indicated by a 3U designation. However, such modules may be used if a commercially available 6U faceplate adapter is attached to the 3U module to allow securing it to the rack rails. Such faceplate adapters are often supplied by the vendor of the 3U high board.
GFK-0448E Chapter 2 Guidelines for Selection of 3rd Party VME Modules
2-3
2
VME Backplanes
The VME standard specifies two backplanes, designated J1 and J2. The Series 90-70 PLC system only contains the J1 backplane; there is no J2 backplane. If the J2 backplane is required, you must purchase a VME Option Kit (IC697ACC715) which contains the hardware and rail necessary to install a J2 backplane but does not contain a J2 backplane.
This kit also contains mounting standoffs to allow rear-mounted racks to have a J2 backplane added. The J2 backplane, which can be different widths, must be obtained from a VME vendor.
Note
None of the standard Series 90-70 PLC Power Supplies make direct connection to the J2 backplane. However, the VME Integrator rack does provide for this connection through a cable.
If power is required on the J2 backplane, it must be connected by the user. One method is to use a modified Two Rack Power cable, IC697CBL700, normally used for second rack operation from one supply. The use of this cable allows +5 VDC power from a connector at the left end of the J1 backplane to be routed to the J2 backplane to make the required connection. If this technique is used, the ability to power a second rack from the power supply in this rack is lost. To use the cable in this manner, the connector at one end must be removed and adapted for connection to the selected J2 backplane. The
+5 volts and common are each carried on several wires in this cable. It is necessary to maintain the parallel connection of these conductors to achieve the required current carrying capacity of the cable. Two wires in this cable, which carry the ACFAIL and
SYSRESET signals, must be disconnected at the power supply end of the cable.
J2 Backplane
Sometimes a J2 backplane is required in a Series 90-70 PLC system that includes 3rd party (non-GE Fanuc) modules. Since GE Fanuc modules do not use the J2 backplane, the selection of a J2 backplane depends on the requirements of the third party modules in the system.
J2 backplanes are available in many different lengths (typically 2 to 21 slots) and with different types of power pick-up connectors. Also, some backplanes pre-buss and terminate row b while allowing rows a and c to be user defined. Some backplanes allow totally user defined pinouts. Some backplanes include on-board termination, and some require off-board termination.
The J2 backplane can be used in many different ways by 3rd party modules. Sometimes it is required only to provide parallel power paths to the module (in addition to J1), and sometimes J2 is needed only to make user interface connections to the module. If 3rd party modules are communicating with each other using 32 bit addressing, then the J2 backplane is used for address bits 24 through 31 (and/or data bits 17 through 31). To determine the correct backplane option to use, the requirements of all the third party modules in the system must be taken into consideration. The manufacturers of the 3rd party modules may need to be consulted to determine the best backplane choice for your application.
J2 backplanes are available from many different vendors. A fairly complete list is available in the VITA Compatible Products Directory. Two vendors that are listed in this directory who have large selections of backplane products are listed on the following page.
2-4 User’s Guide to Integration of 3rd Party VME Modules - December 1997 GFK-0448E
2
BICC VERO ELECTRONICS
1000 Sherman Avenue
Hamden, CT 06514
1-800-BICC-VME
DAWN VME PRODUCTS
47073 Warm Springs Blvd.
Fremont, CA 94539
1-800-258-DAWN
VME Option Kit Contents
The VME Option Kit contains sufficient parts to enable you to add a J2 backplane to a
GE Fanuc rack. The kit consists of the following components.
Table 2-3. VME Option Kit (IC697ACC715)
Description
Connector jumper
M2.5 threaded strip
Aluminum spacer
VME slot filler
Phillips screws, M2.5 x 8
Spring lock washers
Power cable
Manual, GFK-0448, Series 90-70 User’s Guide to
Integration of 3rd Party VME Modules
Quantity
20
20
1
4
4
6
2
1
The J2 backplane is purchased from a 3rd party source. The width of the backplane is determined based on the number of slots required.
Series 90-70 PLC Support of Multi-Master Subsystems
The Series 90-70 PLC system is based on the VME standard.
A Series 90-70 PLC system always requires a Series 90-70 PLC CPU to be located in slot 1 of rack 0 which performs the slot 1 controller functions. It is also a bus master, but only one Series 90-70 PLC CPU can be located in the same Series 90-70 PLC system.
A VME master is a device which is granted temporary control of the bus by the slot 1 controller. A bus master can initiate read and write functions to any supported VME address. The VME bus can support multiple master subsystems. Devices which are capable of master operation but which operate on;y as slaves are not considered masters in the context of this discussion.
Third party VME masters located in the same rack as the Series 90-70 PLC CPU may communicate directly with other 3rd party VME devices in a Series 90-70 PLC system which are in the main rack or in expansion racks without the PLC CPU application participating in the transaction.
Programmable Coprocessor Modules (PCMs) having revision J, or later, can also act as
VME master in any Series 90-70 PLC rack.
GFK-0448E Chapter 2 Guidelines for Selection of 3rd Party VME Modules
2-5
2
Restrictions:
H Third party VME masters are not supported in racks with Bus Receiver Modules
(BRMs), or Remote I/O Scanner modules, nor by Series 90-70 CPUs not supporting this feature (CPUs with catalog numbers earlier than IC697CPU731P,
IC697CPU732D, IC697CPU771M, IC697CPU772D, IC697CPU781F, or
IC697CPU782F). All versions of CPUs with catalog numbers IC697CPU780,
IC697CPU788, IC697CPU789, IC697CPM914, and IC697CPM924 (CPM924 will be available in early 1994) all provide multi-master support.
H The Series 90-70 PLC does not have a dual ported memory with VME addresses and does not have facilities to allow association of VME interrupts with user applications and therefore VME masters cannot initiate communications with the Series 90-70
PLC CPU except by using a common VME memory which might be a dual ported memory on the VME master.
H Other Series 90-70 PLC modules use ASIC chips and an unpublished proprietary messaging protocol to communicate with the Series 90-70 PLC CPU and direct communications with these modules from third party VME masters is not supported.
Categorization of Candidate Modules
VME modules are categorized in several ways. The first is by whether they are bus master modules or bus slave modules. Bus Master modules control the transfer of data between themselves and other modules on the VMEbus. Bus slaves do not control the bus; typically, they have an interface to the VMEbus which can be addressed (data read or written) by a VMEbus master, for example, the Series 90-70 PLC CPU.
The second way of categorizing VME modules is by the number of address and data bits they support. The VMEbus Compatible Products Directory refers to these as the module’s address and data width specification. Both categorization methods are discussed below.
Bus Master Modules
To control data transfers, bus master modules control the bus itself and can potentially interfere with the Series 90-70 CPU which also is attempting to use that bus for communication among modules on the bus. The use of foreign bus master modules is restricted so that improper interaction with the Series 90-70 CPU does not occur. These restrictions include:
H Must use a Series 90-70 CPU that allows foreign VME master support (see the above discussion on Series 90-70 PLC Support of Multi-Master Subsystems).
H The Series 90-70 CPU is always the slot 1 controller. If a 3rd party bus master contains bus arbitration or clock circuitry, that circuitry must be disabled.
H Bus requests must be made only on Bus Request lines BR2 or BR3. Bus Request lines
BR1 and BR0 are reserved by the Series 90-70 PLC. The priority of these lines in the
Series 90-70 system is BR1 highest, followed by BR0, BR3, and BR2.
H Upon receipt of a Bus Clear (BCLEAR) signal, bus masters must release the bus within 40 microseconds (maximum).
H Bus masters must not use block move cycles.
H All bus access in the Series 90-70 CPU is limited to 8 or 16 data bits and 16 or 24 address bits. 3rd party modules may communicate with each other using up to 32 data bits and 32 address bits if a J2 backplane is used.
2-6 User’s Guide to Integration of 3rd Party VME Modules - December 1997 GFK-0448E
2
H Bus masters must never service interrupts IRQ5, IRQ6, or IRQ7. Refer to Interrupts on page 3-5 for more information on interrupts.
H Bus masters cannot be used in expansion racks.
H There is no dual-ported RAM memory on the Series 90-70 PLC CPU directly accessible from the VMEbus. Even with the Series 90-70 CPUs listed above, a foreign
VME bus master cannot initiate a read or write to the Series 90-70 CPU.
Bus Slave Modules
Slave VME modules often have a shared RAM interface through which the VME module data is exchanged with the VMEbus master. Flow of data between the slave module and the VMEbus is controlled by the bus master module. Certain slave modules may have interrupt capability which, if used, must be done with care and in such a way as not to interfere with the Series 90-70 PLC system (for details, refer to Interrupts on page 3-5).
Currently, VME modules may interrupt only each other, not Series 90-70 modules, Series 90-70
PLC I/O modules, or the Series 90-70 CPU.
Bus Width
VME modules transfer data in three widths: 8 bits, 16 bits, and 32 bits. Some modules support all three, some only two (typically 8 and 16 bits) and some only one. The Series
90-70 PLC supports data widths of 8 bits and 16 bits. It does not support a data width of 32
bits. Typically, only modules which transfer data in 8-bit or 16-bit widths are compatible with the Series 90-70 PLC.
VME module support up to three address widths: 16 bits, 24 bits and 32 bits. These are referred to, respectively, as Short (16 bits), Standard (24 bits) and Extended (32 bits). The
Series 90-70 PLC supports address widths of 16 bits and 24 bits. It does not support 32 bit
address widths. If your module requires a 32-bit address you may still be able to use it by either wiring the 25th through 32nd address bits or by installing a J2 backplane and driving the 25th through 32nd address lines external to the VME module. See Appendix
D, Why Do Restrictions Exist?
for additional information.
Auxiliary VME Rack Capability
Sometimes functionality is required that can only be met with the use of a commercially available VMEbus extender or Reflective Memory module to interconnect a second, auxiliary VME rack to the Series 90-70 PLC. Such extenders have boards in both the
Series 90-70 PLC rack and the auxiliary VME rack and are connected through a cable.
When using these bus extenders, they must be set up to allow the two racks to communicate via a shared RAM interface on one of the boards (NOT as an electrical extension of the VMEbus). This shared RAM technique provides a means to structure the complete user-specific system in the auxiliary rack including bus masters, interrupts, etc. as desired with no direct effect on the Series 90-70 PLC operation. The Series 90-70
PLC Bus Transmitter Module and Bus Receiver Module do NOT provide this full capability as the Bus Receiver Module does not arbitrate or respect arbitration for bus mastership.
GFK-0448E Chapter 2 Guidelines for Selection of 3rd Party VME Modules
2-7
Chapter
3
Configuration of VME Modules
3
section level 1 1 figure bi level 1 table_big level 1
VME System Overview
The address on a VMEbus consists of two parts: an address modifier (AM) code and address bits A0 through A31. All boards in a VME system are configured to respond to one or more AM codes and an address range. The AM code can be considered an extension of the address bus. The AM code consists of 6 bits and is used to select the type of VME access (that is, the number of address bits used). There are 64 possible AM codes which are divided into three categories:
H Defined
H Reserved
H User-Defined
The access types and address length for defined AM codes are given in Table 3-1.
Table 3-1. AM Code Types
Access Type
Short
Standard
Extended
Address Length
16 bits
24 bits
32 bits
Bits Used
A0 - A15
A0 - A23
A0 - A31
The GE Fanuc Series 90-70 modules use three of the defined codes:
H 29H Short non-privileged
H 2DH Short supervisory
H 39H Standard non-privileged
There are no reserved AM codes used in the Series 90-70 PLC. The Series 90-70 PLC system also uses all 16 of the user-defined AM codes, 10H through 1FH. These AM codes are discussed later in this chapter.
Third Party Module Address Allocation
Address allocation for 3rd party modules is driven by three items: AM code, GE Fanuc
Series 90-70 module location, and 3rd party module location.
Address assignments for 3rd party modules are typically setup with jumpers. The addresses assigned to 3rd party modules must not overlap installed GE Fanuc Series
90-70 modules or other 3rd party modules.
GFK-0448E 3-1
3
GE Fanuc Series 90-70 Module Address Allocation
Addresses for the GE Fanuc Series 90-70 modules are allocated on a rack and slot basis.
Address allocation is also based on the VME access type. The address allocation for GE
Fanuc modules in the Series 90-70 system are given in the following tables. This information is necessary to determine what unused address space can be allocated to
3rd party modules.
The short access address allocation given in Table 3-2 is the same for each rack. Rack selection is discussed in Expansion Rack Considerations on page 3-3.
The standard access address allocation given in Table 3-3 is allocated on a rack/slot basis.
Standard access address space allocated to a rack cannot be used for a 3rd party module located in another rack. For example, standard access address space allocated to a slot in rack 1 cannot be used by 3rd party modules in another rack.
GE Fanuc Series 90-70 modules plugged into slots indicated in these tables will respond to the listed address. Therefore, care must be taken to assure that a 3rd party module will not respond to an address allocated to a slot which contains a GE Fanuc Series 90-70 module. For example, a PCM residing in rack 0 slot 3 will respond to the following address:
H address range 1800H through 1FFFH for AM code 29H and 2DH;
H address range 020000H through 03FFFFH for AM code 39H
Table 3-2. GE Fanuc Series 90-70 Module Address Allocation for
Short Access AM Codes - 29H and 2DH
Slot Address Range
[
PS
1
2
3
4
7
8
5
6
9
User Defined
[
Addresses in Hexadecimal none none
1000H - 17FFH
1800H - 1FFFH
2000H - 27FFH
2800H - 2FFFH
3000H - 37FFH
3800H - 3FFFH
4000H - 47FFH
4800H - 4FFFH
5000H - FFFFH
Note
If a 3rd party VME module responds to both AM codes 29H and 2DH, then it should be mapped in the user defined address range. Refer to
Appendix B Why Do Restrictions Exist? for more details.
3-2 User’s Guide to Integration of 3rd Party VME Modules - December 1997 GFK-0448E
3
GFK-0448E
Table 3-3. GE Fanuc Series 90-70 Module Address Allocation for
Standard Access AM Code - 39H
Rack Number
0
2 3
Slot Number/Address Allocation
4 5 6 7 8 9
000000 020000 to to
040000 to
060000 to
080000 to
0A0000 to
0C0000 to
0E0000 to
01FFFF 03FFFF 05FFFF 07FFFF 09FFFF 0BFFFF 0DFFFF 0FFFFF
0 100000 through 7FFFFF User Defined for Rack 0 Only
1
2
3
4
5
6
7
E00000 E20000 E40000 E60000 E80000 EA0000 EC0000 EE0000 to to to to to to to to
E1FFFF E3FFFF E5FFFF E7FFFF E9FFFF EBFFFF EDFFFF EFFFFF
D00000 D20000 D40000 D60000 D80000 DA0000 DC0000 DE0000 to to to to to to to to
D1FFFF D3FFFF D5FFFF D7FFFF D9FFFF DBFFFF DDFFFF DFFFFF
C00000 C20000 C40000 C60000 C80000 CA0000 CC0000 CE0000 to to to to to to to to
C1FFFF C3FFFF C5FFFF C7FFFF C9FFFF CBFFFF CDFFFF CFFFFF
B00000 B20000 B40000 B60000 B80000 BA0000 BC0000 BE0000 to to to to to to to to
B1FFFF B3FFFF B5FFFF B7FFFF B9FFFF BBFFFF BDFFFF BFFFFF
A00000 A20000 A40000 A60000 A80000 AA0000 AC0000 AE0000 to to to to to to to to
A1FFFF A3FFFF A5FFFF A7FFFF A9FFFF ABFFFF ADFFFF AFFFFF
900000 920000 940000 960000 980000 9A0000 9C0000 9E0000 to to to to to to to to
91FFFF 93FFFF 95FFFF 97FFFF 99FFFF 9BFFFF 9DFFFF 9FFFFF
800000 820000 to to
840000 to
860000 to
880000 to
8A0000 to
8C0000 to
8E0000 to
81FFFF 83FFFF 85FFFF 87FFFF 89FFFF 8BFFFF 8DFFFF 8FFFFF
[ All addresses shown are in Hexadecimal format
] Rack 0 is the CPU rack.
Note that GE Fanuc Series 90-70 modules will not respond to the user defined address space listed in the tables. For short access AM codes, 29H and 2DH, address range 5000H through FFFFH is user definable for each rack. For example, two 3rd party modules responding to AM code 29H and address 5000H through 7000H will not conflict if they reside in different racks.
The user definable address space for standard access AM code 39H is 100000H through
7FFFFFH. This address space is available in rack 0 only. For example, a 3rd party module responding to address 100000H through 200000H must reside in rack 0.
An AM code not used by GE Fanuc Series 90-70 modules is 3DH. Therefore, 3rd party modules configured to respond only to standard access AM code 3DH and address range 000000H through FFFFFFH will never interfere with GE Fanuc Series 90-70 modules. 3rd party modules configured to respond to 3DH must reside in the main rack.
Chapter 3 Configuration of VME Modules 3-3
3
Modules with large address space requirements are permitted in the Series 90-70 PLC system. They will simply occupy the address allocation for more than one slot. Care must be taken to assure that no GE Fanuc Series 90-70 modules reside in slots that a 3rd party module’s address covers. For example, consider a module requiring 1Mbyte of standard access AM code 39H address space. This module can be located in rack 1 and configured to respond to address E00000H through EFFFFFH. In this case, no Series
90-70 modules may reside in rack 1. Refer to Appendix C for configuration examples.
Expansion Rack Considerations
Expansion racks are addressed differently for short access AM codes then they are for standard access AM codes. For short access the rack is addressed by the AM code. Tables
3-4 and 3-5 give the AM codes that the module must be configured to respond to and that must be programmed in the function block AM parameter (see Chapter 5,
Programming Considerations) to select an expansion rack for short access. For standard access (AM code 39H) the address alone selects the expansion rack and slot (refer to
Table 3-3).
For example, consider a Series 90-70 PLC system containing two 3rd party modules; one configured to respond to short access AM code 2DH address 3000H through 4FFFH resides in rack 5, and one which responds to standard access AM code 39H address
EC0000H through EFFFFFH residing in rack 1. Note that GE Fanuc developed Series
90-70 modules must not be in slots 6, 7, 8, and 9 in rack 5, and slots 8 and 9 in rack 1.
The following function block parameters must be programmed to address the module residing in rack 5 configured for short access AM code 2DH:
H AM code 12H
H desired address within range 3000H through 4FFFH
The following function block parameters must be programmed to address the module residing in rack 1 configured for standard access AM code 39H:
H AM code 39H
H desired address within range EC0000H through EFFFFFH
3-4
Table 3-4. Programmed AM Codes for Short Non-Privileged Access code 29H
Rack
3
4
5
0
[
1
2
6
7 reserved
[ Rack 0 is the CPU Rack
Programmed
AM Code
29H
1EH
1DH
1CH
1BH
1AH
19H
18H
1FH
Board Configured
AM Code
29H
29H
29H
29H
29H
29H
29H
29H
User’s Guide to Integration of 3rd Party VME Modules - December 1997 GFK-0448E
Table 3-5. Programmed AM Codes for Short Supervisory Access AM Code 2DH
Rack
5
6
7
2
3
0
[
1
4 reserved
[ Rack 0 is the CPU Rack.
Programmed
AM Code
2DH
16H
15H
14H
13H
12H
11H
10H
17H
Board Configured
AM Code
2DH
2DH
2DH
2DH
2DH
2DH
2DH
2DH
Bus Width Compatibility
The Series 90-70 VME backplane uses the J1 connector only; therefore the maximum number of address and data bits the backplane can support is:
H 24 address bits and
H 16 data bits
With this restriction the Series 90-70 PLC system can support modules which use:
H 16 address and 16 or 8 data bits and
H 24 address and 16 or 8 data bits
VMEbus Clock and System Functions
The Series 90-70 PLC system provides the VMEbus clock and bus controller functions.
VME modules which include this capability should have them disabled. The Series 90-70
PLC power supply generates the necessary power sequencing signals such as ACFAIL and SYSRESET. VME modules providing these functions must have them disabled.
VME modules must not assert these signals under any condition.
3
GFK-0448E Chapter 3 Configuration of VME Modules 3-5
3
VME Interrupts
The Series 90-70 PLC CPU handles VME interrupts IRQ5, IRQ6, and IRQ7. 3rd party
VME modules must not service these interrupts. Third party VME modules may interrupt each other on IRQ1, IRQ2, IRQ3, or IRQ4. Third party VME modules may interrupt the Series 90-70 PLC CPU on IRQ6. See Interrupting the PLC CPU (page 3-21) for more information on interrupting the PLC CPU on IRQ6.
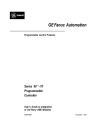
If a 3rd Party VME module is physically located to the left of a module that can generate interrupts, then the 3rd Party VME module must pass the VME interrupt acknowledge daisy chain to the slot on the right. If the 3rd Party VME module does not pass the VME interrupt acknowledge daisy chain to the right, then it must be physically located to the right of all modules that can generate VME interrupts.
3rd Party
Module
IRQ1
3rd Party
Module
Figure 3-1. VME Interrupts between 3rd Party Modules
When an interrupt is used between 3rd party VME modules, only interrupts IRQ1 through IRQ4 can be used, and one of the modules must be the interrupt handler. This avoids interference with the processing of interrupts by the Series 90-70 PLC CPU.
Special backplane jumpers must be installed in those slots which have VME modules that either generate or handle these interrupts (IRQ1 – IRQ4).
A list of these jumpers and their functions can be found in Table F-1 in Appendix F.
3-6 User’s Guide to Integration of 3rd Party VME Modules - December 1997 GFK-0448E
Slot Location Considerations for VME Modules
Use the following guidelines to determine the slot location of VME modules in a Series
90-70 PLC system. The Series 90-70 PLC system has two types of racks, standard racks and VME Integrator racks.
Standard Series 90-70 Racks and VME Integrator racks
To avoid potential problems with 3rd party modules which may not pass the VME daisy chain signals, the following guidelines are suggested.
H All Series 90-70 PLC modules should occupy lower numbered (that is, the leftmost) slots in the rack. All 3rd party VME modules must be installed to the right of the
Series 90-70 PLC modules.
H There must not be any unused slots between Series 90-70 modules in the rack.
Similarly, there must not be any unused slots between VME modules which must interrupt each other. And there must not be any unused slots between the PLC CPU and a VME module which handles interrupts. If an unused slot between modules is required (for example, to accommodate an over-wide module) a connector which daisy chains the interrupt signals must be used.
VME Integrator Racks
H VME modules can be installed in any module slot (2PL - 9PL and 12PL - 19PL).
H Series 90-70 modules, when installed in a VME Integrator Rack, can only occupy slots 2PL - 9PL) since they require two VME slots. Jumpers on the backplane are configurable to allow the SYSFAIL signal to be enabled or disabled; to allow the
LWORD signal to be inactive; to configure IRQ1/ - IRQ4/ signals for VME slots 12PL to 19PL; and to configure the Bus Grant signals for VME slots 12PL to 19PL.
Note
3rd Party VME modules CANNOT be installed in a remote I/O system controlled by the Series 90-70 Remote I/O Scanner. The 3rd Party VME modules cannot communicate with the Series 90-70 CPU from a remote system since the VME instructions cannot be executed over the Genius
I/O communications link.
3
GFK-0448E Chapter 3 Configuration of VME Modules 3-7
3
VME Module Configuration
When any features beyond the standard VME read and write function blocks are being used in conjunction with a 3rd Party VME module, the the module must be specified in the Logicmaster 90-70 or CIMPLICITY Control I/O configuration. There are six mutually exclusive configuration modes for 3rd Party VME modules. Table 3-6 summarizes each of the configuration modes.
Table 3-6. Modes of Configuration for 3rd Party VME Modules
Mode Description
None The configuration of the module is used only as a placeholder.
Interrupt Only The module will interrupt the PLC CPU to trigger logic execution.
Bus Interface The module’s memory is configured to be accessed via the VME config read and VME config write function blocks. In addition, the module may interrupt the PLC CPU to trigger logic execution.
Full Mail For use with the GE Fanuc Plug & Play PC Coprocessor.
Reduced Mail This mode is not yet supported by the PLC CPU.
I/O Scan For use with the Series 90-70 Thermocouple Input module, catalog number HE697THM160.
If your particular application does not require any of the 3rd Party VME features provided by the PLC CPU or it is just using the standard VME read and VME write function blocks, then configuring the module in the rack/slot configuration is not required. Even if the configuration of the module is not required, you may wish to include the module in the configuration for documentation or configuration error checking purposes. Use the NONE configuration mode in this case. A 3rd party VME module with configuration mode NONE acts as a placeholder within the rack/slot configuration.
If your application does require use of a 3rd Party VME feature provided by the PLC
CPU, then you are required to specify the module in the I/O configuration. Table 3-7 summarizes which configuration modes can be used with each of the particular PLC
CPU features for 3rd Party VME Modules.
3-8 User’s Guide to Integration of 3rd Party VME Modules - December 1997 GFK-0448E
Table 3-7. Third Party VME Features vs. Configuration Modes
Feature
VME Read and VME Write Function Blocks (Chapter 5, pages 5-1 through 5-13)
Configuration Modes
None, Bus Interface, Interrupt
Only, Full Mail, and I/O Scan (all modes)
Bus Interface VME Config Read and VME Config Write Function
Blocks (Chapter 5, pages 5-14 through 5-17)
Interrupting the PLC CPU (see page 3-21)
Plug and Play PC Coprocessor module
Series 90-70 Thermocouple Input module
Interrupt Only and Bus Interface
Full Mail
I/O Scan
Configuring 3rd Party Modules with Logicmaster 90-70
Note
For information on configuration using CIMPLICITY Control programming software, refer to the CIMPLICITY Control online help.
Note that the information in this paragraph applies to both Logicmaster 90-70 and CIMPLICITY
Control programming software. There is one selection available for foreign VME modules in the I/O configuration software: 3RD PTY VME which is found under the VME menu.
When 3RD PTY VME is selected, six modes of configuration are available (which are described above). If a 3rd Party VME module is placed to the left of a module that can generate interrupts, then it is assumed that the 3rd Party VME module passes the VME interrupt acknowledge daisy chain to the slot on the right. If the module does not pass the VME interrupt acknowledge daisy chain, then it must be placed to the right of all modules that can generate VME interrupts. The configuration software will flag an error if an empty slot is located to the left of a module which can generate interrupts.
3
GFK-0448E Chapter 3 Configuration of VME Modules 3-9
3
Configuring a VME Module
To configure a VME module on the I/O Configuration Rack screen:
1.
Move the cursor to the desired rack and slot location. The slot may be either unconfigured or previously configured.
Note
When configuring the VME module in a VME Integrator Rack, the half-slot screen for a particular slot is displayed. This allows you to configure the half slots of that slot. The remainder of the configuration process is the same for the VME Integrator Rack as it is for a standard I/O rack.
2.
Press VME (F7) and then VME (F1) from the I/O Configuration Rack screen to display a list of available modules.
3.
Position the cursor on the 3RD PARTY VME module, and press the Enter key to display the detail screen for that module.
3-10 User’s Guide to Integration of 3rd Party VME Modules - December 1997 GFK-0448E
3
Selecting the Configuration Mode
The configuration mode specifies how the module will be accessed. The configuration mode is selected in the Configuration Mode field on the module detail screen.
1.
To select a different configuration mode, move the cursor to the Configuration Mode field and repeatedly press the Tab key until the desired mode is displayed on the screen. Then, press the Enter key.
2.
Configure the module. Then, press Rack (Shift-F1) or the Escape key to return to the rack display.
None Mode
When
NONE
mode is selected, the following VME detail screen is displayed.
GFK-0448E
The configuration mode on this screen is set to
NONE
. There are no other parameters to be selected.
Chapter 3 Configuration of VME Modules 3-11
3
Interrupt Only Mode
Note
I
NTERRUPT ONLY
mode is not supported by a Release 6 or earlier CPU.
When
INTERRUPT ONLY
mode is selected, the following VME detail screen is displayed.
3-12
Table 3-8. Parameters for INTERRUPT ONLY Configuration Mode
Parameter Description
Configuration Mode The configuration mode is set to
INTERRUPT ONLY
.
Interrupt Select whether the interrupt is to be
ENABLED
* or
DISABLED
. If
EN-
ABLED
, then PLC CPU will execute logic when the interrupt arrives If
DISABLED
, the PLC CPU will not execute logic when the interrupt arrives.
Interrupt ID A byte hexadecimal value which identifies the module driving the interrupt line. The value in this field must either be in the form slot:rack, based on the rack and slot the module is in, or a value in the range F0 to FE hex. For example, if a VME module is configured in slot 3 of rack 0, a value of 30 (30H; slot 3 rack 0) is displayed. Each VME module configured within the system must have a different interrupt
ID.
The default value must be a value based on the rack and slot the module is in. The first half-slot configured for a slot (either A or B) will be assigned the slot:rack ID; the second half-slot configured for the slot
(either A or B) will be in the range
F0
-
FE
. The PLC CPU does not support interrupts from modules in slot B.
* Default selection.
User’s Guide to Integration of 3rd Party VME Modules - December 1997 GFK-0448E
Bus Interface Mode
Note
BUS INTERFACE
mode is supported by Release 4 and later CPUs.
When
BUS INTERFACE
mode is selected, the following VME detail screen is displayed.
3
GFK-0448E
Table 3-9. Parameters for BUS INTERFACE Configuration Mode
Parameter
Configuration
Mode
Address Modifier
Code
Description
The configuration mode is set to
BUS INTERFACE
.
Address
The memory space (in hexadecimal) on the VME bus that the module responds to. Choices are:
09H
0AH
= extended non-privilege data access.
= extended non-privilege program access.
ODH
OEH
= extended supervisory data access.
= extended supervisory program access.
29H
* = short non-privilege access.
2DH
39H
3AH
3DH
3EH
= short supervisory access.
= standard non-privilege data access.
= standard non-privilege program access.
= standard supervisory data access.
= standard supervisory program access.
A 16-bit, 24-bit, or 32-bit hexadecimal value, depending on the AM mode selected. If the AM code is
29H
or
2DH
, the address range must be a
16-bit value, 0000 to 0000FFFF. If the AM code is
39H
,
3AH
,
3DH
, or
3EH
, the address range must be a 24-bit value, 0000 to 00FFFFFF. If the AM code is
09H
,
0AH
,
0DH
, or
0EH
, the address range must be a 32-bit value,
0000 to FFFFFFFF. (Although the Series 90-70 I/O rack does not contain the P2 backplane, the upper eight address lines of the 32-bit address can be jumpered to a fixed value on the module.) Default = 0000FFFF.
Chapter 3 Configuration of VME Modules 3-13
3
Table 3-9. Parameters for BUS INTERFACE Configuration Mode – Continued
Parameter
Dual Port Memory
Size in K Bytes
Interface Type
Interrupt
Interrupt ID
* Default selection.
Description
The size of the dual port memory (in 1K increments) for the VME module.
Values are
1
* to
16,384
.
Specify how data is to be read/written to the VME module. Choices are:
WORD ACCESS
:
Data is to be read/written a word at a time to consecutive addresses.
BYTE ADDRESS
:
Data is to be read/written a byte at a time to consecutive addresses.
ODD BYTE ONLY
:
Data is to be read/written only to odd bytes because the hardware cannot support even addresses.
SINGLE WORD ADDRESS
:
also called same address. Data is to be read a word at a time from the same address on theME bus into PLC memory and written a word at a time from consecutive words in PLC memory to the same address.
SINGLE BYTE ADDRESS
:
Data is to be read a byte at a time from the same address on the VME bus into PLC memory and written a byte at a time from consecutive words in PLC memory to the same address.
Select whether the interrupt is to be
ENABLED
* or
DISABLED
.
If
ENABLED
, the PLC CPU will execute logic when the interrupt arrives.
If
DISABLED
, the PLC CPU will not execute logic when the interrupt arrives.
A byte hexadecimal value which identifies the module driving the interrupt line. The value in this field must either be in the form slot:rack, based on the rack and slot the module is in, or a value in the range F0 to FE hex. For example, if a VME module is configured in slot 3 of rack 0, a value of 30 (30H; slot 3 rack 0) is displayed. Each VME module configured within the system must have a different interrupt
ID.
The default value must be a value based on the rack and slot the module is in. The first half-slot configured for a slot (either A or B) will be assigned the slot:rack ID; the second half-slot configured for the slot
(either A or B) will be in the range
F0
-
FE
. The PLC CPU does not support interrupts from modules in slot B.
3-14 User’s Guide to Integration of 3rd Party VME Modules - December 1997 GFK-0448E
Full Mail Mode
Note
FULL MAIL
mode is supported by Release 5.5 and later CPUs.
When
FULL MAIL
mode is selected, the following VME detail screen is displayed.
3
GFK-0448E Chapter 3 Configuration of VME Modules 3-15
3
Table 3-10. Parameters for FULL MAIL Configuration Mode
Parameter Description
Configuration
Mode
The configuration mode is set to
FULL MAIL
.
High Priority Mail Select whether high priority mail is to
ENABLED
* or
DISABLED
. The PLC
CPU requires this parameter to be set to
ENABLED
.
Interrupt ID A byte hexadecimal value which identifies the module driving the interrupt line. The value in this field must either be in the form slot:rack, based on the rack and slot the module is in, or a value in the range F0 to FE hex. For example, if a VME module is configured in slot 3 of rack 0, a value of 30
(30H; slot 3 rack 0) is displayed. Each VME module configured within the system must have a different interrupt ID.
Address Modifier
Code
Address
The default value must be a value based on the rack and slot the module is in. The first half-slot configured for a slot (either A or B) will be assigned the slot:rack ID; the second half-slot configured for the slot (either A or B) will be in the range
F0
-
FE
. The PLC CPU does not support FULL MAIL modules in slot B.
The memory space (in hexadecimal) on the VME bus that the module responds to. In rack zero, the choices are:
09H
0AH
ODH
OEH
= extended non-privilege data access.
= extended non-privilege program access.
= extended supervisory data access.
= extended supervisory program access.
39H
* = standard non-privilege data access.
3AH
= standard non-privilege program access.
3DH
3EH
= standard supervisory data access.
= standard supervisory program access.
In racks 1 - 7, the AM code must be
39H
.
A 16-bit, 24-bit, or 32-bit hexadecimal value, depending on the AM code selected. In rack zero, for 24-bit addressing modes where the AM code is
09H
,
0AH
,
0DH
, or
0EH
, the address must be xxxx0000H. For 32-bit addressing modes where the AM code is
39H
,
3AH
,
3DH
, or
3EH
, the address must be 00xx0000H. (Default = 00100000H)
In racks 1 - 7, the address must be 00xx0000H. Default = 10000H *
(((10H - rack) * 10H) + (2 * (slot - 2)))
The hexadecimal digits represented by x may have any value from 0 through
F, inclusive.
Although the Series 90-70 I/O rack does not contain the P2 backplane, the upper eight address lines of the 32-bit address can be jumpered to a fixed value on the module.
Dual Port
Memory Size in K Bytes
* Default selection.
The size of the dual port memory (in 1K increments) for the VME module.
Values are
16
* to
16,384
.
3-16 User’s Guide to Integration of 3rd Party VME Modules - December 1997 GFK-0448E
Reduced Mail Mode
Note
REDUCED MAIL
mode is not yet supported by the PLC CPU.
When
REDUCED MAIL
mode is selected, the following VME detail screen is displayed.
3
GFK-0448E Chapter 3 Configuration of VME Modules 3-17
3
Table 3-11. Parameters for REDUCED MAIL Configuration Mode
Parameter
Configuration
Mode
Interrupt ID
Description
The configuration mode is set to
REDUCED MAIL
.
Address Modifier
Code
A byte hexadecimal value which identifies the module driving the interrupt line. The value in this field must either be in the form slot:rack, based on the rack and slot the module is in, or a value in the range F0 to FE hex. For example, if a VME module is configured in slot 3 of rack 0, a value of 30 (30H; slot 3 rack 0) is displayed. Each VME module configured within the system must have a different interrupt ID.
The default value must be a value based on the rack and slot the module is in. The first half-slot configured for a slot (either A or B) will be assigned the slot:rack ID; the second half-slot configured for the slot (either A or B) will be in the range
F0
-
FE
. The PLC CPU does not support interrupts from modules in slot B.
The memory space (in hexadecimal) on the VME bus that the module responds to. Choices are:
09
0A
= extended non-privilege data access.
= extended non-privilege program access.
OD
OE
29
*
= extended supervisory data access.
= extended supervisory program access.
= short non-privilege access.
2D
39
3A
3D
3E
= short supervisory access.
= standard non-privilege data access.
= standard non-privilege program access.
= standard supervisory data access.
= standard supervisory program access.
Address
Dual Port
Memory Size in
K Bytes
* Default selection.
A 16-bit, 24-bit, or 32-bit hexadecimal value, depending on the AM mode selected. If the AM code is
29
or
2D
, the address range must be a 16-bit value, 0000 to 0000FFFF. If the AM code is
39
,
3A
,
3D
, or
3E
, the address range must be a 24-bit value, 0000 to 00FFFFFF. If the AM code is
09
,
0A
,
0D
, or
0E
, the address range must be a 32-bit value, 0000 to FFFFFFFF.
(Although the Series 90-70 I/O rack does not contain the P2 backplane, the upper eight address lines of the 32-bit address can be jumpered to a fixed value on the module.) Default = 0000FFFF.
The size of the dual port memory (in 1K increments) for the VME module.
Values are
4
* to
16,384
.
3-18 User’s Guide to Integration of 3rd Party VME Modules - December 1997 GFK-0448E
I/O Scan Mode
Note
I/O SCAN
mode is supported by Release 5.5 and later CPUs.
When
I/O SCAN
mode is selected, the following VME detail screen is displayed.
3
Press the Page Down key to display the reference address parameters.
GFK-0448E Chapter 3 Configuration of VME Modules 3-19
3
Table 3-12. Parameters for I/O Scan Configuration Mode
Parameter
Configuration
Mode
Address Modifier
Code
Address
Reduced Mail
Interrupt ID
Reference
Address/Length
* Default selection.
Description
The configuration mode is set to
I/O SCAN
.
The memory space (in hexadecimal) on the VME bus that the module responds to. Choices are:
09H
= extended non-privilege data access.
0AH
ODH
OEH
= extended non-privilege program access.
= extended supervisory data access.
= extended supervisory program access.
29H
* = short non-privilege access.
2DH
= short supervisory access.
39H
3AH
= standard non-privilege data access.
= standard non-privilege program access.
3DH
3EH
= standard supervisory data access.
= standard supervisory program access.
A 16-bit, 24-bit, or 32-bit hexadecimal value, depending on the AM mode selected. If the AM code is
29H
or
2DH
, the address range must be a
16-bit value, 0000 to 0000FFFF. If the AM code is
39H
,
3AH
,
3DH
, or
3EH
, the address range must be a 24-bit value, 0000 to 00FFFFFF. If the AM code is
09H
,
0AH
,
0DH
, or
0EH
, the address range must be a 32-bit value, 0000 to FFFFFFFF. Default = (slot * 2K).
Select whether high priority mail is to be
ENABLED
* or
DISABLED
.
If
ENABLED
, the PLC CPU will send and receive high priority mail from this module.
A byte hexadecimal value which identifies the module driving the interrupt line. The value in this field must either be in the form slot:rack, based on the rack and slot the module is in, or a value in the range F0 to
FE hexadecimal. For example, if a VME module is configured in slot
3 of rack 0, a value of 30 (30H; slot 3 rack 0) is displayed. Each VME module configured within the system must have a different interrupt ID.
The default value must be a value based on the rack and slot the module
is in. The first half-slot configured for a slot (either A or B) will be assigned the slot:rack ID; the second half-slot configured for the slot (either A or B) will be in the range
F0
-
FE
.
The PLC CPU does not support I/O Scan modules in slot B.
The %I, %Q, %AI, and %AQ offsets and lengths that will be scanned by the PLC. For %I and %Q, the valid range is from
0
to
16
bytes.
For %AI and %AQ, the valid range is from
0
to
64
words.
3-20 User’s Guide to Integration of 3rd Party VME Modules - December 1997 GFK-0448E
3
Interrupting the PLC CPU
Third party VME Modules may interrupt the Series 90-70 PLC CPU on IRQ6 to trigger the execution of logic in the Series 90-70 application program. Each interrupt can be used to trigger one LD interrupt block and up to the maximum number of standalone programs. CIMPLICITY Control (version 2.00 or higher) is required to use this feature.
Also, CPU version 7.10 or higher is required.
Series 90-70
CPU
IRQ6
3rd Party
Modules
GFK-0448E
Figure 3-2. VME Interrupts from 3rd Party Modules
Module Requirements
Third Party VME modules being used to interrupt the Series 90-70 PLC CPU must meet the following requirements.
IRQ6
Third Party VME modules may only use IRQ6 to interrupt the PLC CPU. The module must release IRQ6 as soon as the PLC CPU completes the VME interrupt acknowledge cycle. If the module does not release IRQ6 immediately upon the acknowledge, then the PLC CPU will interpret this as a subsequent interrupt request and be forced to service the VME interrupt again. If this condition persists, the recurring interrupts could starve all of the other processes running in the PLC CPU and eventually cause the PLC system watchdog timer to expire. An expired watchdog timer will send the CPU to
STOP/HALT mode.
Interrupt ID
When the 3rd Party VME module generates a VME interrupt, it must present an interrupt id during the interrupt acknowledge cycle. The id that the module presents is a byte value which must be either the binary coded decimal representation slot:rack
(based on its physical location in the system) or a value between 0F0 and 0FEH. For example, if the VME module is placed in slot 5 of rack 1, its default interrupt id would be
51H (slot 5 rack 1). Alternatively, the module could use the value FBH as long as no other module in the system will use that value. It is acceptable for the interrupt id to be configurable either with hardware jumpers or with a VME write from within the application program.
Dual Port Memory
Third Party VME modules being used to interrupt the Series 90-70 PLC CPU may optionally have dual port memory. This memory can be accessed by using the VME read or VME write function blocks. The VME address for the dual port memory must fit the allocation requirements described in pages 3-1 through 3-5.
Chapter 3 Configuration of VME Modules 3-21
3
3-22
Module Configuration
Third party VME modules that will be used to interrupt the PLC CPU must be specified in the CIMPLICITY Control rack/slot configuration. To configure a third party VME module, chose Add Module from the Edit–>Module Operations menu, select the VME tab from the Module Catalog, and then select 3rd Party VME. Third party VME modules may be placed in the main rack or in expansion racks. When using the Integrator’s rack,
3rd Party VME modules used to interrupt the PLC CPU may only reside in a slot A; they may not be used in a slot B. Once the 3rd Party VME module is added, a parameters dialog with the following three parameters will appear.
Configuration Mode
There are six mutually exclusive configuration modes for third party VME modules. The two valid configuration modes for interrupting the PLC CPU are Interrupt Only and
Bus Interface
. Although VME interrupts can be generated by 3rd party modules using other configuration modes (such as Full Mail and I/O Scan), those interrupts are used strictly for high priority mail messages. They cannot be used to trigger the execution of a block or program.
Interrupt
This parameter is used to mask the interrupt from this 3rd Party VME module. When this parameter is set to Enabled, the PLC CPU will process the interrupt from this module and schedule the associated block and programs for execution. When this parameter is set to
Disabled, the PLC CPU will process the interrupt from this module but will not schedule the associated block or programs for execution. When the interrupt is Disabled in the rack/slot configuration, it cannot be unmasked via Service Request Function Block #17.
Interrupt ID (Hex)
Each VME module in the system (3rd Party or otherwise) must have a unique interrupt identifier. The interrupt identifier is a byte hexadecimal value which identifies the module driving the interrupt line and must be entered on the configuration screen. The
3rd Party VME module may either use its physical location (slot:rack) or an unused value between F0 and FE hexadecimal as its interrupt id. For example, if a VME module is configured in slot 3 of rack 0, its default interrupt id would be 30H (slot 3 rack 0).
Alternatively, the module could use the value F5H as long as no other module in the system is using that value. (CIMPLICITY Control programming software configuration function will prevent the user from selecting the same interrupt id for more than one module.) Only one interrupt id is allowed for each module. The interrupt id that the module in this rack and slot is using must match the interrupt id entered as this configuration parameter.
Associating Interrupt with Logic
In addition to configuring the 3rd Party VME module in the rack/slot configuration within CIMPLICITY Control, the association between the interrupt and the block and/or program(s) that are to be executed needs to be specified within the resource editor.
CIMPLICITY Control provides a set of pre-defined names which correspond to all of the possible interrupt ids that a 3rd Party VME module could use. Each of these names can be used as the SINGLE input for an IEC task. The form for these names is VME_xx,
User’s Guide to Integration of 3rd Party VME Modules - December 1997 GFK-0448E
where xx is the interrupt id (for example, VME_30, VME_F5). The VME_xx name form is only for use with interrupts from 3rd party VME modules. (Series 90-70 discrete and analog interrupts are named by their corresponding %I and %AI references.)
A single interrupt source (that is, one VME_xx name) can be used as the trigger to multiple IEC tasks with different priorities. However, a single interrupt source can only trigger one LD interrupt block. The VME_xx variable is not a real physical variable that can be accessed and tested by a program; it is simply a name to satisfy the SINGLE input to the IEC task. For more information about defining IEC tasks, refer to the CIMPLICITY
Control online help.
Frequency and Queuing
The Series 90-70 PLC system allows VME interrupts from discrete, analog, and 3rd Party modules to trigger LD interrupt blocks and standalone programs in the PLC. The queuing and frequency of the 3rd Party interrupts are subject to the same rules that apply to the discrete and analog interrupts. (See Interrupt Handling in Chapter 2 in the
Series 90-70 Programmable Controller Reference Manual, GFK-0265G, and later revisions for more information.)
Dynamic Masking of the Interrupt
The Series 90-70 PLC CPU provides a service to dynamically mask and unmask interrupts from 3rd Party VME modules from within the application logic. This operation is analogous to how interrupts from Series 90-70 discrete and analog modules are masked and unmasked via Service Request Function Block #17.
To mask or unmask an interrupt from a 3rd Party VME module, the application logic will pass VME_3PY_INT_ID (17 decimal, 11H) as the memory type and the interrupt id as the offset to SVC_REQ #17. When the interrupt is not masked, the PLC CPU will process the interrupt and schedule the associated block and programs for execution.
When the interrupt is masked, the PLC CPU will process the interrupt but will not schedule the associated block or programs for execution. When the interrupt is Disabled in the rack/slot configuration, it cannot be unmasked via Service Request Function Block
#17. For more information on Service Request Function Block #17, see GFK-0265, the
Series 90-70 Programmable Controller Reference Manual.
3
GFK-0448E Chapter 3 Configuration of VME Modules 3-23
Chapter
4
Installation of VME Modules
4
section level 1 1 figure bi level 1 table_big level 1
Cooling for Optimum Operation
As indicated previously, if any selected VME modules require forced air for cooling, the installation of fans to ensure that those cooling requirements are met must be done by the user. Additionally, certain industrial applications may require the presence of loss-of-fan detection. Rack Fan Assemblies (IC697ACC721 and IC697ACC724) are available from GE Fanuc as an option for those applications requiring additional cooling.
Rack Standoffs for J2 Backplane Requirements
When specifying components for those applications requiring the J2 backplane, be aware that many commercially available J2 backplanes have wirewrap pins that extend beyond the Series 90-70 PLC backplane. Subsequent use of the J2 backplane will require that the panel-mount version of the rack be mounted on standoffs attached to the panel to ensure clearance between the wirewrap pins and the panel. Refer to Table 2-3, which lists the items in the VME option kit for mounting a J2 backplane. The front-mount version may use standard rack mounting techniques.
Grounding Requirements
VME modules used in a Series 90-70 PLC rack must use proper grounding practices.
VME modules often use the module front as the ground point with the top and bottom screws which secure the module to the rack as the ground connection. The user should therefore be certain that the mounting screws are securely attached, and the module should not be removed from the rack unless external connections to the module are first removed.
Warning
If the external connections are not removed as described above, potentially hazardous voltages may exist on the module. Additionally, no grounding point exists after the mounting screws have been disconnected.
Module Location in Racks
All VME modules installed in a standard Series 90-70 PLC rack should be physically located with consideration for empty slots as described under Slot Location
Considerations for VME modules
in the previous chapter on page 3-5. Location of VME modules in a VME Integrator Rack are also described on that page.
GFK-0448E
4-1
4
This page intentionally left blank.
4-2
User’s Guide to Integration of 3rd Party VME Modules – December 1997
GFK-0448E
Chapter
5
Programming Considerations
5
section level 1 1 figure bi level 1 table_big level 1
This chapter describes the programming functions which allow the Series 90-70 PLC to communicate with 3rd party VME modules. For additional information on Series 90-70
PLC programming, refer to GFK-0263, Logicmaster t 90 Programming Software User’s
Manual and GFK-0265, Logicmaster t 90 Programming Software Reference Manual, or
CIMPLICITY Control online help (as applicable to your programming software).
Programming Functions for Communicating with 3rd Party VME Modules
A group of functions (instructions) is available with Logicmaster 90 software to allow the
Series 90-70 PLC CPU to communicate with VME modules obtained from 3rd Party manufacturers. These functions include:
H VME READ (VMERD)
H VME WRITE (VMEWRT)
H VME READ/MODIFY/WRITE (VMERMW)
H VME TEST AND SET (VMETST)
H VME CONFIG READ (VME_CFG_RD)
H VME CONFIG WRITE (VME_CFG_WRT)
H SWAP
Byte Significance Convention
When transferring data between the Series 90-70 PLC and a 3rd party VME module, proper consideration must be given to byte significance convention. The Series 90-70
PLC uses the Intel convention for storing word data in bytes, that is, the least significant bits (LSB) of a word are stored in the even byte. Many VME modules follow the
Motorola
convention of storing the least significant bits of a word in the odd byte.
The VMEbus access circuitry of the Series 90-70 PLC keeps byte addresses straight, that is, byte address 1 is the same storage location whether accessed from the Series 90-70
PLC or a Motorola convention CPU. However, because of the difference in byte significance, transfers of word and multiword data, for example, 16 bit integers (INT,
UINT), 32 bit integers (DINT) or floating point (REAL) numbers, will require adjustment on transfers to or from Motorola convention modules.
In these cases, the two bytes in each word must be swapped, either before or after the transfer (the SWAP function is available for this purpose). In addition, for multiword data items, the words must be swapped end-for-end on a word basis. For example, a
64-bit real number transferred to the Series 90-70 PLC from a Motorola convention module must be byte swapped and word reversed, either before or after reading, as follows:
GFK-0448E
5-1
5
B1 B2 B3 B4 B5 B6 B7 B8
Character (ASCII) strings or BCD data require no adjustment since the Intel and
Motorola conventions for storage of character strings are identical.
VME READ (VMERD)
The VMERD function reads data from the dual-port RAM of VME modules located in the Series 90-70 PLC rack. Typically, these are not GE Fanuc modules, but may include some GE Fanuc modules, such as the Programmable Coprocessor Module (PCM). This function should be executed before the data is needed in the program.
_____
| |
(enable) —| VME_|— function OK (logic)
| RD_|
address | BYTE|
modifier —|AM |
| LEN |
module | 001 | data read
address ——|ADR Q|— from VME bus
|_____|
Parameter Description
ENABLE:
TYPE:
LEN:
AM:
ADR:
OK:
Q:
power flow input which, when energized, enables the execution of the function.
function type, either BYTE or WORD, to select the corresponding type of VMEbus access to be performed.
internal parameter which specifies the number of bytes or words to be transferred (depends on function type). LEN may be from 1 to 32,767.
hexadecimal value coded to specify the rack in which the module resides and the access mode of the VMEbus access to be performed. See Series 90-70 Module Address Allocation on page 3-2.
double word which specifies the hexadecimal address of the first word or byte to be accessed.
May be a constant or the reference address of the first (low) word of two words containing the module address. The address is based on the rack and slot the module is located in. See Series
90-70 Module Address Allocation on page 3-2.
power flow output which is energized when the function is enabled and the data is successfully read.
specifies the first location in the PLC user reference into which the data read from the VME module is to be stored.
When the VMERD function receives power flow through its enable input, the function accesses the VME module at the specified address (ADR) and address modifier (AM) and copies LEN data units (WORDs or BYTEs) from the VME module to PLC locations beginning at output reference (Q). The VMERD function passes power to the right via its OK output when its operation is successful.
Refer to Chapter 3 for a discussion on VME module addressing using address and address modifier codes.
5-2 User’s Guide to Integration of 3rd Party VME Modules - December 1997 GFK-0448E
GFK-0448E
5
Example of VMERD Function
In the following example, when enabling input %I00001 goes true, 256 bytes of Short space data are read from a module in rack 4, slot 7 into registers %R00001 through
%R00128. Unless an error occurs while reading the data, output coil %Q00001 will be set to true.
_____
| %I00001 | | %Q00001
|———] [—————————| VME_|———————————————————————————————————————————————( )——
| | RD_|
| | BYTE|
| CONST —|AM |
| 0013 | LEN |
| | 256 |
| CONST —|ADR Q|—%R00001
| 00003800 |_____|
|
Entering a VMERD Function
1.
Enter enable input permissive logic either before or after selecting the VMERD function. Position the cursor to allow a doubleword function to be entered, that is, allow 2 blank cursor positions to the left of the cursor.
2.
Select DATAMV (Shift F6). Select MORE (F9), then VMERD (F1). The screen displays:
_____
| |
| |
| RD |
| BYTE|
???????—|AM |
| LEN |
| 001 |
????????????—|ADR Q|—???????
|_____|
3.
The function can read either byte or word data; the default selection is BYTE. If this should be changed to WORD, select TYPES (F10) then WORD (F2).
4.
The default data length is 1 (either 1 word or 1 byte). To specify a different amount of data to be read, leave the cursor on the block and type in the number. Press the
Enter key.
5.
Move the cursor to the left of AM and enter the hexadecimal number that represents the address modifier code. To enter a hexadecimal number, enter a zero, the hexadecimal digits, and the letter H. Press the Enter or Tab key.
6.
Move the cursor to the left of ADR and enter either a hexadecimal constant or the beginning (low) reference where the address of the VME module is stored.
7.
Move the cursor to the right of Q and enter the beginning (low) output reference to receive the data that is read.
8.
If the program should check the execution of the VMERD function, move the cursor to the upper right and enter the appropriate logic.
Chapter 5 Programming Considerations 5-3
5
9.
When the rung is complete, use the keypad + or Esc key to accept it.
The following memory types can be used for parameters of the VMERD function:
Valid Memory Types:
Parameter flow %I %Q %M %T %S %G %R %P %L %AI %AQ const none
enable
AM
ADR ok
Q
•
•
•
• o o o o o o
•
•
•
•
•
•
•
•
•
•
•
•
•
•
•
•
•
•
Note: Indirect referencing is available for all register references (%R, %AI, %AQ, %P, and %L)
•
= Valid data type, or place where power may flow through the function.
o = Valid reference for BYTE data only.
5-4 User’s Guide to Integration of 3rd Party VME Modules - December 1997 GFK-0448E
VME WRITE (VMEWRT)
The VMEWRT function writes data to the dual-port RAM of VME modules located in the
Series 90-70 PLC rack. Typically, these are not GE Fanuc modules, but may include some
GE Fanuc modules, such as the PCM. Locate the function at a place in the program where the output data will be ready to send.
_____
| |
(enable) —| VME_|— function OK (logic)
| WRT_|
data to be| BYTE|
written ——|IN |
| LEN |
address | 001 |
modifier —|AM |
| |
module | |
address ——|ADR |
|_____|
ENABLE:
TYPE:
LEN:
IN:
AM:
ADR:
OK:
Parameter Description
power flow input which, when energized, enables the execution of the function.
function type, either BYTE or WORD, to select the corresponding type of VMEbus access to be performed.
internal parameter which specifies the number of bytes or words to be transferred (depends on function type). LEN may be from 1 to 32,767.
specifies the first location in the PLC memory where the data to be written to the VME module is stored. This parameter may be a constant, in which case that value is written to all VME addresses covered by the function’s length.
hexadecimal value coded to specify the rack in which the module resides and the access mode of the VMEbus access to be performed. See Series 90-70 Module Address Allocation on page 3-2.
double word which specifies the hexadecimal address of the first word or byte to be accessed.
May be a constant or the reference address of the first (low) word of two words containing the module address. The address is based on the rack and slot the module is located in. See Series
90-70 Module Address Allocation on page 3-2.
power flow output which is energized when the function is enabled and completes successfully.
When the VMEWRT function receives power flow through its enable input, the LEN data units from the PLC locations beginning at input reference (IN) are written to the
VME module at the specified address (ADR) and address modifier (AM). The VMEWRT function passes power to the right via its OK output when its operation is successful.
See Chapter 3 for a discussion on VME module addressing using address and address modifier codes.
5
GFK-0448E Chapter 5 Programming Considerations 5-5
5
5-6
Example of VMEWRT Function
In the following example, every sweep that enabling input %M00001 is true, the hexadecimal value FFFF is written to each of 20 words on the VME bus, the first (lowest address) being specified by the contents of %R00019 (low word) and %R00020 (high word). Unless an error occurs while writing the data, internal coil %M00055 will be set to true.
_____
| %M00001 | | %M00055
|———] [—————————| VME_|———————————————————————————————————————————————( )——
| | WRT_|
| | WORD|
| CONST —|IN |
| FFFF | LEN |
| | 020 |
| CONST —|AM |
| 0039 | |
| | |
| %R00019—|ADR |
| |_____|
|
Entering a VMEWRT Function
1.
Enter enable input permissive logic either before or after selecting the VMEWRT function. Position the cursor to allow a doubleword function to be entered, that is, allow 2 empty cursor positions to the left of the cursor.
2.
Select DATAMV (Shift F6). Select MORE (F9), then VMEWRT (F2). The screen displays:
_____
| |
| |
| WRT |
| BYTE|
???????—|IN |
| LEN |
| 001 |
???????—|AM |
| |
| |
????????????—|ADR |
|_____|
3.
The function can write either byte or word data. The default selection is BYTE. If this should be changed to WORD, select TYPES (F10) then WORD (F2).
4.
The default data length is 1 (either 1 word or 1 byte). To specify a different amount of data to be written, leave the cursor on the block and type in the number. Press the Enter key.
5.
Move the cursor to the left of IN and enter a reference or constant for the data to be written. To enter a hexadecimal number, enter a zero, the hexadecimal digits, and the letter H. Press the Enter or Tab key.
6.
Move the cursor to the left of AM and enter the hexadecimal number that represents the address modifier code.
User’s Guide to Integration of 3rd Party VME Modules - December 1997 GFK-0448E
7.
Move the cursor to the left of ADR and enter either a hexadecimal constant or the beginning (low) reference where the address of the VME module is stored.
8.
If the program should check the execution of the VMEWRT function, move the cursor to the upper right and enter the appropriate logic.
9.
When the rung is complete, use the keypad + or Esc key to accept it.
The following memory types can be used for parameters of the VMEWRT function:
Valid Memory Types:
Parameter flow %I %Q %M %T %S %G %R %P %L %AI %AQ const none
enable
IN
AM
ADR ok
•
•
•
•
• o
• o
• o
• o
• o
•
•
•
•
•
•
•
•
•
•
•
•
•
•
•
•
•
•
•
•
Note: Indirect referencing is available for all register references (%R, %AI, %AQ, %P, and %L)
•
= Valid data type, or place where power may flow through the function.
o = Valid reference for BYTE data only.
5
GFK-0448E Chapter 5 Programming Considerations 5-7
5
VME READ/MODIFY/WRITE (VMERMW)
The VMERMW function updates a data element in the dual-port RAM of VME modules located in the Series 90-70 PLC rack. Typically, these are not GE Fanuc modules, but may include some GE Fanuc modules, such as the PCM.
_____
| |
(enable) —| VME_|— function OK (logic)
| RMW_|
| BYTE|
operation—|OP |
| |
| |
data mask—|MSK |
| |
address | |
modifier —|AM |
| |
module | |
address ——|ADR |
|_____|
ENABLE:
TYPE:
OP:
MSK:
AM:
ADR:
OK:
Parameter Description
power flow input which, when energized, enables the execution of the function.
function type, either BYTE or WORD, to select the corresponding type of VMEbus access to be performed.
a constant which specifies whether an AND or OR function is to be used to combine the data and the mask. 0 specifies AND, 1 specifies OR.
a word value containing a mask to be ANDed or ORed with the data read from the bus. If TYPE is BYTE only the low 8 bits of the mask are used.
hexadecimal value coded to specify the rack in which the module resides and the access mode of the VMEbus access to be performed. See Series 90-70 Module Address Allocation on page 3-2.
double word which specifies the hexadecimal address of the first word or byte to be accessed.
May be a constant or the reference address of the first (low) word of two words containing the module address. The address is based on the rack and slot the module is located in. See Series
90-70 Module Address Allocation on page 3-2.
power flow output which is energized when the function is enabled and completes successfully.
When the VMERMW function receives power flow through its enable input, the function reads a word or byte of data from the module at the specified address (ADR) and address modifier (AM). This byte or word of data is combined (AND/OR) with the data mask MSK. Selection of AND or OR is made using the OP input. If byte data is specified, only the lower 8 bits of MSK are used. The result is then written back to the same VME address from which it was read. The VMERMW function passes power flow to the right via its OK output whenever power is received when its operation is successful.
See Chapter 3 for a discussion on VME module addressing using address and address modifier codes.
5-8 User’s Guide to Integration of 3rd Party VME Modules - December 1997 GFK-0448E
GFK-0448E
5
Example of VMERMW Function
In the following example, when enabling input %M00044 is energized, the hexadecimal value 80H is ORed with the byte of data read from address 106010H on the VME bus in rack 0 (the main rack); this should be a module in slot 5. Unless an error occurs while accessing the data, coil %Q00027 will be set to true.
_____
| %M00044 | | %Q00027
+———] [—————————| VME_|——————————————————————————————————————————————( )——
| | RMW_|
| | BYTE|
| CONST —|OP |
| 00001 | |
| | |
| CONST —|MSK |
| 0080 | |
| | |
| CONST —|AM |
| 0039 | |
| | |
| CONST —|ADR |
| 00106010 |_____|
|
Entering a VMERMW Function
1.
Enter enable input permissive logic before or after selecting VMERMW function.
Position cursor to allow a doubleword function to be entered, that is, 2 blank cursor positions to left of cursor.
2.
Select DATAMV (shift F6). Select MORE (F9), then VMERMW (F3). The screen displays:
_____
| |
| |
| RMW |
| BYTE|
???????—|OP |
| |
| |
???????—|MSK |
| |
| |
???????—|AM |
| |
| |
????????????—|ADR |
|_____|
3.
The function can operate on either byte or word data. The default selection is BYTE.
If this should be changed to WORD, select TYPES (F10) then WORD (F2).
4.
Move the cursor to the left of OP and enter the number that represents the type of operation to be performed: 0 for AND, 1 for OR. Press the Enter or Tab key.
5.
Move cursor to left of MSK and enter the mask value or reference containing the mask value.
6.
Move the cursor to the left of AM and enter the hexadecimal number that represents the address modifier code. To enter a hexadecimal number, enter a zero, the hexadecimal digits, and the letter H. Press the Enter or Tab key.
Chapter 5 Programming Considerations 5-9
5
7.
Move the cursor to the left of ADR and enter either a hexadecimal constant or the beginning (low) reference where the address of the VME module is stored.
8.
If the program should check the execution of the VMERMW function, move the cursor to the upper right and enter the appropriate logic.
9.
When the rung is complete, use the keypad + or Esc key to accept it.
The following memory types can be used for parameters of the VMERMW function:
Valid Memory Types:
Parameter flow %I %Q %M %T %S %G %R %P %L %AI %AQ const none
enable
OP
•
MSK
AM
ADR ok
•
•
•
•
•
•
•
•
•
•
•
•
•
•
•
•
•
•
•
•
•
•
•
•
•
•
•
•
•
•
•
•
•
Note: Indirect referencing is available for all register references (%R, %AI, %AQ, %P, and %L)
•
= Valid data type, or place where power may flow through the function.
[ = %SA, %SB, %SC only; %S cannot be used.
5-10 User’s Guide to Integration of 3rd Party VME Modules - December 1997 GFK-0448E
VME TEST AND SET (VMETST)
The VMETST function handles semaphores located in the dual-port RAM of VME modules located in the Series 90-70 PLC rack. Typically, these are not GE Fanuc modules, but may include some GE Fanuc modules, such as the PCM. The VMETST function exchanges a boolean true (1) for the value currently at the semaphore location. If that value already was true, then the VMETST function does not acquire the semaphore. If the existing value was false, then the semaphore is set and the VMETST function has the semaphore and the use of the memory area it controls. The semaphore is cleared and ownership relinquished by using the VMEWRT function to write a 0 to the semaphore location.
_____
| |
(enable) —| VME_|— function OK (logic)
| TS_ |
address | BYTE|
modifier —|AM Q|— semaphore acquired
| |
module | |
address ——|ADR |
|_____|
ENABLE:
TYPE:
AM:
ADR:
OK:
Q:
Parameter Description
power flow input which, when energized, enables the execution of the function.
function type; either BYTE or WORD to select the corresponding type of VMEbus access to be performed.
hexadecimal value coded to specify the rack in which the module resides and the access mode of the VMEbus access to be performed. See Series 90-70 Module Address Allocation on page 3-2.
double word which specifies the hexadecimal address of the first word or byte to be accessed.
May be a constant or the reference address of the first (low) word of two words containing the module address. The address is based on the rack and slot the module is located in. See Series
90-70 Module Address Allocation on page 3-2.
power flow output which is energized when the function is enabled and completes successfully.
set to true if the semaphore was acquired. Set to false if the semaphore was not available, that is, was owned by another task.
When the VMETST function receives power flow, a boolean true is exchanged with the data at the address specified by ADR using the address mode specified by AM. The
VMETST function sets the Q output to true if the semaphore (false) was available and acquired. The VMETST function passes power flow to the right through its OK output whenever power is received and its operation is successful.
See Chapter 3 for a discussion on VME module addressing using address and address modifier codes.
5
GFK-0448E Chapter 5 Programming Considerations 5-11
5
Example of VMETST Function
In the following example, the VMERD, VMEWRT, and VMETST functions are used to read data protected by a semaphore into the PLC.
When enabling input %M00047 is set true (elsewhere in the program), the VMETST function is executed to acquire the semaphore (semaphore VME address stored in
%R00041 and %R00042). When this is successful, coil %M00047 is reset and coil
%M00048 is set. When %M00048 is set, the VMERD function reads the data (20 words of data whose VME address is stored in %R00043 and %R00044; data read into %R00200 through %R00219). If the read is successful (if it is not - something is misprogrammed or broken), the VMEWRT function relinquishes the semaphore. Coil %M00048 is reset when the VMEWRT is successful. %M00049 is set to indicate to later logic that fresh data is now available.
If the semaphore was not available, VMERD and VMEWRT are not executed. The net effect is that the setting of %M00047 causes the PLC to check the semaphore each sweep until the semaphore is available. When it becomes available, the semaphore is acquired, the data is read and the semaphore is relinquished. No further action is taken until
%M00047 is set again.
| _____
|%M00047 | |
+——] [———————————| VME_|—
| | TS_ |
| | BYTE| %M00047
| CONST —|AM Q|——————————————————————————————————————————————(RM)—
| 0039 | | |
| | | | %M00048
| %R00041—|ADR | —————————————————————————————————————————(SM)—
| |_____|
|
| _____ _____
|%M00048 | | | | %M00048
+——] [———————————| VME_|—————————————————| VME_|——————————————————————(RM)—
| | RD_| | WRT_| |
| | WORD| | BYTE| | %M00049
| CONST —|AM | CONST —|IN | —————————————————(SM)—
| 0039 | LEN | 0000 | LEN |
| | 020 | | 001 |
| %R00043—|ADR Q|—%R00200 CONST —|AM |
| |_____| 0039 | |
| | |
| %R00041—|ADR |
| |_____|
5-12 User’s Guide to Integration of 3rd Party VME Modules - December 1997 GFK-0448E
Entering a VMETST Function
1.
Enter enable input permissive logic either before or after selecting the VMETST function. Position the cursor to allow a double word function to be entered, that is, allow 2 blank cursor positions to the left of the cursor.
2.
Select DATAMV (shift F6). Select MORE (F9), then VMETST (F4). The screen displays:
_____
| |
| |
| TS_ |
| BYTE|
???????—|AM Q|—
| |
| |
????????????—|ADR |
|_____|
3.
The function can operate on either byte or word data. The default selection is BYTE.
If this should be changed to word, select TYPES (F10) then WORD (F2).
4.
Move the cursor to the left of AM and enter the hexadecimal number that represents the address modifier code. To enter a hexadecimal number, enter a zero, the hexadecimal digits, and the letter H. Press the Enter or Tab key.
5.
Move the cursor to the left of ADR and enter either a hexadecimal constant or the beginning (low) reference where the address of the VME module is stored.
6.
Move the cursor to the right of Q and enter a coil, or logic that uses the semaphore.
7.
If the program should check the execution of the VMETST function, move the cursor to the upper right and enter the appropriate logic.
8.
When the rung is complete, use the keypad + or Esc key to accept it.
The following memory types can be used for parameters of the VMETST function:
Valid Memory Types:
Parameter flow %I %Q %M %T %S %G %R %P %L %AI %AQ const none
enable
AM
ADR ok
Q
•
•
•
•
•
•
•
•
•
•
•
•
•
•
•
•
•
•
•
Note: Indirect referencing is available for all register references (%R, %AI, %AQ, %P, and %L)
•
= Valid data type, or place where power may flow through the function.
5
GFK-0448E Chapter 5 Programming Considerations 5-13
5
VME_CFG_RD
Use the VME_CFG_RD function to read the configuration for a VME module. The
VME_CFG_RD function has five input parameters and three output parameters. When the function receives power, the data elements (N) are read from the VME bus at the location defined by rack (R), slot (S), and dual port offset (OFF). The data read is placed in output Q. The status of the operation is placed in the status word output (ST). The function has a length specification (LEN) of the maximum size of the output array.
If the function is completed successfully, ok is set ON; otherwise, it is set OFF. It is also set OFF when:
H The number of data elements (N) is greater than the length (LEN) specified.
H The rack/slot value (R and S) is out of range or is not a valid VME location.
H The most significant byte of the dual port offset (OFF) is not zero.
H The most significant byte of the dual port address plus the dual port offset is not zero.
H Read beyond the end of dual port memory.
H Specified rack/slot not configured for a Third-Party VME module in
BUS
INTERFACE
mode.
H If the dual port offset is an even number, configure for the odd byte only. If the dual port offset is an odd number, configure for word or single word.
_____
| |
| |
| CFG_|
| READ|
(rack number) —|R ST|— (status word)
| LEN |
|00001|
(slot number) —|S Q|— (output parameter Q)
| |
| |
(dual port offset) —|OFF |
| |
| |
(data elements) —|N |
|_____|
5-14
Parameters:
Parameter
enable
R
S
OFF
N ok
ST
Q
LEN
Description
When the function is enabled, the data initialization is performed.
The rack number is specified in R.
The slot number is specified in S.
OFF specifies the dual port offset.
N contains the amount of data (data elements) to be read from the VME bus.
The ok output is energized when the function is performed without error.
The status word contains the status of the operation.
When the function is performed, the data is read to array Q.
LEN is the length of the output array in bytes.
User’s Guide to Integration of 3rd Party VME Modules - December 1997 GFK-0448E
5
Valid Memory Types:
Parameter flow %I %Q %M %T %S %G %U %R %P %L %AI %AQ %UR const none
enable
R
S
OFF
N ok
•
•
•
•
•
•
•
•
•
•
•
•
•
•
•
•
•
•
•
•
•
•
•
•
•
•
•
•
•
ST
• • • • •
[
• •
Q
• • • • •
[
• •
•
Valid reference or place where power may flow through the function
[
%SA, %SB, %SC only; %S cannot be used.
•
•
•
•
•
•
•
•
•
•
•
•
•
•
•
•
•
•
•
•
•
•
•
•
•
•
•
•
•
•
•
•
•
•
•
Example:
In the following example, when enable is ON, VME data at rack 1, slot 3 and dual port offset defined by %R00100 is read into %R00101 through %R00110 of the array %R00101 through %R00116. If an error was encountered, the status word %AQ0001 will contain an error code.
| _____
|%I00001 | |
|——| |———| VME_|—
| | CFG_|
| | READ|
| CONST —|R ST|—%AQ0001
| 00001 | LEN |
| |00016|
| CONST —|S Q|—%R00101
| 00003 | |
| | |
|%R00100—|OFF |
| | |
| | |
| CONST —|N |
| 00010 |_____|
|
GFK-0448E Chapter 5 Programming Considerations 5-15
5
VME_CFG_WRT
Use the VME_CONFIG_WRITE function to write the configuration to a VME module.
The VME_CFG_WRT function has six input parameters and two output parameters.
When the function receives power, the data elements (N) are written from the data array (IN) to the VME bus at the location defined by rack (R), slot (S), and dual port offset (OFF). The status of the operation is placed in the status word output (ST). The function has a length specification (LEN) of the maximum size of the output array.
If the function is completed successfully, ok is set ON; otherwise, it is set OFF. It is also set OFF when:
H The number of data elements (N) is greater than the length (LEN) specified.
H The rack/slot value (R and S) is out of range or is not a valid VME location.
H The most significant byte of the dual port offset (OFF) is not zero.
H The most significant byte of the dual port address plus the dual port offset is not zero.
H Read beyond the end of dual port memory.
H Specified rack/slot not configured for a Third-Party VME module in
BUS
INTERFACE
mode.
H If the dual port offset is an even number, configure for the odd byte only. If the dual port offset is an odd number, configure for word or single word.
_____
| |
| |
| CFG_|
|WRITE|
(input parameter IN) —|IN ST|— (status word)
| LEN |
|00001|
(rack number) —|R |
| |
| |
(slot number) —|S |
| |
| |
(dual port offset) —|OFF |
| |
| |
(data elements) —|N |
|_____|
5-16 User’s Guide to Integration of 3rd Party VME Modules - December 1997 GFK-0448E
5
GFK-0448E
Parameters:
Parameter
enable
IN
R
S
OFF
N ok
ST
LEN
Description
When the function is enabled, the data initialization is performed.
IN contains the data to be written to the VME bus at the location defined by rack (R), slot (S), and dual port offset (OFF).
The rack number is specified in R.
The slot number is specified in S.
OFF specifies the dual port offset.
N contains the amount of data (data elements) to be written to the VME bus.
The ok output is energized when the function is performed without error.
The status word contains the status of the operation.
LEN is the length of the input array in bytes.
Valid Memory Types:
Parameter flow %I %Q %M %T %S %G %U %R %P %L %AI %AQ %UR const none
enable
IN
R
S
OFF
N
•
•
•
•
•
•
•
•
•
•
•
•
•
•
•
•
•
•
•
•
•
•
•
•
•
•
•
•
•
•
• ok
•
ST
• • • • •
[
• •
•
Valid reference or place where power may flow through the function
[
%SA, %SB, %SC only; %S cannot be used.
•
•
•
•
•
•
•
•
•
•
•
•
•
•
•
•
•
•
•
•
•
•
•
•
•
•
•
•
•
•
•
•
•
•
•
•
•
•
•
•
Example:
In the following example, when enable is ON, data from %R00101 through %R00110 of the array %R00101 through %R00116 is written to the VME bus at rack 1, slot 3 and dual port offset defined by %R00100. If an error was encountered, the status word %AQ0001 will contain an error code.
| _____
|%I00001 | |
|——| |———| VME_|—
| | CFG_|
| |WRITE|
|%R00101—|IN ST|—%AQ00001
| | LEN |
| |00016|
| CONST —|R |
| 00001 | |
| | |
| CONST —|S |
| 00003 | |
| | |
|%R00100—|OFF |
| | |
| CONST —|N |
| 00010 |_____|
|
Chapter 5 Programming Considerations 5-17
5
SWAP
ENABLE:
TYPE:
IN:
OK:
Q:
The SWAP function is used to swap two bytes within a word, or two words within a double word. The necessity of doing this swap was described previously in Byte
Significance Convention at the beginning of this chapter. The SWAP can be performed over a wide range of memory by specifying a length greater than 1 for the function. If this is done, each word or double word of data within the specified length will be appropriately swapped.
The SWAP function has two inputs and two outputs:
_____
| |
(enable) —|SWAP |— function OK (logic)
| WORD|
source of | |
swap data—|IN Q|— results of swap
| LEN |
| 001 |
|_____|
Parameter Description
power flow input which, when energized, enables the execution of the function.
function type; either BYTE or WORD to select the corresponding type of swap to be performed.
specifies the location in PLC memory for the beginning reference for data to be swapped.
power flow output which is energized when the function is enabled and completes successfully.
specifies the location in PLC memory where the swapped data will be stored.
When the SWAP function receives power flow, it performs the swap operations on each word or double word of data within the specified area. The results of the swap are stored to output Q. The SWAP function passes power to the right whenever power is received.
Example of SWAP Function
In the following example, when enabling input %I00001 goes true, two bytes located in word %I00033 through %I00048 are swapped. The result of the swap is stored in
%L00007. Unless an error occurs while swapping the bytes, output coil Q00001 will be set to true.
_____
| %I00001 | | %Q00001
|———] [—————————|SWAP_|————————————————————————————————————————————————( )——
| | WORD|
| | |
| %I00033 —|IN Q|—%L00007
| | LEN |
| | 001 |
| |_____|
|
5-18 User’s Guide to Integration of 3rd Party VME Modules - December 1997 GFK-0448E
Entering a SWAP Function
1.
Enter enable input permissive logic either before or after selecting the SWAP function.
2.
Select DATAMV (Shift F6). Select MORE (F9), then SWAP (F6). To change the data type, select TYPES (F10), then DWORD (F2). The screen displays:
_____
| |
| |
| WORD|
| |
???????—|IN Q|—???????
| LEN |
| 001 |
|_____|
3.
The function can swap either bytes or words. The default length for the swap is 1
(either 1 word or 1 double word). To specify a swap length that is different than 1, leave the cursor on the block and type in the number. Press the Enter key.
4.
Move the cursor to the left of IN and enter the beginning reference for data to be swapped (the table below shows the types of inputs and outputs you can enter for this function). Press the Enter key.
5.
Move the cursor to the right of Q and enter the reference where the swapped data will be stored. Press the Enter key.
6.
If the program should check the execution of the SWAP function, move the cursor to the upper right and enter the appropriate logic.
The following memory types can be used for parameters of the SWAP function:
Valid Memory Types:
Parameter flow %I %Q %M %T %S %G %R %P %L %AI %AQ const none
enable
IN ok
IN
•
•
•
• o o o o o o o o o o
•
•
•
•
•
•
•
•
•
•
•
•
Note: Indirect referencing is available for all register references (%R, %AI, %AQ, %P, and %L)
•
= Valid data type, or place where power may flow through the function.
o = Valid reference for WORD data only.
5
GFK-0448E Chapter 5 Programming Considerations 5-19
Appendix
A
Commonly Used Acronyms and
A
Abbreviations
ACFAIL
ADR
AM
ASCII
BCD
BCLEAR
BRM
BRx
BTM
CPU
H
IRQx
LSB
PLC
RAM
SYSFAIL
SYSRESET
VITA
VME
VME-I
VMERD
VMERMW
VMETST
VMEWRT
Following is a list of acronyms used throughout this manual. The acronym is listed first followed by its derivation or description.
AC Fail (power sequencing signal)
Address
Address Modifier
American National Standard Code for Information Interchange
Binary Coded Decimal
Bus Clear signal
Bus Receiver Module
Bus Request line (x is the Bus Request line number)
Bus Transmitter Module
Central Processing Unit
Hexadecimal
Interrupt Request (x is the Interrupt Request number)
Least Significant Bit
Programmable Logic Controller
Random Access Memory
System Fail (power sequencing signal)
System Reset (power sequencing signal)
VME International Trade Association
VERSA Module Europe
Industrialized VMEbus
VME Read function
VME Test and Set function
VME Write function
GFK-0448E
A-1
A
This page intentionally left blank.
A-2 User’s Guide to Integration of 3rd Party VME Modules – December 1997 GFK-0448E
Appendix
B
Why Do Restrictions Exist?
B
section level 1 1 figure_ap level 1 table_ap level 1
The body of this manual describes a number of restrictions and recommendations for adding 3rd party VME modules to the Series 90-70 PLC. This appendix describes the reasons for certain of these restrictions. This appendix is intended for use by those of you who want more information than is provided in the body of this manual.
Interrupts and a 3rd Party Interrupt Handler
If it is necessary to use interrupts 1 through 4, a 3rd party interrupt handler is required.
The 3rd party handler must be configured to handle interrupt requests IRQ1 through
IRQ4 only.
In the Series 90-70 PLC system IRQ1 through IRQ4 are used for slot identification.
Jumper locations are provided to disable slot identification and connect IRQ1 through
IRQ4 to the backplane. Therefore, when using 3rd party interrupt handlers, it is necessary to install jumpers on the backplane at the slots that contain the interrupt handler and 3rd party boards that will request interrupts.
A foreign interrupt handler becomes a bus master when servicing interrupts, therefore all foreign bus master restrictions apply.
AM Codes and Expansion Racks
The Series 90-70 VME bus is extended to expansion racks through the Bus Transmitter and Bus Receiver modules. During short access the Series 90-70 user defined AM codes,
10H through 1FH, are used by the Bus Transmitter Module to determine if the short access is directed towards the main or expansion racks. During a short access the Bus
Receiver Module uses the Series 90-70 user defined AM code to determine if its rack has been selected.
During standard access the Bus Transmitter Module and Bus Receiver Modules use the address to determine which rack the modules reside in. When a Bus Transmitter
Module receives an address allocated to an expansion rack it drives the VME bus in the main rack and transmits the address to the Bus Receiver Modules in the system. Any
Bus Receiver Module present will then respond to the VME access if the address is allocated to the rack it resides in.
Restrictions for AM Code 29H
During short access the Bus Receiver Module waits to receive the Series 90-70 defined
AM code for its rack. The Bus Receiver Module then converts the Series 90-70 defined
GFK-0448E
B-1
B
AM code to the corresponding short access AM code. After converting an AM code, the
Bus Receiver module takes control of the VME bus transferring control signals and data to and from its rack. For example, assume that you have programmed AM code 18H and address 4000H in a VME byte write function block. The Bus Transmitter Module will take control of the VME bus in the main rack and transmit AM code 18H and address
4000H. The Bus Receiver Module present in rack 7 will convert AM code 18H to 29H and transmit it, the control address, and data to the local bus in rack 7.
Restrictions for AM Code 39H
The user defined address 100000H through 7FFFFFH for AM code 39H is restricted to rack 0. This is due to the fact that the Bus Transmitter Module will not pass rack 0 allocated addresses to extended racks. If a Bus Transmitter Module is not present address 100000H through 0EFFFFFH is unused address space and can be allocated to 3rd party modules.
When a Bus Transmitter Module is present unused address space allocated to expansion racks cannot be assigned to 3rd party modules in the main rack. This restriction is due to the fact that the Bus Transmitter Module will always drive the backplane when an address allocated to an expansion rack is used. This occurs with or without the expansion rack present.
Unused address space in expansion racks must only be assigned to 3rd party modules located in that rack. This restriction is due to the Bus Receiver Module. The Bus
Receiver Module will only respond to addresses allocated to the rack it resides in.
Restrictions for AM Codes 0DH and 09H
It is possible to use extended addressing (32 bit address) in the main rack only. To use extended addressing you must pull the upper address bits A24 through A31, located on the P2 connector, to a known state. You can then program a VME access function block with the correct extended AM code and address. Extended access will not interfere with
Series 90-70 modules.
Restrictions for AM Code 2DH
Immediately after a power cycle or after Logicmaster 90 has downloaded a new configuration to the CPU, the Series 90-70 CPU will check for the presence of GE Fanuc modules in each available rack and slot. Using AM code 29H, the CPU will attempt to read the module “VME ID” bytes from each of the short address ranges listed in the table on page 3-2. If any data can be read successfully, indicating the presence of a module, then the CPU will set a diagnostic bit at offset address 1 using AM code 2DH.
When using a non-GE Fanuc module, the effect of such a write to the board should be carefully considered. If this could cause a problem, it is recommended that the module addressing be configured to respond in the “user defined” range as listed. Another alternative might be to disable the board response to AM code 2DH.
B-2
User’s Guide to Integration of 3rd Party VME Modules – December 1997
GFK-0448E
Appendix
C
Configuration Examples
C
section level 1 1 figure_ap level 1 table_ap level 1
This appendix contains three examples of configuring 3rd party VME modules. These configuration examples include:
1.
Two examples of a single slot board in the main (CPU) rack;
2.
A 3rd party VME module in an expansion rack.
Example 1 - Single Slot Module Located in the Main Rack
The following assumptions are made:
A. The module can be configured as a D16/A16 or D16/A24.
B. The address and AM code are configurable.
The module will be configured for two different Series 90-70 configurations.
Table C-1. Example 1 - Series 90-70 Configuration 1
Slot
1
4
5
2
3
6
Module
IC697CPU731 - CPU
IC697PCM711 - PCM
IC697MDL650 - 32 point, 24VDC Input
IC697MDL740 - 32 point 24/48VDC Output
IC697BEM713 - Bus Transmitter Module
3rd Party VME Module
Table C-2. Example 1 - Series 90-70 Configuration 2
Slot
3
4
1
2
5
Module
IC697CPU771 - CPU
IC697PCM711 - PCM
IC697MDL650 - 32 point, 24VDC Input
IC697MDL740 - 32 point 24/48VDC Output
3rd Party VME Module
GFK-0448E
C-1
C
Example 1 - Configuration 1
For Configuration 1 the 3rd party module must be located in slot 6. The following address ranges are available:
Table C-3. Example 1 - Configuration 1 Available Address Range
AM Code
29H
2DH
39H
3DH
Address Range
3000H - FFFFH
3000H - FFFFH
080000H - 7FFFFFH
000000H - 7FFFFFH
The best address choice is AM code 3DH. With this configuration, the module will be out of the Series 90-70 address range. This allows for Series 90-70 module expansion without having to reconfigure the 3rd party module.
Example 1 - Configuration 2
For configuration 2, the 3rd party module must be located in slot 5. Without the Bus
Transmitter Module the following address ranges are available:
Table C-4. Example 1 - Configuration 2 Available Address Range
AM Code
29H
2DH
39H
3DH
Address Range
2800H - FFFFH
2800H - FFFFH
080000H - 7FFFFFH
000000H - 7FFFFFH
The best address choice is AM code 3DH. As with the previous example, this will allow for Series 90-70 module expansion. If a Bus Transmitter Module will never be present in the system, then AM code 39H with address range 100000H through FFFFFFH will also allow for Series 90-70 module expansion within the main rack.
C-2 User’s Guide to Integration of 3rd Party VME Modules - December 1997 GFK-0448E
Example 2 - Single Slot Module Located in an Expansion Rack
In this example, a 3rd party module will be located in an expansion rack. It is assumed that the module’s AM code and address range are configurable. The module will be located in expansion rack 4 which has the following configuration:
Table C-5. Example 2 - Series 90-70 Expansion Rack Configuration
Slot
1
2
3
Module
IC697BEM711 - Bus Receiver Module
IC697MDL650 - 32 point, 24VDC Input
3rd party VME module
With this configuration the available address range is as shown in the following table.
As stated previously, AM code 3DH is not available in expansion racks.
Table C-6. Example 2 - Available Address Range
AM Code
29H
2DH
39H
Address Range
1800H - FFFFH
1800H - FFFFH
B20000H - BFFFFFH
The best choice for this configuration is to use either AM code 29H or 2DH and address range 5000H through FFFFH. This will allow for expansion within this rack without having to reconfigure the 3rd party VME module. When using a short access to address this module the AM code programmed must be 1BH for configured AM code 29H and
13H for configured AM code 2DH.
C
GFK-0448E Appendix C Configuration Examples
C-3
Appendix
D
Quick Compatibility Checklist
D
section level 1 1 figure_ap level 1 table_ap level 1
GFK-0448E
This appendix provides a checklist to be used as a quick reference to help select Series
90-70 PLC compatible 3rd party VME modules. There may also be other factors which determine compatibility. Refer to the text in this manual for more detailed information. h The module must comply with VMEbus Specification Revision C.1.
h Series 90-70 CPUs that allow operation with foreign masters were available beginning with the first quarter of 1992. Catalog numbers of these CPUs are:
IC697CPU731P, IC697CPU732D, IC697CPU771M, and IC697CPU772D (or later revision of each model), and all newer CPU models. Previous revisions may not work properly when used with foreign masters.
h The Series 90-70 rack accommodates 6U modules; 3U modules require the use of adapter hardware or a 6U faceplate to support the smaller 3U module.
h The standard Series 90-70 rack has only a J1 backplane. To use modules with both P1 and P2 connectors you must add a J2 backplane to the Series 90-70 rack and provide the required power connections. No Series 90-70 module uses the J2 backplane.
h The standard Series 90-70 racks (catalog numbers IC697CHS750/790/791) provide card guides for every other VME slot. Multiple slot modules, or modules which have daughter boards can not plug into these racks without modification. The VME
Integrator racks (IC697CHS782/783) provide card guides and connectors for every
VME slot (17 slots).
h The module must be A24 (standard) or A16 (short) address compatible. Although the Series 90-70 PLC system does not support A32 (extended) bit addressing, such modules may be used if the upper 8 address bits (A24 through A31) are strapped to a fixed value.
h The module must be compatible with D16 (16 data bits) and D8 (8 data bits) data transfers. The Series 90-70 PLC system does not support D32 (32 data bits) data transfers. 16 bit data transfers are preferred.
h The module must respond to one or any combination of the following address modifier (AM) codes:
H 2DH, 29H Short Access
H 39H, 3DH Standard Access h Modules responding to AM code 3DH must reside in the main rack.
h The module must not respond to Series 90-70 defined AM codes 10H through 1FH.
h Modules requiring " 12VDC must reside in a rack powered by the GE Fanuc 100W
AC/DC, 90W 24 VDC or 90W 48 VDC power supply.
D-1
D
h Per connector current requirements for any VME module must not exceed 4.5A at 5
VDC and 1.5A at " 12 VDC at 25
°
C (77
°
F). The GE Fanuc power supplies provide:
H 55W AC/DC power supply: 11 amps of 5 volt DC power;
H 90W 24 VDC power supply: 18 amps of 5 volt DC power, 1.5 amps of +12 volt
DC power, and 1 amp of –12 volt DC power;
H 90W 48 VDC power supply: 18 amps of 5 volt DC power, 1.5 amps of +12 volt
DC power, and 1 amp of –12 volt DC power;
H 100W AC/DC power supply: 20 amps of 5 volt DC power, 2 amps of +12 volt DC power, and 1 amp of –12 volt DC power.
h Multi-board sets which have 0.8I centers will not fit in the standard Series 90-70 rack since the rack backplane connectors and card guides are on 1.6
I centers. To use these these types of modules requires the VME Integrator rack, which has connectors and card guides on 0.8
I centers.
h Cooling fans may be required for non GE Fanuc modules to meet the 0 to 60
°
C (32 to
140
°
F) operating temperature range of the Series 90-70 PLC. For applications requiring additional cooling, an optional rack fan assembly (IC697ACC721) is available.
h The range of addresses to which the module responds must be configurable to prevent overlap with those used by any Series 90-70 modules present in the system.
h All Bus Arb functions must be disabled at power-up.
h Modules must not assert the signals ACFAIL and SYSRESET. If they do, the system will not operate properly. If the module asserts SYSFAIL, it must do so only at power-up, and must drive SYSFAIL for no longer than one second.
h Masters must not use Address Only (ADO) cycles.
h The module must be able to recover from SYSFAIL which is asserted by the Series
90-70 CPU during power-up, and during I/O configuration.
h Modules must not generate block transfer cycles.
h VITA categorizes modules by address width, data width, data transfer type, and master/slave. Modules which are most likely to be integrated into the Series 90-70
PLC System are characterized by one or more of the following acronyms (the acronyms are explained in both the VITA catalog and the VMEbus Specification).
A16
A24
A32
SAD016
SAD024
SD8
SBLT8
SRMW8
SALL8
D8
D16
D32
SD8(O)
SRMW8(O)
SD16
SBLT16
SRMW16
SALL16
D-2 User’s Guide to Integration of 3rd Party VME Modules - December 1997 GFK-0448E
Appendix
E
VMEbus International Trade Association
E
section level 1 1 figure_ap level 1 table_ap level 1
The VMEbus International Association (VITA) publishes three documents which may be helpful to users of VME-based products. These documents are:
The VMEbus Compatible Products Directory, which contains listings of VMEbus compatible products.
The VMEbus Specifications, which describes the VMEbus.
The VMEbus Handbook, which is a user’s guide to VMEbus board design.
The Introduction to the VMEbus Compatible Products Directory describes VITA as:
The VMEbus International Trade Association is an incorporated non-profit organization of vendors and users having common market interests. The functions performed by VITA are both technical and promotional. They are aimed at increasing the total market size, providing vendors greater market exposure and affording users more timely technical and product availability information. VITA also provides users with a channel of communication. VITA operates through its various committees and has offices in the USA and Europe. For additional information, please contact:
VITA
10229 N. Scottsdale Road
Suite B
Scottsdale, Arizona 85253
U.S.A.
(602) 951-8866
VITA - Europe
P.O. Box 192
NL - 5300 AD Zaltbommel
The Netherlands
31.4180.14661
GFK-0448E E-1
E
This page intentionally left blank.
E-2 User’s Guide to Integration of 3rd Party VME Modules – December 1997 GFK-0448E
Appendix
F
VME Integrator Racks
F
section level 1 1 figure_ap level 1 table_ap level 1
GFK-0448E
This appendix describes the Series 90-70 VME Integrator Racks available from GE Fanuc.
Two versions of VME Integrator racks are available. Catalog numbers for the VME
Integrator racks are as follows:
17-Slot, Rear Mount - IC697CHS782
17-Slot, Front Mount - IC697CHS783
Features
H Accepts 3rd Party VME modules which require 0.8 inch spacing.
H Accepts all Series 90t-70 PLC module types.
H Rear mount rack mounts in a 10 inch
(254 mm) deep enclosure.
H Front mount rack mounts in a standard 19 inch (483 mm) rack.
H Accepts plug-in AC/DC and DC GE
Fanuc power supplies, or can use external supply (Power Supply
Adaptor module required).
H Provision for two rack operation from single power supply.
H Provision for power supply for highcurrent configurations.
H Optional accessory kit available for adding J2 backplane.
H Optional fan assembly (for high-power
3rd Party modules and Series 90-70
CPU modules that require forced air cooling).
Functions
The available VME Integrator Racks for the Series 90-70 Programmable Logic
Controller can be used for all Series 90-70
CPU and I/O configurations (except redundancy applications), and 3rd party
VME modules. This rack has a 17-slot backplane and is designed to provide easy integration of 3rd party VME modules into a Series 90-70 PLC system. Integration of
3rd Party VME modules must be in accordance with guidelines described in this manual,
the User’s Guide to Integration
of 3rd Party VME Modules, GFK-0448B, or later.
Backplane connectors are spaced on 0.8
inch centers to accommodate 3rd party
VME modules. Series 90-70 modules each use two of these slots. Standard Series 90-70
racks have slots spaced on 1.6 inch centers for
Series 90-70 modules. VME modules that require 0.8 inch spacing for installation will not fit in standard Series 90-70 racks
(IC697CHS750/790/791).
F-1
F
a44958
Î
Î
01
2
1
-12V
8
4
0V
+5V +12V
1 2 3 4 5 6 7 8 9
Î
Î
Î
Î
Î
Î
F-2
Î
Î
Î
Î
Note
Figure F-1. VME Integrator Rack
Each rack configuration will accept one power supply in the leftmost module position, and either
1.
17 3rd Party VME modules
2.
9 Series 90-70 modules, or
3.
a combination of Series 90-70 and 3rd
Party VME modules.
Two racks can be interconnected to share a single power supply for applications having extended I/O requirements. A
Power Supply Extension Cable kit
(IC697CBL700) is available for such applications. There are also four power cube screw connections (+5V, +12V, –12V, 0V) on the backplane for use with a Series
90-70 power supply when used to supply power to an optional P2 backplane. These
connections are not intended for direct connection to a 3rd Party power supply.
The power supply capacity may limit the maximum number of modules in a rack. No more than three VME modules
can be used in a rack with Series 90-70 modules.
Each rack provides slot sensing for rack-type I/O modules designed for the
Series 90-70 PLC. No jumpers or DIP switches on the I/O modules are required for module addressing.
The flexibility of this rack to allow both 3rd party VME and Series 90-70 modules is accomplished through the use of jumpers on the backplane to configure slots. The
VME Integrator rack is factory configured to accept standard Series 90-70 modules.
Integration of 3rd party VME modules is done by moving these jumpers to different positions. The exact jumper configuration depends on the requirements of each 3rd
Party VME module.
Overall rack dimensions are:
height = 11.15 inches (283mm) width = 19 inches (483mm)
depth* = 7.25 inches (184mm).
*
Depth is 8.25 inches (209mm) with spacers in VME option kit installed.
Slots are 0.8 inch wide except the power supply slot which is 2.4 inches wide.
User’s Guide to Integration of 3rd Party VME Modules - December 1997
GFK-0448E
GFK-0448E
F
WITH OPTIONAL VME
J2 BACKPLANE KIT
1.00
(25.4)
9.14
7.25
(184)
(232)
CONNECTOR
FOR
POWER
SUPPLY
SPACER
(QTY.4)
SIDE VIEW
SERIES 90–70 MODULES
EXTEND 1.7 IN. (43MM)
BEYOND FRONT OF RACK,
VME MODULES MAY FIT FLUSH
WITH FRONT OF RACK.
a44989
* *
6.00
(152.4)
.45
(11)
*
.75
(19)
DIMENSIONS IN INCHES, MILLIMETERS ARE IN PARENTHESIS
19.00
(483)
18.11
(460)
17.04
(433)
*
* * * 6.00
(152.4)
6.75
(172)
GROUND
STUD
3.00
(76)
GROUND
STUD
.25 DIA.
(TYPICAL)
2.24
(57)
1.50
(38)
*
* *
.34 (8.64)
FRONT VIEW
ALLOW SUFFICIENT HORIZONTAL CLEARANCE FOR ACCESS TO GROUND STUDS AT EACH END OF
THE RACK.
IF THE EXTENSION CABLE IS USED, ALLOW APPROXIMATELY 6 INCH HORIZONTAL
CLEARANCE ON THE LEFT SIDE OF THE RACK FOR ACCESS TO THE CONNECTOR.
* * *
ALLOWANCE FOR COOLING
( IF REQUIRED FOR ADDITIONAL COOLING, RACK FAN
ASSEMBLY IC697ACC721 IS AVAILABLE
11.15
(283)
* * *
6.00
(152.4)
Figure F-2. VME Integrator Rack Dimensions for Rear (Panel) Mount Installation
WITH OPTIONAL VME
J2 BACKPLANE KIT
1.00
(25.4)
7.25
(184)
CONNECTOR
FOR
POWER
SUPPLY
SPACER
(QTY.4)
9.14
(232)
SIDE VIEW
SERIES 90-70 MODULES
EXTEND 1.7 IN. (43MM)
BEYOND FRONT OF RACK,
VME MODULES MAY FIT FLUSH
WITH FRONT OF RACK.
a45219
* *
6.00
(152.4)
.45
(11)
*
1.48
(38)
2.25
(57)
7.50
(191)
3.00
(76)
2.25
(57)
1.48
(38)
DIMENSIONS IN INCHES, MILLIMETERS ARE IN PARENTHESIS
GROUND
STUD
19.00
(483)
18.34
(466)
17.04
(433)
*
GROUND
STUD
.265 x .437
(TYPICAL)
.33 (8.38)
FRONT VIEW
*
* *
ALLOW SUFFICIENT HORIZONTAL CLEARANCE FOR ACCESS TO GROUND STUDS
AT EACH END OF THE RACK.
IF THE EXTENSION CABLE IS USED, ALLOW APPROXIMATELY 6 INCH HORIZONTAL
CLEARANCE ON THE LEFT SIDE OF THE RACK FOR ACCESS TO THE CONNECTOR.
* * * ALLOWANCE FOR COOLING IF REQUIRED FOR ADDITIONAL COOLING, RACK FAN
ASSEMBLY IC697ACC721 IS AVAILABLE
* * *
6.00
(152.4)
* *
11.15
(283)
* 6.00
(152.4)
Figure F-3. VME Integrator Rack Dimensions for Front (Rack) Mount Installation
Appendix F VME Integrator Racks F-3
F
Rack Mounting
Racks are available for either rear (panel) or front (rack) mounting. Rack dimensions and installation information for each type or rack is shown in Figures F-2 and F-3 on the previous page. The rack must be mounted in the orientation shown in the figures.
Sufficient space must be left around the rack as shown to allow air flow for module cooling. A Rack Fan Assembly is available for installations requiring forced air cooling.
The mounting requirements (either front or rear mount) must be determined according to the application and the proper rack ordered. Refer to the illustrations on the previous page for mounting dimensions of these racks. Mounting flanges are an integral part of rack side panels and are installed at the factory.
I/O Connections
The VME Integrator racks accommodate two module types.
First, they accommodate rack-type Series
90-70 high-density I/O modules, which use a detachable field wiring terminal board.
Each I/O module will accept up to forty
AWG #14 (2.1 mm
2
) wires. The wire bundle is routed out the bottom of the terminal board cavity where a cleat is provided for a tie wrap to secure the bundle to the terminal board housing.
Second, they accommodate VME modules which may have varying methods of connecting to field devices.
Configuring a VME Integrator Rack
A series of jumper positions are located on the backplane near each slot. These jumpers provide for flexibility in the types of modules to be installed, either VME modules in single slots (0.8 inch spacing between centers) or Series 90-70 modules, which require two slots (1.6 inch spacing between centers).
Table F-1 shows the relationship of the slot numbers to the jumper numbers.
Configurable functions and signals are:
H select rack ID for multiple rack systems (Series 90-70 feature)
H configure SYSFAIL signal to be enabled or disabled (per slot)
H LWORD signal in slot 1 configurable to be inactive
H configure IRQ1/ - IRQ4/ signals for
VME slots 12PL to 19PL
H configure Bus Grant signals for VME slots 12PL to 19PL
F-4
User’s Guide to Integration of 3rd Party VME Modules - December 1997
GFK-0448E
Î
Î
F
The following figure is an example of the location of these jumpers on the backplane. The jumpers shown are referenced in the text following the figure.
a44988
Î
Î
Î
ÎÎ
ÎÎ
ÎÎÎÎÎÎÎÎÎÎÎÎÎÎÎÎÎÎÎÎÎÎÎ
ÎÎÎÎÎÎÎÎÎÎÎÎÎÎÎÎÎÎÎÎÎÎÎ
ÎÎÎÎÎÎÎÎÎÎÎÎÎÎÎÎÎÎÎÎÎÎÎ
ÎÎÎÎÎÎÎÎÎÎÎÎÎÎÎÎÎÎÎÎÎÎÎ
ÎÎÎÎÎÎÎÎÎÎÎÎÎÎÎÎÎÎÎÎÎÎÎ Î
ÎÎÎÎÎÎÎÎÎÎÎÎÎÎÎÎÎÎÎÎÎÎÎ
ÎÎ ÎÎÎÎÎÎÎÎÎÎÎÎÎÎÎÎÎÎÎÎÎÎÎ
ÎÎÎÎÎÎÎÎÎÎÎÎÎÎÎÎÎÎÎÎÎÎÎ
ÎÎÎÎÎÎÎÎÎÎÎÎÎÎÎÎÎÎÎÎÎÎÎ
ÎÎ
0V
ÎÎ
ÎÎÎ ÎÎÎ Î ÎÎ Î Î Î ÎÎ ÎÎ
1
Î Î ÎÎ Î ÎÎÎ ÎÎÎ Î ÎÎ Î Î ÎÎ Î Î ÎÎ Î Î ÎÎ Î Î ÎÎ ÎÎ
ÎÎ ÎÎÎ Î Î ÎÎ
2
ÎÎÎÎÎÎÎÎÎÎÎÎÎÎÎÎÎÎÎÎÎÎÎ
ÎÎ ÎÎÎ Î Î ÎÎ Î Î ÎÎ Î Î ÎÎ
ÎÎÎÎÎÎÎÎÎÎÎÎÎÎÎÎÎÎÎÎÎÎÎ ÎÎÎÎÎÎÎÎÎÎÎÎÎÎÎÎÎÎÎÎÎÎÎ
Î
8
ÎÎÎ ÎÎÎ ÎÎ
Î ÎÎ Î Î ÎÎ Î Î ÎÎ Î ÎÎ Î Î ÎÎ Î Î ÎÎ Î Î
ÎÎ ÎÎÎ
Î ÎÎ Î Î ÎÎ Î Î ÎÎ Î ÎÎ ÎÎ Î ÎÎ Î ÎÎ ÎÎ ÎÎ Î
ÎÎÎÎÎÎÎÎÎÎÎÎÎÎÎÎÎÎÎÎÎÎÎ ÎÎÎÎÎÎÎÎÎÎÎÎÎÎÎÎÎÎÎÎÎÎÎ
ÎÎ ÎÎÎ ÎÎ
Î Î ÎÎ Î Î ÎÎ Î Î ÎÎ Î ÎÎ Î Î ÎÎ Î ÎÎ Î ÎÎ ÎÎ Î Î ÎÎ Î Î ÎÎ Î Î Î Î ÎÎ Î ÎÎ Î Î Î Î ÎÎ Î Î ÎÎ Î Î ÎÎ
JP43 JP38
ÎÎÎÎÎÎÎÎÎÎÎÎÎÎÎÎÎÎÎÎÎÎÎ ÎÎÎÎÎÎÎÎÎÎÎÎÎÎÎÎÎÎÎÎÎÎÎ
Î ÎÎ Î
4
ÎÎ
ÎÎ Î Î ÎÎ Î Î ÎÎ Î Î
ÎÎÎ
Î Î ÎÎ Î ÎÎ Î Î ÎÎ Î Î ÎÎ
ÎÎ
Î ÎÎ Î Î ÎÎ Î Î Î ÎÎ ÎÎ ÎÎ Î ÎÎ Î Î Î Î Î Î ÎÎ Î ÎÎ Î Î ÎÎ Î
ÎÎÎÎÎÎÎÎÎÎÎÎÎÎÎÎÎÎÎÎÎÎÎ ÎÎÎÎÎÎÎÎÎÎÎÎÎÎÎÎÎÎÎÎÎÎÎ
ÎÎ ÎÎ ÎÎÎ
ÎÎ
Î Î Î Î ÎÎ Î Î ÎÎ Î ÎÎ Î Î Î ÎÎ Î Î Î Î Î ÎÎ Î Î Î Î ÎÎ Î Î ÎÎ Î Î Î Î ÎÎ Î Î ÎÎ
Î ÎÎ Î
2
ÎÎ Î
ÎÎ
Î ÎÎ Î Î ÎÎ Î Î ÎÎ Î
ÎÎÎ
Î ÎÎ Î Î ÎÎ Î Î ÎÎ Î Î
ÎÎ
ÎÎ
Î Î Î ÎÎ Î Î ÎÎ Î Î ÎÎ Î ÎÎ Î Î ÎÎ Î Î ÎÎ Î Î ÎÎ Î Î
ÎÎÎÎÎÎÎÎÎÎÎÎÎÎÎÎÎÎÎÎÎÎÎ ÎÎÎÎÎÎÎÎÎÎÎÎÎÎÎÎÎÎÎÎÎÎÎ JP44
ÎÎÎÎÎÎÎÎÎÎÎÎÎÎÎÎÎÎÎÎÎÎÎ ÎÎÎÎÎÎÎÎÎÎÎÎÎÎÎÎÎÎÎÎÎÎÎ
ÎÎ ÎÎ ÎÎÎ
ÎÎ
ÎÎ Î ÎÎ Î
Î Î ÎÎ Î Î ÎÎ
ÎÎ Î
Î Î ÎÎ Î Î ÎÎ
Î Î ÎÎ ÎÎ Î
Î Î Î Î ÎÎ Î Î ÎÎ
ÎÎ Î
Î Î ÎÎ Î Î ÎÎ
ÎÎ
JP57
ÎÎÎ
ÎÎ
ÎÎ
ÎÎ
JP56
ÎÎÎÎÎÎÎÎÎÎÎÎÎÎÎÎÎÎÎÎÎÎÎ ÎÎÎÎÎÎÎÎÎÎÎÎÎÎÎÎÎÎÎÎÎÎÎ
Î ÎÎ Î
1
Î Î ÎÎ Î Î ÎÎ ÎÎ Î Î ÎÎ ÎÎ Î Î Î Î Î ÎÎ ÎÎ Î Î ÎÎ Î ÎÎ Î Î ÎÎ Î
ÎÎÎÎÎÎÎÎÎÎÎÎÎÎÎÎÎÎÎÎÎÎÎ ÎÎÎÎÎÎÎÎÎÎÎÎÎÎÎÎÎÎÎÎÎÎÎ
ÎÎ ÎÎÎ ÎÎ
Î ÎÎ Î Î ÎÎ Î Î ÎÎ Î Î Î ÎÎ Î Î ÎÎ Î Î ÎÎ Î Î Î Î ÎÎ Î Î Î Î ÎÎ Î Î ÎÎ ÎÎ Î Î ÎÎ Î Î ÎÎ Î Î
–12V
ÎÎÎÎÎÎÎÎÎÎÎÎÎÎÎÎÎÎÎÎÎÎÎ ÎÎÎÎÎÎÎÎÎÎÎÎÎÎÎÎÎÎÎÎÎÎÎ
ÎÎ
ÎÎ
Î Î ÎÎ Î Î ÎÎ Î Î ÎÎ
ÎÎÎ
ÎÎ Î Î ÎÎ Î Î ÎÎ Î Î
ÎÎ
SP1
Î ÎÎ Î Î ÎÎ Î Î ÎÎ ÎÎ Î Î ÎÎ ÎÎ Î Î Î ÎÎ Î Î
JP5
ÎÎÎÎÎÎÎÎÎÎÎÎÎÎÎÎÎÎÎÎÎÎÎ ÎÎÎÎÎÎÎÎÎÎÎÎÎÎÎÎÎÎÎÎÎÎÎ
ÎÎ ÎÎÎ ÎÎ
ÎÎ Î Î ÎÎ Î Î ÎÎ Î Î ÎÎ Î Î ÎÎ Î Î ÎÎ Î Î ÎÎ ÎÎ Î Î Î ÎÎ Î ÎÎ Î Î ÎÎ Î Î ÎÎ ÎÎ Î Î ÎÎ Î Î ÎÎ Î
JP40 JP42
ÎÎÎÎÎÎÎÎÎÎÎÎÎÎÎÎÎÎÎÎÎÎÎ ÎÎÎÎÎÎÎÎÎÎÎÎÎÎÎÎÎÎÎÎÎÎÎ
ÎÎ ÎÎÎ ÎÎ
ÎÎ Î Î ÎÎ Î Î ÎÎ Î Î
Î ÎÎ
Î Î ÎÎ ÎÎ Î ÎÎ Î Î ÎÎ Î Î ÎÎ Î
Î
ÎÎ ÎÎ ÎÎ Î ÎÎ Î ÎÎ Î Î ÎÎ Î Î ÎÎ ÎÎÎ Î
ÎÎÎÎÎÎÎÎÎÎÎÎÎÎÎÎÎÎÎÎÎÎÎ ÎÎÎÎÎÎÎÎÎÎÎÎÎÎÎÎÎÎÎÎÎÎÎ JP39 JP41
Î
ÎÎ
Î Î ÎÎ Î Î ÎÎ Î Î ÎÎ
ÎÎÎ
ÎÎ Î Î ÎÎ Î Î ÎÎ Î Î
JP8
Î ÎÎ ÎÎ
ÎÎ
Î Î ÎÎ Î Î ÎÎ Î Î ÎÎ
Î
ÎÎ
ÎÎÎ ÎÎÎ ÎÎ
ÎÎ
1A
ÎÎ ÎÎ ÎÎ Î Î Î ÎÎ Î ÎÎ
1B
ÎÎ ÎÎ
ÎÎ
Î Î ÎÎ ÎÎ
Î
1PL 12PL 2PL
ÎÎÎÎÎÎÎÎÎÎÎÎÎÎÎÎÎÎÎÎÎÎÎ ÎÎÎÎÎÎÎÎÎÎÎÎÎÎÎÎÎÎÎÎÎÎÎ
ÎÎ ÎÎÎ ÎÎ
ÎÎ ÎÎ ÎÎ ÎÎ
ÎÎÎÎÎÎÎÎÎÎÎÎÎÎÎÎÎÎÎÎÎÎÎ ÎÎÎÎÎÎÎÎÎÎÎÎÎÎÎÎÎÎÎÎÎÎÎ
ÎÎÎÎÎÎÎÎÎÎÎÎÎÎÎÎÎÎÎÎÎÎÎ ÎÎÎÎÎÎÎÎÎÎÎÎÎÎÎÎÎÎÎÎÎÎÎ
ÎÎÎÎÎÎÎÎÎÎÎÎÎÎÎÎÎÎÎÎÎÎÎ
ÎÎÎÎÎÎÎÎÎÎÎÎÎÎÎÎÎÎÎÎÎÎÎ
Figure F-4. Example of Jumper Locations on Backplane
F-5 GFK-0448E Appendix F VME Integrator Racks
F
Default Jumper Configurations
The following table describes the jumper configuration for each of the configurable VME rack signals.
The default jumper configuration for each of these signals is shown following the table. Table F-1 on the next page lists all of the jumper numbers and their associated slots.
Signal Name or Function See
Rack ID Select
-
Applicable Jumpers
JP1 to JP4
SYSFAIL/
LWORD/
IRQ1/ to IRQ4/ (Interrupt lines)
A
See Table 1 for jumper numbers.
B
JP44
C
See Table 1 for jumper numbers
Bus Grant 0 - 3/ and IACK/
D
See Table 1 for jumper numbers
Description
Selects rack ID number 0 -7, see text for settings
(default rack ID = 0)
Enabled or disabled for each slot (default = enabled).
Slot 1 only, set to active or inactive (default=inactive ).
Select for Series 90-70 module slots 1PL to 9PL.
If VME module in slot uses these signals, install jumpers (default = no jumpers).
If VME modules are installed that pass daisy chain signals, jumpers must be removed in VME slots 12PL to 19P (default = jumpers).
A configuration selection consists of a jumper plug which is placed over two adjacent pins. In some cases (such as LWORD jumper), this pin is placed over 2 of 3 in-line pins; other selections require the jumper plugs to be present or not be present. Factory default jumper positions are shown below with shaded areas representing a jumper that is present. The configuration
example shown below is for slot 12PL. The physical arrangement for the other connectors is the same, only the jumper numbers (JPxx) are different.
Sysfail/
1
2
3
(See Table 1 for jumper numbers for all slots.) o
ÉÉ o
enabled
ÉÉ ÉÉ o
ÉÉ
disabled
A
LWORD/ (JP44)
ÉÉ ÉÉ o o o
ÉÉ ÉÉ
B
inactive active
IRQ1/ to IRQ4/
(See Table 1 for jumper numbers for slots
1PL to 9PL.)
IRQ4/
JP5
o o
IRQ3/
IRQ2/ o o o o
A jumper plug, when installed, allows IRQ1/ -
IRQ4/ to be active. If a VME module in a slot uses these signals install jumpers; otherwise remove the jumpers.
(default is no jumpers).
IRQ1/ o o
JP8
C
* shaded boxes represent default positions
Bus Grant 0-3
(See Table 1 for jumper numbers
and IACK
for slots 12PL to 19PL.)
NOTE
BG jumpers are to the right of the
12PL connector;
IACK jumper is to the left of the
12PL connector.
D
IACK/ o
1
JP57
o
2
ÉÉ
ÉÉ o 1
BG0/
ÉÉ
ÉÉ o
2
JP60
ÉÉ ÉÉ o
1
BG1/
ÉÉ ÉÉ ÉÉ o
2
JP59
ÉÉ o
1
BG2/
ÉÉ ÉÉ o
2
ÉÉ
ÉÉ
JP58
o
1
BG3/
ÉÉ ÉÉ o
2
ÉÉ ÉÉ
JP62
o
1
ÉÉ ÉÉ o
2
ÉÉ ÉÉ
JP61
If VME modules are installed in a slot and the Bus
Grant and IACK signals must be passed - remove these jumpers. If signals are not needed, leave jumpers in place.
(This jumper is for
Sysfail which is described above.)
ÉÉ
F-6
User’s Guide to Integration of 3rd Party VME Modules - December 1997
GFK-0448E
GFK-0448E
F
The following table is a list of the slots, and jumpers associated with each slot.
Multiple jumpers listed in a column under a signal are shown in the same numerical order as they appear on the backplane (that is, left to right or top to bottom).
Table F-1. VME Integrator Rack Jumper Location and Function
Slot
Number
1VME-12PL (1B)
2VME-13PL (2B)
3VME-14PL (3B)
4VME-15PL (4B)
5VME-16PL (5B)
6VME-17PL (6B)
7VME-18PL (7B)
8VME-19PL (8B)
1GEF-1PL (1A)
2GEF-2PL (2A)
3GEF-3PL (3A)
4GEF-4PL (4A)
5GEF-5PL (5A)
6GEF-6PL (6A)
7GEF-7PL (7A)
8GEF-8PL (8A)
9GEF-9PL (9A)
Bus Grant 0
→
3
Jumpers
JP60, 59, 58, 62
JP53, 54, 55, 51
JP66, 65, 64, 68
JP72, 71, 70, 74
JP78, 77, 76, 80
JP84, 83, 82, 86
JP90, 89, 88, 92
JP96, 95, 94, 98
-
-
-
-
-
-
-
-
-
There are three basic configurations of modules that can be accommodated by the
VME Integrator rack:
1.
Standard (Series 90-70 modules only)
2.
Series 90-70 controller, and Series
90-70 modules and/or 3rd party VME modules, or
3.
3rd party VME modules only. Refer to Table F-1 for jumper numbers and their functions.
(1) Standard Configuration
This configuration consists of a Series 90-70
CPU or Bus Receiver in slot 1PL and Series
90-70 modules in the remaining applicable slots (2PL to 9PL).
IACK
Jumper
-
-
-
-
-
-
JP93
-
-
-
JP57
JP56
JP63
JP69
JP75
JP81
JP87
Note
Do not install Series 90-70 modules in VME slots 12PL to 19PL.
Sysfail
Jumper
JP97
JP43
JP38
JP99
JP45
JP46
JP47
JP61
JP52
JP67
JP73
JP79
JP85
JP91
JP48
JP49
JP50
IRQ1/ to IRQ4/
Jumper
-
-
-
-
-
-
-
-
JP39, 40, 41, 42
JP5, 6, 7, 8
JP9, 10, 11, 12
JP13, 14, 15, 16
JP17, 18, 19, 20
JP21, 22, 23, 24
JP25, 26, 27, 28
JP29, 30, 31, 32
JP33, 34, 35, 36
Standard Configuration Jumper Positions
Refer to Figure F-4 which is an example of jumper positions and numbers per slot.
H JP1 through JP4 (rack ID jumpers) jumpered to the proper position for
Rack ID, where applicable.
H JP43 remains in its default position
(as shipped from factory). This allows the SYSFAIL signal to be activated by the Series 90-70 CPU.
H JP44 remains in its default position.
This jumpers the LWORD signal in slot 1 to be inactive allowing only
16-bit wide data transfers.
H All other jumpers remain in their factory set default positions.
(2) Series 90-70/VME Configuration
This configuration consists of a Series 90-70
CPU or Bus Receiver module in slot 1PL
and a combination of Series 90-70 modules and 3rd party VME modules in the remaining slots. Series 90-70 modules can
Appendix F VME Integrator Racks F-7
F
F-8
be placed in slots 2PL to 9PL only. 3rd party
VME modules can use the VME slots 12PL to 19PL and slots 2PL to 9PL. Note that all slots have a jumper that allows you to disable the SYSFAIL/ signal to that slot by removing the appropriate jumper.
Note
Integration of 3rd Party VME modules must be in accordance with guidelines described in this manual
(User’s Guide to Integration of 3rd Party
VME Modules, GFK-0448B, or later).
Series 90-70/VME Jumper Positions
H JP 1 through JP4 (rack ID jumpers) jumpered to the proper position for
Rack ID.
H JP43 remains in its default position
(as shipped from factory). This allows the SYSFAIL signal to be activated by the Series 90-70 CPU
(SYSFAIL required by Series 90-70
I/O modules).
H JP44 remains in its default position.
This jumpers the LWORD signal in slot 1 to inactive (for GE Fanuc modules) allowing only 16-bit wide data transfers.
H VME modules can be installed in either the Series 90-70 module slots
(2PL to 9PL) or in the VME slots
(12PL to 19PL).
H If VME modules are installed in the
Series 90-70 module slots (2PL to
9PL) and they use the IRQ1/ - IRQ4/ signals, then you must install the four jumpers in positions that are located to the immediate left of the Series
90-70 slots in use.
H If the VME modules are installed in
VME slots (12PL to 19PL), and the board must pass the Bus Grant and
IACK signals, you must remove five jumpers for each slot being used.
Leave these jumpers in if the board does not need to pass the Bus Grant and IACK
signals on a daisy chain. These jumpers are the top four to the immediate right of the slot being used and the lower (of two jumpers) to the immediate left of the slot being used.
(3) VME Configuration
This configuration consists of a 3rd party
Controller in slot 1PL and 3rd party VME modules in the remaining slots (2PL to 9PL and 12PL to 19PL). Note that each slot has a jumper that allows the SYSFAIL/ signal to be disabled to that slot since all VME modules may not require access to that signal.
VME Jumper Positions
H To configure slot 1 for a 3rd party controller, five jumpers must be removed. There are four jumpers behind the power supply (JP1 to JP4) that must be moved to positions JP39 to JP42. Jumper JP44 must be moved from its default position to the right.
H If VME modules are installed in the
Series 90-70 module slots (2PL to
9PL) and they use the IRQ1/ - IRQ4/ signals, then you must install four jumpers in the positions that are located to the immediate left of the
Series 90-70 slots in use.
H If the VME modules are installed in
VME slots (12PL to 19PL), and the board must pass the Bus Grant and
IACK signals, you must remove five jumpers for each slot being used.
Leave these jumpers in if the board does not need to pass the Bus Grant and IACK
signals on a daisy chain. These jumpers are the top four to the immediate right of the slot being used and the lower (of two jumpers) to the immediate left of the slot being used.
User’s Guide to Integration of 3rd Party VME Modules - December 1997
GFK-0448E
GFK-0448E
F
Power Supply Extension Cable
For many applications, one power supply is sufficient for the power requirements of two racks. This two-rack operation from a single power supply can be implemented if only 5 volt power of 5.2 amperes or less is required in the second rack.
A 3-foot Power Supply Extension cable available from GE Fanuc (see the Ordering
Information at end of this appendix) provides the necessary interconnection. In addition to +5 volt power, the extension cable includes power sequencing signals necessary for proper system operation.
The Power Supply Extension cable attaches to a 9-pin D-type connector located on the backplane. Access to the connector is through a hole in the left side of the rack as shown in the outline drawing (Figure F-1).
Adequate clearance (approximately 6 inches) must be provided on the left side of the rack for access to the connector.
This connector can also be used to provide power to a user installed 3rd party J2 backplane. An option kit (IC697ACC715) is available for installing a J2 backplane.
Maximum power that can be supplied to the J2 backplane is 5 VDC at 5.2 amps.
The Power Supply Extension cable must be secured before power is applied. It must not be disconnected during system operation.
Slot Addressing
The Series 90-70 PLC system allows user configuration of I/O point references for modules in a rack without the need for board address DIP switches or jumpers. The address structure is described below.
Configuration is done with the configurator function of the Logicmaster t 90-70
Programming Software package. For more information on configuration, see GFK-0263, the Logicmaster 90 Programming Software
User’s Manual.
Note
In order to configure slots 12PL to
19PL, you must have version 4.xx, or later of Logicmaster 90 Programming
Software.
Appendix F VME Integrator Racks
Rack Number
Multiple racks in a system must be assigned a rack number from 0 to 7; the
CPU rack is always Rack 0. The PLC determines the number of each rack in the system from the configuration of four binary-encoded jumpers on the rack’s backplane. These jumpers are located on the backplane directly behind the power supply, which must be removed to gain access to the jumpers.
To set the rack number, move the jumpers corresponding to the 1, 2, 4, and 8 bits to either the 0 or 1 position. The sum of the digits in the 1 position equals the desired rack number. For example, as shown below, rack number 2 would have the 2 bit jumper in the 1 position and the 1, 4 and 8 bit jumpers in the 0 position.
0 1
8
4
RACK NUMBER =2
2
1
Figure F-5. Rack Number Jumpers
a42823
Shield Ground
The bottom rail of the rack is used for module shield grounding. Some Series
90-70 I/O modules have a ground clip that contacts the conductive bottom rail when the module is fully inserted. Shield connections in the user connectors are routed to this ground clip through conductors on the module.
F-9
F
Safety Ground
The ground lug on either side of the rack must be connected to earth ground with not less than an AWG #12 (3.3 mm
2
) wire.
The ground lugs are #8-32.
Warning
If the ground lug is not connected to earth ground, the rack is not grounded. The rack must be grounded to minimize electrical shock hazard which may result in severe personal injury.
Module Retention
Series 90-70 I/O modules have molded latches that automatically snap onto the upper and lower rails of the rack when the module is fully inserted (3rd party VME
modules do not have these latches
).
Optionally, M2.5x8 screws may be used to secure the modules to the rack for high vibration applications.
To remove a Series 90-70 module, first remove the field half of the terminal board
(if it is an I/O module), then grasp the top and bottom of the module to depress the latch releases while pulling the module out.
For more detailed information on removing
I/O terminal boards, refer to the Series 90-70
Programmable Controller Installation Manual or individual data sheets for I/O modules.
Warning
System Noise Immunity
Three easy steps must be taken to properly ground the Series 90-70 PLC system to reduce the possibility of errors due to electrical noise.
1.
Make sure that the power supply mounting screws, especially the bottom two, are properly secured.
2.
The GND terminal on the power supply must be connected to the GND terminal on either side of the rack using AWG
# 12 wire. Use of a ring terminal and star washer is recommended.
3.
The GND terminal on the rack must be connected to a good earth ground.
Do not remove (or insert) modules when either the Series 90-70 PLC power supply or any externally connected power sources are on.
Hazardous voltages may exist.
Personal injury, damage to the module or unpredictable operation of the device or process being controlled may result.
If M2.5x8 screws have been used to secure modules to the rack, remove the screws before removing the modules.
A blank faceplate is available to cover two consecutive unused slots in the rack. See the Ordering Information on page F-12.
F-10
User’s Guide to Integration of 3rd Party VME Modules - December 1997
GFK-0448E
Rack Fan Assembly
An optional Rack Fan Assembly is available in two versions (IC697ACC721 for 120 VAC power source and IC697ACC724 for 240
VAC power source) for installation on the bottom of the rack for additional cooling if forced air cooling is required when a number of high-power VME modules are installed in the rack and heat build-up could be a problem.
The fan assembly consists of three fans wired in parallel. The fans have a low noise level and are assembled using ball bearings for extended life.
The three fans on the fan assembly are wired in parallel. The fan on the left
(looking at front of rack) has a three foot cable to be wired to the AC power source.
The other two fans are connected through a cable/connector assembly to this fan. It is recommended that the fans be wired to the same source of power as the Series
90-70 PLC so that the fans are energized regardless of whether or not the PLC is energized. This will ensure that the fans are running when the PLC is active.
The following illustration shows the position of the fan assembly when it is mounted on a rack. Note that it is mounted on the bottom of the rack with air flow from the bottom towards the top of the rack. For detailed specifications and installation instructions, refer to the data sheet for the
Rack Fan Assembly, GFK-0637D, or later version.
a45460
F
1 2 3 4 5 6 7 8
9
Figure F-6. Fan Assembly Mounted on Rack
GFK-0448E Appendix F VME Integrator Racks F-11
F
Table F-2. VME Integrator Rack Specifications
Number of Slots:
Dimensions -
17-Slot Rack:
17 on 0.8 inch centers plus power supply slot
Maximum 5 Volt Current (from standard
Series 90-70 power supplies):
20 amps (100 watt 120/240 VAC or 125 VDC power supply)
11 amps (55 watt 120/240 VAC or 125 VDC power supply)
18 amps (90 watt 24 VDC power supply)
18 amps (90 watt 48 VDC power supply)
Maximum current from user supplied (not
3.3 amps (+5 VDC)
Series 90-70) Power Supply, slot J1 only:
1.1 amps (
Ç
12 VDC)
I/O References:
Rack Identification:
VME/Series 90-70 slot configuration:
User configurable with Logicmaster 90-70 configuration software.
Four jumpers (JP1 - JP4) behind rack power supply.
Via jumpers on backplane (refer to text).
Height
11.15
I
283mm
Width
19.00
I
483mm
Depth
7.25
I
184mm
Note
All Series 90-70 modules extend 1.7
I (43mm) beyond the front of the rack; 3rd party VME modules may fit flush with or extend from front of rack.
VME
System designed to support VME standard C.1.
Refer to GFK-0867B, or later for product standards and general specifications.
Table F-3. VME Integrator Rack Ordering Information
Description
VME Integrator Rack - 17 slots, rear mount
VME Integrator Rack - 17 slots, front mount
Power Supply Cable Kit (includes cable and faceplate for vacant power supply slot)
Option Kit for J2 Backplane Installation (backplane not included)
Blank Slot Filler (Qty. 6)
Rack Fan Assembly (optional), 120 VAC
Rack Fan Assembly (optional), 240 VAC
Catalog Number
IC697CHS782
IC697CHS783
IC697CBL700
IC697ACC715
IC697ACC720
IC697ACC721
IC697ACC724
F-12
User’s Guide to Integration of 3rd Party VME Modules - December 1997
GFK-0448E
Appendix
G
Application Bulletins
G
section level 1 1 figure_ap level 1 table_ap level 1
This appendix provides examples of applications using 3rd party VME modules in the
Series 90-70 PLC system.
GFK-0448E G-1
Number: H-03-91-6
Application
Bulletin
To: 1, 2A, 3, 4, 8, 10, 11, 12
Application Note for Xycom XVME-420 Intelligent
Peripheral Controller Module
Overview
The following application note describes a successful integration of a third party VME module into the
Series 90-70 PLC system. Note that the Xycom XVME-420 is NOT a fully qualified third party module and has not gone through the Vendor Qualification Program. The application was not intended to represent a real situation, and was constructed only to demonstrate that the Xycom XVME-420 module could be successfully integrated, and made to work as described in its own manual.
The Xycom XVME-420 Intelligent Peripheral Controller module is ideally suited for cost sensitive applications which need more than 1 or 2 serial interfaces for devices such as terminals, bar code readers, and weigh scales. There are four RS-232 (or four TTL compatible) ports per module, as well as an IEEE-P959 expansion port. Internal buffering is available, so it is not necessary for the module to interrupt the CPU, or for the CPU to handle each serial character as it arrives at the port.
Although the module has many different programmable characteristics, the application described in this document is basic and uses two of the four ports. In this application, the module is NOT used as an interrupter, and is used only as a slave, not as a master on the VME bus. Once this application has been successfully duplicated, more complex applications can be attempted.
The XVME manual used for this demonstration was Xycom part number 74420 and was dated 1984.
IMPORTANT NOTE
The standard XVME-420 module needs to be modified slightly to work with the Series
90-70 PLC. The standard module will not correctly recover from the SYSFAIL signal, which is asserted by the PLC during I/O configuration at power up. Xycom is aware of the modification which is required. When ordering this module, be sure to mention the modification.
2
Application Note for Xycom XVME-420 Intelligent
Peripheral Controller Module
Application Description
A serial RS-232 Bar Code Reader was connected to port 1 to input data to the PLC. The PLC stores the bar code in registers, verifies it for the correct number of characters and then causes the bar code to be transmitted through port 2 of the module with a BAD BAR CODE error message if appropriate. A Dumb
Terminal was connected to port 2 of the module to receive the echoed bar code and any error message due to mis-verification.
a44849
BAR CODE
READER
BAR CODE
WAND
ÎÎ
Î
1
2
Î
3
4
UNIVERSAL
SIMULATOR
CASE
Î
SERIES 90-70
DEMONSTRATOR
CASE
ÎÎ
Î ÎÎ
ÎÎÎÎÎÎÎÎÎÎÎÎ Î
Application Note for Xycom XVME-420 Intelligent
Peripheral Controller Module
System Configuration
The system configuration for this demonstration consists of the standard Series 90-70 Demo Case with a
100 watt power supply (the module does require +/– 12 VDC). All modules were left in the Series 90-70
Demo rack (with the exception of the power supply being changed to a 100 watt) and the XVME-420 was put in slot 9 which was previously empty. If a bar code reader is not available, it could be exchanged for a dumb terminal or a PC running terminal emulation software on which a bar code could be manually entered (typed). The XVME-420 defaults to look for a carriage return as the record terminator character, although it can be changed. The Universal Simulator Case display unit was used as the dumb terminal for Port 2. The XVME-420 ports default to 9600 baud, 8 bits/character, no parity, 1 stop bit, full duplex.
The only thing that needs to be reconfigured at the universal simulator display unit is the baud rate from
19.2K to 9600 baud. For the demonstration, cables to and from the XVME-420 ports require only transmit, receive and ground to be wired.
The module must be assigned a starting address in the VME address space. You must use address modifier 2DH, and the address must be in the short address space. Although the manual states that AM code 29H can also be used, this will result in attempts by the module to access external global memory instead of its own on-board memory. The module uses 1K byte in the short address space, and the start address can be assigned to any one of 16 specific 1K byte boundaries ranging from 0000H to 3C00H. Note that the short address space that would be used by a Series 90-70 I/O module, for slot 9 of the Series 90-70
CPU rack starts at 4800H, which is outside of the range the XVME-420 can respond to.
To accommodate the XVME-420 in slot 9 for this demonstration, address 2800H was used, which is the start of the address space that would be used by a Series 90-70 I/O module, for slot 5. This is possible because the address modifier code used to get to the VME-420 is 2DH and NOT 29H. The discrete I/O module in slot 5 of the demo cases does not respond to AM code 2DH so there is no conflict between the two modules. Base address 2800H was set with J4 and J7 IN, and with J5 and J8 OUT. In general, any previously unused short VME address space can be used by a 3rd party module.
The bus request jumpers were set to J1=A, J2=B, J6=A. These should not have any effect since the board will not be used as a master.
Jumpers J10-J13 were all set to the A position, and J15-J16 were set to the B position. This is NOT as described in the manual, but it was the way the product was shipped to us, and Xycom confirmed that it was correct. The explanation for the difference is that these jumpers may be set differently depending on the types of memory devices used on the module.
The application was done with J3 IN, but this may work better with J3 OUT. J3=OUT restricts the module to responding to address modifier 2DH instead of 2DH and 29H.
Programming
All of the serial operating parameters such as baud rate, parity, stop bits, and others are programmable on a port by port basis. As noted above, the power-up default parameters were used for this demonstration
(the entire power up default list is on page 4-25 of the Xycom manual).
There are 2 basic modes of operation - character read/write, and record read/write. Character read/write basically turns the board into a four port USART, and requires that the Series 90-70 CPU handle each character individually. This would have severely limited the baud rate which could be handled without missing characters coming into the port, and would have required the construction of a PLC based buffer handler for the data.
The record read/write mode was used, since this takes advantage of the internal buffers on the module.
This application closely followed the example in the Xycom manual on page 3-12 to 3-14 (reading a record under polled operation).
With reference to this example, the host base address is 0, the base address of the I/O interface block is
2800H, the command block is at 2A00H, the data buffer is at 2A14H, and the command is set to read a maximum of 48 bytes.
As noted above, with the default board parameters, the end of record for incoming data is defined as a carriage return. If more than 48 characters arrive before a carriage return arrives, then only the first 48
3
4
Application Note for Xycom XVME-420 Intelligent
Peripheral Controller Module
characters will be available in the buffer. There are several other ways to configure the XVME-420 to terminate a record including ending the record if a specific number of characters has arrived.
The following describes what is necessary to receive a record on port 1 of the XVME-420. Since the default port and module parameters were used, the remaining tasks for the Series 90-70 CPU are to:
1.
Write the command block described below to address 2A00H. There is nothing magic about address
2A00H except that it is in the module’s dual ported address space, and it is not used for anything else.
The command block basically tells the module/port what to do. But it doesn’t do it until it gets a go command (see item 3). For the Series 90-70, you MUST use an AM code of 2DH at address 2A0DH in the command block or the module might (depending on J3 jumper setting) use it’s inherent mastership capability to attempt an access of the external (non-existent) global memory and cause erroneous operation of the CPU.
2.
Write the command block pointer described below to address 2892H. The command block pointer for each port is at its own fixed location in memory compared to the base of 2800H, and tells the module where to find the command block (item 1 above). Remember you MUST use an AM code of 2DH at address 2893H or the CPU might crash as described above in item 1.
3.
Write 01H to the I/O channel 1 request register at 2882H. This tells the module to look at 2892H to find out where it’s command is, then execute the command.
4.
When the command block is written in step 1, addresses 2A06H and 2A02H are set to FF. These are the response word and response flag respectively. When the CARRIAGE RETURN is received on the port, indicating the end of record, the FF is set to a 0 by the module. The CPU must poll 2A06H to see if the record is complete. If so, then go to step 5.
If the command block contains an invalid command, the address 2A02H will contain a non-0 error code.
5.
After the above steps are completed, the data block can be read at address 2A14H by the 90-70 CPU.
The command block which we used for the read record function is:
Address
2A00H
2A02H
2A04H
2406H
2A08H
2A0AH
2A0CH
2A0EH
2A10H
2A12H
Even
00
FF
00
FF
00
00
00
00
2A
00
Odd
05 (06 for a write record)
FF
00
FF
00
00
2D † DON’T USE 29H
00
14
00
The command block pointer is:
2892H
2894H
2896H
00
00
2A
2D † DON’T USE 29H
00
00
Writing a record out of port 2 is almost identical to the above description, except you first have to write the data you want to transmit to the module’s dual ported address space (unless it is already there, as it is with the bar code). Change the command to 06H instead of 05H and write the command block pointer for port 2 instead of port 1 (starts at address 2898H instead of 2892H. Also to execute the command, write
01H to the I/O channel 2 request register at 2883H instead of 2882H.
A commented ladder program is included on the following pages.
Mike Smith
(804) 978-5056
Dick Matthews
(804) 978-5704
Application Note for Xycom XVME-420 Intelligent
Peripheral Controller Module
5
6
Application Note for Xycom XVME-420 Intelligent
Peripheral Controller Module
Application Note for Xycom XVME-420 Intelligent
Peripheral Controller Module
7
8
Application Note for Xycom XVME-420 Intelligent
Peripheral Controller Module
Application Note for Xycom XVME-420 Intelligent
Peripheral Controller Module
9
10
Application Note for Xycom XVME-420 Intelligent
Peripheral Controller Module
Application Note for Xycom XVME-420 Intelligent
Peripheral Controller Module
11
12
Application Note for Xycom XVME-420 Intelligent
Peripheral Controller Module
Application Note for Xycom XVME-420 Intelligent
Peripheral Controller Module
13
14
Application Note for Xycom XVME-420 Intelligent
Peripheral Controller Module
Application Note for Xycom XVME-420 Intelligent
Peripheral Controller Module
15
16
Application Note for Xycom XVME-420 Intelligent
Peripheral Controller Module
Application Note for Xycom XVME-420 Intelligent
Peripheral Controller Module
17
18
Application Note for Xycom XVME-420 Intelligent
Peripheral Controller Module
Application Note for Xycom XVME-420 Intelligent
Peripheral Controller Module
19
20
Application Note for Xycom XVME-420 Intelligent
Peripheral Controller Module
Application Note for Xycom XVME-420 Intelligent
Peripheral Controller Module
21
22
Application Note for Xycom XVME-420 Intelligent
Peripheral Controller Module
Application Note for Xycom XVME-420 Intelligent
Peripheral Controller Module
23
24
Application Note for Xycom XVME-420 Intelligent
Peripheral Controller Module
Application Note for Xycom XVME-420 Intelligent
Peripheral Controller Module
25
26
Application Note for Xycom XVME-420 Intelligent
Peripheral Controller Module
Application Note for Xycom XVME-420 Intelligent
Peripheral Controller Module
27
28
Application Note for Xycom XVME-420 Intelligent
Peripheral Controller Module
Application Note for Xycom XVME-420 Intelligent
Peripheral Controller Module
29
30
Application Note for Xycom XVME-420 Intelligent
Peripheral Controller Module
Application Note for Xycom XVME-420 Intelligent
Peripheral Controller Module
31
Application
Bulletin
To: 1, 2A, 3, 4, 8, 10, 11, 12 Number: H-10-91-34
High Speed Inter-Rack Communications Using Reflective Memory
SUMMARY
There has been considerable interest on the part of traditional VME users to apply the Series 90 t-70 in their applications. Many users require a configuration which allows a Series 90-70 system to be tied to a separate VME system via a high speed inter-rack link. In addition, many Series 90-70 users need a very high speed communications link among multidropped Series 90-70 CPUs.
The VMIVME-5550, a product from VME Microsystems International, was investigated as a possible answer to these needs. A cursory investigation revealed that the VMIVME-5550 is essentially compatible with the Series 90-70 at the VME interface level, and would be useful in some applications. Some restrictions were identified, and are noted on the next page.
No attempt was made to simulate any specific real application beyond the testing for basic Series 90-70 compatibility, and the actual transmission of data between the Series 90-70 systems.
OVERVIEW
The VMIVME-5550 is a reflective memory board. Its primary use is to connect multiple VME and/or Series
90-70 racks together in a multidrop parallel communications link. Each rack must have a master, which can read and write memory on the 5550 board. In a Series 90-70 system, the Series 90-70 CPU is the master. In a more general case, the master is typically a CPU based on a Motorola 680X0 chip.
The inter-rack link can be up to 1000 feet long, with up to 16 nodes on the bus. The bus can run at 20
Mbytes per second over short distances between compatible VME systems. In the Series 90-70 the transfer rate is limited to 10 Mbytes per second due to absence of Lword transfers. Long cables also restrict the maximum data rate.
Any data written by a master to one of the cards is transmitted immediately to all other nodes on the bus to the same relative address in the other cards.
The 5550 might be useful in applications which require
D A high speed communication link between Series 90-70 racks.
D A high speed communication link between Series 90-70 racks and standard VME racks.
D Data sharing between separate systems.
D A Geniust tie-in to a traditional VME based computer. This would be done using a standard Series
90-70 and Genius Bus Controller, with a CPU program providing the data transfer between the CPU
Genius I/O tables and the reflective memory board.
The board is a single wide 6U board, which contains both J1 and J2 connectors. The board is available with different amounts of memory. As tested, the modules contained 256K of dual ported memory, and a
512 byte FIFO. This was the least expensive configuration. Per VMIC’s price list of February 1991, these modules would cost $2195 each in small quantities. This configuration appears to be more than adequate for use in most Series 90-70 related systems.
tSeries 90 and Genius are trademarks of GE Fanuc Automation North America, Inc.
2
High Speed Inter-Rack Communications Using Reflective Memory
RESTRICTIONS
Application restrictions which were noted are as follows:
D The board needs 7A at 5V to operate. In many instances, the 100W Series 90-70 power supply would be required to support a configuration which includes this board. A detailed power analysis should be done before deciding on the 55W supply.
D A P2 backplane would be strongly recommended due to the power consumption of the board. The board was run successfully using only a J1 backplane, however this is NOT recommended for a real installation. A P2 kit is available from GE Fanuc as part number IC697ACC715. This kit contains hardware necessary to mount a P2 backplane, which must be purchased from another source. The
P2 backplane would only need to be of sufficient length to support this board, unless additional third party modules in the system also require P2.
D Due to the power consumption noted above, forced air cooling is strongly recommended for an industrial environment. The GE Fanuc Series 90-70 Rack Fan Assembly IC697ACC721 or
IC697ACC724 could be used. In a lab environment, forced air cooling may not be required. If in doubt, temperature measurements should be made, and compared with VMIC’s specifications.
D The ribbon cables which are used as the link transmission media may not be suitable for lengthy cable runs in an industrial environment. VMIC should be consulted if this is a problem.
D Many of the components are on sockets, including a crystal oscillator. It is possible that these components could come loose in a high vibration environment. This board is not recommended for a high vibration environment. Also, be sure to check that all components are seated before plugging in the boards.
D The board includes the ability to interrupt its local CPU when data is received from one of the other racks. This capability must be disabled with the present versions of the Series 90-70. Future versions of the Series 90-70 may allow interrupts of this type to be used. The board is useful even without this function.
This function would still be usable in a standard VME rack with a non Series 90-70 master.
D Discipline is required by each of the masters to ensure that they do not write to the same memory areas as the other masters (at least not at the same time). One approach is to allow all the masters to read the entire memory, but restrict (in local CPU software) write access for each master to a different area of the memory.
D If modification of a common data base by multiple masters is required, a mechanism must be set up in master firmware to ensure that modification of a data byte is not attempted simultaneously by more than one master.
D Extensive compatibility testing, quality testing, and so forth, was not done on this board by GE Fanuc.
Although the board appears to work properly in the application described here, this does not guarantee that it will operate in all environments, or in all applications.
High Speed Inter-Rack Communications Using Reflective Memory
SETUP
The test that was conducted consisted of connecting two Series 90-70 systems together with the 5550 cards, and transmitting data in both directions. In CPU 0, data was read from the reflective memory, incremented, then passed to CPU 1. In CPU 1, the data was read from the reflective memory, then written back to CPU 0.
The two 5550 cards were both mapped at the CPUs VME address 100,000H, and were accessed with AM code 39H. It is not required, however, that all cards on the link have the same base address. The cards could be mapped to different address spaces in each CPU. When the master accesses the board, it is looking for data at an address relative to the base address of the board, not at any absolute address.
For example, if card A is mapped at 100,000H and card B is mapped at 200,000H, then data written to address 100,100H in card A can be read in card B at 200,100H.
The jumpers on both cards were set identically, except for the node ID jumper.
JUMPERS
J12,J13
IN
full speed link
J11
OUT
Extended addressing disabled
J10
IN
Accepts both non-privileged and supervisory AM codes
J9
IN/OUT,IN,IN,IN
(top to bottom), sets the node address at 0 or 1, IN is address 0, OUT is address 1 for the
Least Significant bit.
OUT,OUT,IN,IN
(top to bottom) -- sets the maximum node number at 3
J8
(Note: The link should run slightly faster if the maximum node was set to 1 instead of 3).
IN,IN,OUT,IN,IN,IN,IN,IN
(out is the A20 bit, which will set the start address to 100,000H in the CPUs VME address space).
J7,J6,J5,J4,J3,J2,J1 ALL IN (factory set for amount of on-board memory)
.
The SIP resistor termination networks were left in for both cards, but should be removed for middle units if more than two units are connected. When more than two units are connected, an additional vampire connector is also used (VMIC part number 999-064).
Additional information regarding VME integration into the Series 90-70 is available in GFK-0448 (this manual). Additional information from VMIC regarding the 5550 may be obtained by calling Steve May -
VMIC at 205-880-0444.
The information used for this setup was obtained from the 5550 instruction manual dated March 1991.
3
R. H. Matthews
Program Manager
GE Fanuc Automation North America, Inc., Charlottesville, Virginia
4
High Speed Inter-Rack Communications Using Reflective Memory
High Speed Inter-Rack Communications Using Reflective Memory
5
6
High Speed Inter-Rack Communications Using Reflective Memory
High Speed Inter-Rack Communications Using Reflective Memory
7
Application
Bulletin
To: 1, 2A, 3, 4, 8, 10, 11, 12 Number: H-12-91-35
Integration of a 68030 CPU with OS-9
t into the Series 90t-70 PLC
1. Overview
Adding a foreign CPU to a Series 90-70 PLC is an excellent way to provide additional processing power, add an additional operator interface platform, or incorporate a high-level process controller to the system. A real-time operating system such as OS-9 is ideally suited for such an application. OS-9 is a high performance multi-tasking, ROMable operating system for Motorola 680x0 microprocessors. OS-9 provides a complete software development environment including a file system, editors and compilers in a UNIX-like environment.
Several customers have already written applications for OS-9, which are running on non-PLC platforms.
By integrating a 68030 CPU with OS-9 into the Series 90-70 PLC, customers with OS-9 experience and/or canned applications can now take advantage of the industrial I/O provided by the Series 90-70 PLC.
Users who have traditionally used OS-9 (quite often in conjunction with other VME platforms) may find the ability to interface to true industrial I/O in the Series 90-70 PLC particularly appealing.
The application example which follows describes the integration of a 68030 based module, with OS-9 into the Series 90-70 PLC system.
1.1 The Hardware Platform
The Matrix CPU330 is a high performance 68030 based CPU which provides a fast, extended temperature platform for OS-9 applications. Options are available to run at speeds up to 33 Mhz with up to 8 Mbytes of on-board dynamic ram. It provides a variety of real-time controller functions, and includes a Dbus-68 daughterboard interface with many available options.
Matrix is a participant in the GE Fanuc Recommended VME Vendor program, and has developed a custom CPU330 package specifically for use in the Series 90-70 PLC. The part number for this custom version is GE-CPU331-N-2. This part number includes the standard extended temperature CPU330 board with 1 Mbyte of RAM memory, custom OS-9 software, a 25 MHZ clock, and documentation specifically for use in the Series 90-70 PLC.
1.2 The Application
This application note demonstrates the CPU330 being used as both a VME slave and VME master in a
Series 90-70 PLC system. No attempt has been made to use the complete set of hardware functionality of the CPU330 board; rather, an easy to understand application was developed primarily to demonstrate the successful integration of the CPU330 board and OS-9 into a Series 90-70 PLC system and provide a framework for more complex applications.
tOS-9 is a trademark of Microware Systems Corporation. tSeries 90 is a trademark of GE Fanuc Automation North America, Inc.
2
Integration of a 68030 CPU with OS-9 into the Series 90-70 PLC
To demonstrate the mastership capability of the Matrix CPU board in the Series 90-70 system, a XYCOM
XVME-428 8-port serial card was included in the setup. It not only provides dual port memory for the Matrix
CPU to access, but also demonstrates a realistic application in conjunction with the Matrix CPU330 as a smart bar code reader. The CPU330 is programmable in C, which is provided with the Professional OS-9 package supplied by Matrix. Version 3.2 was used to develop the code shown at the end of this application bulletin.
Also included in the setup is a Matrix DSM module containing a 50 Mbyte hard disk and 3-1/2 inch floppy disk drive. The DSM module contains the OS-9 system software for the disk-based Professional OS-9 and application software. The CPU330 and DSM communicate across the VME backplane. Keep in mind that the DSM is not needed to run the application. In this example, the CPU330 was used as the development environment, as well as the run time platform. The DSM was required only for development of the application program. A program could be developed on a totally different platform, then put into ROM or downloaded for execution on the CPU330.
2. Setup
The setup for this demonstration consists of the following:
Series 90-70 9 slot rack
- 100 Watt power supply (The Matrix CPU330, DSM and XYCOM 428 all require 12V provided by the
100 Watt power supply).
- SLOT 1: Series 90-70 CPU772 with expansion memory daughterboard. The CPU used must have multiple master support. This will be explained further below. The CPU772 is connected to a Workmaster II through a serial cable. The Workmaster II was used to develop the 90-70
CPU ladder program.
- SLOT 2: Matrix GE-CPU331-N-2 with 1 Mbyte DRAM, 25 MHz - 68030, and two
Serial ports. Professional GE-OS9 EPROMs installed. The CPU330 is configured to respond to 400000h - 4FFFFFh in standard address space (AM Codes 39h or 3Dh).
- SLOT 3: Matrix GE-DSM-SF-FFF-050 with 1Mb 3.5I floppy disk drive and 50 Mb hard drive with controller. The DSM is configured to respond to
5000h - 507Fh in short address space (AM Codes 29h or 2Dh).
- SLOT 4: XYCOM XVME-428Intelligent asynchronous serial communication module.
The XVME-428 is, configured as a slave only, responding to 3800h -
3BFFh in short address space (AM Codes 29h and 2Dh).
Integration of a 68030 CPU with OS-9 into the Series 90-70 PLC
3
Note
A separate application note for the XVME-420/428 in a 90-70 environment has been published, if you would like additional information, contact GE Fanuc).
Please refer to GE Fanuc publication GFK-0448 (this manual) for additional information regarding integration of 3rd party VME modules into the Series 90-70 PLC environment.
2.1 Setup Notes
1.
A Standard EIA-232 cable is connected between Serial Port B of CPU330 front panel and a VT100 terminal set for 9600 baud, no parity. This terminal is used as the CPU330 system console.
2.
A serial cable assembly number XVME-930, available from XYCOM is connected between JK1 on the
XVME-428 front panel and a VT100 terminal set for 9600 baud, no parity. Of the four D-connectors from the cable assembly, the one corresponding to serial port 0 is used. This VT100 is used for data entry into the XVME-428 board and can be replaced by any serial device such as a bar code reader
(the OS-9 program, written in C, would need to be modified to accommodate the particular protocol of the bar code reader).
3.
The Matrix DSM uses interrupt request 4 to communicate to the CPU330 board. Special backplane jumpers must be installed in the slots occupied by the CPU330 and the DSM to handle this interrupt.
In this demonstration, the jumpers for IRQ4 at slot 2 (JP5) and slot 3 (JP 9) must be installed.
4.
Since multiple VME master capability is demonstrated in this application note, a multiple-master
Series 90-70 CPU is required. Multiple-master capability has been phased into Series 90-70 CPU models. Please contact GE Fanuc for details on which CPU revisions support multiple VME masters.
5.
The CPU330 , DSM and XVME-428 in this application all require " 12 VDC, therefore the 100 Watt power supply is needed.
6.
A minor mechanical incompatibility problem exists between the Matrix Dbus-68 daughterboards and a standard Series 90-70 PLC rack. None of these daughterboards were used in this application. If you would like to use one of these Dbus-68 daughterboards, you will have to use a GE Fanuc Integrator rack (IC697CHS782/783) instead of the standard 9 slot rack.
7.
GE Fanuc Series 90-70 products require only convection cooling when operating in a 0 - 60 degrees
Celsius environment. Both the CPU330 and XVME-428 will also operate in this environment with convection cooling only. The DSM module however, is only rated at 4 - 45 degrees Celsius and would require fans if operating outside this range. This is not normally a problem since the DSM is typically only used for development (most likely in a controlled environment) and can be removed from many target systems.
2.2 Matrix GE-CPU330 Configuration
The Matrix GE-CPU330 is a standard MD-CPU330 shipped from the factory with jumpers already configured for operation in a Series 90-70 PLC and the special GE-OS9 firmware installed. Please verify that the jumpers are properly installed as described below before applying power to the system. A brief discussion of each jumper setting follows - refer to the MD-CPU330 User’s Manual for more information:
System Controller - Jumpers J7, J11:
EPROM Size - Jumper J4:
Reset/Abort Switch Enable - Jumper J5:
Disable system controller functions by removing J7 and J11. There can be only one slot one controller in the system, and this MUST be the
Series 90-70 CPU.
This jumper is set by the factory to match the EPROMs installed. Do not modify the factory setting.
This jumper should be configured to disable the Reset/Abort switch by removing J5. Using the switch to reset the CPU330 causes SYSFAIL to be activated, thus forcing all Series 90-70 output boards to their default state. Disabling the switch prevents this from happening. The preferred method to reset the CPU330 is to power cycle the entire system.
4
Integration of a 68030 CPU with OS-9 into the Series 90-70 PLC
VMEbus Request Level - Jumpers J8, J9, J10:
Serial Port A Flow Control - Jumper J3:
Serial Port A Interface Selection
These jumpers are shipped with Bus Request level 3 set. The Series
90-70 PLC has a fixed priority arbiter with BR1 as the highest priority followed by BR0, BR3 and BR2. Foreign VME masters are only allowed to use BR3 and BR2.
This is configured for RTS/CTS flow control as shipped from the factory. It should be set to match the user ’s Port A serial device.
SPA-330-422 is installed in the DTE configuration as shipped from the factory. It depends on Port A option ordered. Set orientation to select
DCE or DTE according to the user ’s Port A needs.
The standard professional/industrial OS-9 EPROMS were specially modified by Matrix for use in a Series
90-70 PLC. Make sure you specify these EPROMs when ordering OS-9 from Matrix. When you order the
GE-CPU330, the special EPROMs come already installed.
The special GE Fanuc modifications made to the OS-9 EPROMs are as follows:
- The CPU330 VME slave address is at 0400000h. The standard CPU330 slave address was changed to avoid potential conflicts with reserved Series 90-70 PLC addresses.
A special 4K of memory is reserved for data transfers to/from the Series 90-70 PLC. The use of this
memory is completely user defined. This memory starts at offset 0400h from the base address of the board.
VME IRQ4 is the only VME interrupt enabled. Use of IRQ5-7 is not allowed by foreign VME boards.
The professional OS-9 EPROMs will look for the DSM module at address 5000h in short address space. The standard DSM slave address was changed to avoid potential conflicts with Series 90-70
PLC reserved addresses.
2.3 The Matrix DSM Configuration
THE GE-DSM is the standard DSM shipped from the factory with jumpers already configured for operation in a Series 90-70 PLC. Please verify that the jumpers are properly installed as described below before applying power to the system. A brief discussion of each jumper setting follows - refer to the
MD-SCSIFLP User’s Manual for more information:
Base Address - Jumpers J4:
AM Code Response - Jumper J6:
Interrupt Request Level - J3:
VMEbus Request Level - Jumper J5:
Bus Grant Daisy-Chain - Jumpers J7:
SCSI Termination Power - Jumper J1:
High Density Drive - Jumper J2:
Set jumpers for base address of 5000h. The jumpers MUST be set for this address in order for the GE-CPU330 to find the
DSM.
Remove J6 to allow both supervisory and non-privileged access
(Am codes 29h and 2Dh). Will work either way.
Set for Interrupt Request level 4. MUST be set for this level for the GE-CPU330 to recognize the interrupt.
These jumpers are shipped with Bus Request level 3 set. The
Series 90-70 PLC has a fixed priority arbiter with BR1 as the highest priority followed by BR0, BR3 and BR2. Foreign VME masters are only allowed to use BR3 and BR2.
Must be set to correspond with Bus request level which in this case is Bus Grant 3 Daisy-chain.
Remove J1 for no termination power.
Will be set by factory to correspond to DSM model ordered.
Integration of a 68030 CPU with OS-9 into the Series 90-70 PLC
5
2.4 XYCOM XVME-428 Configuration
The XVME-428 Jumper settings were modified slightly from their factory defaults. A brief discussion of each follows - refer to the XVME-428 User’s Manual for more information:
Base address - Jumpers J4, J5, J7, J8:
Address modifier - Jumper J3:
Bus Request level - Jumpers J1, J2, J6:
Memory range select - Jumpers J9-J14:
P2 Power - Jumpers J17, J18, J19:
Set jumpers for base address at 3800h.
Set J4=IN; J5, J7, J8=OUT.
Install J3 for recognition in both supervisory and non-privileged short I/O space (AM Codes 29h and 2Dh).
Use factory default of Bus Request level 3. This is not used since XVME-428 will not be used as a bus master in this application.
These are set by the factory to match the memory installed in the board. Do not modify the factory settings.
Keep all jumpers in B position - no power supplied to P2 connector.
3.Application Programs
3.1 Overview
In this application, the Matrix CPU330 board will collect data from both the XYCOM serial card and the
Series 90-70 CPU, sort it and display the data in a simple bar graph. The data consists of three digit ASCII numbers which will be sorted and displayed by ranges (that is, 100-200, 500-900, and so forth).
The Series 90-70 CPU will periodically write data to the dual port ram on the Matrix CPU and set a flag indicating that data is available. The Matrix CPU330 polls this flag and when it is set, will read the data and reset the flag. This demonstrates use of the CPU330 as a VME slave.
The Matrix board collects data from the XVME-428 board by commanding it to read three characters. The
Matrix CPU then polls the read complete flag. When the read command is complete this flag is set and the Matrix CPU will read the data from the XVME-428 dual port ram. The three digit data is entered at the VT100 keyboard but could come from any serial device such as a bar code reader (the three digit data could represent a three digit bar code for instance). When the three digit data is read by the Matrix CPU, it will echo the data back to the XVME-428 by issuing a write command. The data will then appear on the
VT100 terminal. All commands are written to the XYCOM XVME-428 board by the CPU330. This demonstrates use of the CPU330 as a VME master.
Data collected from the Series 90-70 CPU and XVME-428 is checked, sorted and displayed on the Matrix system console (VT100) in bar graph format. When invalid data is detected, an error flag will be set in the Matrix dual port ram to inform the Series 90-70 CPU of an error (the CPU does nothing with this error).
The C program on the CPU330, and the ladder logic in the Series 90-70 CPU are described later in this document.
6
Integration of a 68030 CPU with OS-9 into the Series 90-70 PLC
3.1.1 Controlling the XVME-428 Serial Card
The XVME-428 power up default settings are used for this application:
8 bits/character, 1 stop bit, no parity
9600 baud
no line control
incoming characters not echoed
record I/O mode (transmit/receive strings of characters)
no request acknowledge interrupt
Commanding the XVME-428 to execute a transmit/receive is a three step process. The first step is to write a command block to the XVME-428 dual port ram. This command block will tell the XVME- 428 what to do and also contains an area for the transmit or receive data (only if 6 bytes or less of data). The second step is to write a pointer to the command block into the Command block pointer for channel 0. This tells the XVME-428 where the command block is located. The third step is to write to the I/O request register for channel 0, initiating command execution.
For simplicity in this application, the Response Flag (byte 6 of the command block) will be polled to determine when the operation has completed. The XVME-428 is also capable of generating an interrupt to the CPU330 upon command completion. Using this method instead would cut down on bus traffic and possibly improve system performance.
The XVME-428 addresses are constructed as follows:
0xfff00000 access to VME short address space from CPU330
+ 0x00003800 base address of XYCOM 428 board
+ 0x00000092 XYCOM 428 pointer register offset
= 0xfff03892 address of XYCOM 428 pointer register
For more information on programming the XVME-428 please refer to the XYCOM XVME-428 Intelligent
Asynchronous Serial Communication Module Users Manual, and the XVME420/428 application note which was previously published.
3.1.2 Series 90-70 CPU and Matrix CPU330 Communications
The Matrix board is used strictly as a slave when communicating to the Series 90-70 CPU. Data is written directly by the Series 90-70 CPU into the Matrix dual port ram. To make this type of communication easy to use, Matrix has reserved a 4K block of dual port memory for transfers between the Series 90-70 PLC and the CPU330. This block of memory does not need to be allocated. It is hidden from OS-9 and therefore will never be used by the operating system or allocated to any application programs. This 4K block of memory is located at offset 0400h from the base address of the CPU330 and is only available on the special GE-OS9 firmware (prom set).
The use of this 4K block of memory is completely up to the user. If you need to use more than 4K bytes of memory for Series 90-70 PLC to Matrix CPU data transfers, have your OS-9 program execute a memory request and store a pointer to this newly allocated memory in the default 4K block. This will allow the PLC to find the extra memory block.
Integration of a 68030 CPU with OS-9 into the Series 90-70 PLC
7
8
Integration of a 68030 CPU with OS-9 into the Series 90-70 PLC
Integration of a 68030 CPU with OS-9 into the Series 90-70 PLC
9
10
Integration of a 68030 CPU with OS-9 into the Series 90-70 PLC
Integration of a 68030 CPU with OS-9 into the Series 90-70 PLC
11
12
Integration of a 68030 CPU with OS-9 into the Series 90-70 PLC
Integration of a 68030 CPU with OS-9 into the Series 90-70 PLC
13
14
Integration of a 68030 CPU with OS-9 into the Series 90-70 PLC
Appendix
H
Related VME Products
H
section level 1 1 figure_ap level 1 table_ap level 1
This appendix is a partial listing of VME products which have been used successfully with Series 90-70 PLC systems.
GFK-0448E H-1
GFK-0448E
Numbers
3rd party VME interrupt support, 3-21
A
Access types for AM codes, 3-1
Address allocation, 3rd party, 3-1
Address allocation, Series 90-70, 3-2
Address length for AM codes, 3-1
AM codes, access types and address
Application examples, G-1
B
Backplane voltage isolation, 2-3
Backplane, description of, 1-2
Byte significance convention
Index
Byte swapping, example of, 5-1
C
C.1, VMEbus specification, 2-1
Cable, power supply extension, F-9
Categorization, candidate modules, 2-6
Communications, Genius I/O, 3-7
selecting the configuration mode for a
Configuration, interrupt (3rd party), 3-22,
Configuring a VME module, 3-10
Cooling with rack fan assembly, 1-4
Cooling, rack, 4-1
D
Data move functions
Data sheet, VME integrator rack, F-1
Data transfer arbitration bus, 1-3
E
Environmental considerations, list of, 2-1
Index-1
Index
Index-2
F
Fan assembly, rack, 1-4, 4-1, F-11
G
Genius I/O communications link, 3-7
H
I
Installation, VME modules
Integration of 3rd party VME modules,
Integrator rack, VME, 3-7, F-1
International trade association, VITA, E-1
Interrupt configuration (3rd party), 3-22,
configuration mode, 3-22 interrupt, 3-22 interrupt ID (hex), 3-22
Interrupt support, 3rd party VME, 3-21
Interrupting the PLC CPU, 3-21
Isolation, backplane voltage, 2-3
J
L
Location, slot for VME modules, 3-7
Logicmaster 90, programming with, 5-1
M
Module address allocation, 3rd party, 3-1
Module address allocation, Series 90-70,
Module requirements, 3rd party, 3-21 dual port memory, 3-21 interrupt ID, 3-21
N
O
P
Power requirements, VME-based systems,
GFK-0448E
GFK-0448E
Power supply extension cable, F-9
Power supply, description of, 2-2
Programming considerations, 5-1
Programming functions, VME
Q
Quick compatibility checklist, D-1
R
Rack
dimensions, VME integrator, F-3 mounting, VME integrator, F-3
Rack fan assembly, 1-4, 4-1, F-11
Rack, VME integrator, 2-3, 3-7, F-1
Requirements for grounding, 4-1
Retaining modules in rack, F-10
S
Screen, example of configuration, 3-8
Selection of 3rd party VME modules,
Series 90-70 module address allocation,
Index
Signals
Slot location, VME modules, 3-7
T
Third party module address allocation, 3-1
3rd party module address allocation, 3-1
Trade association, international, VITA, E-1
U
V
VITA
VME
compatible products directory, 1-4
guidelines for selection of 3rd party
Index-3
Index
I/O connections, F-4 jumper configuration, F-4, F-7
jumper location and function, F-7
Series 90-70/VME configuration, F-7
VME Integrator Racks, mounting require-
VME interrupt support, 3rd party, 3-21
selecting the configuration mode, 3-11
VME module, configuration, 3-8
VME modules, examples of applications,
VME READ (VMERD) function, 5-2
VME read configuration function, 5-14
VME TEST AND SET (VMETST), 5-11
VME write configuration function, 5-16
VMEbus
6U modules, 1-2 backplane, 1-2
mechanical structure, 1-1 standard definition, 1-1
W
Index-4
GFK-0448E
advertisement
* Your assessment is very important for improving the workof artificial intelligence, which forms the content of this project