
advertisement

Manual Instalador
Installer´s Guide
Inst alación Platos de Ducha
Comp
Shower
Inst
Comp
NºGarantia / Guaranteen Number :
E
INDICE
1- CONDICIONES GENERALES
2- GARANTÍA
3- CARACTERÍSTICAS DEL PRODUCTO
4- ARTÍCULOS SUMINISTRADOS
5- ELEMENTOS NECESARIOS
6- PREINSTALACIÓN DE LOS PLATOS DE DUCHA
7- ASPECTOS A TENER EN CUENTA ANTES
DE LA INSTALACIÓN
8- OPCIONES DE INSTALACIÓN
9- INSTALACIÓN DE LOS PLATOS DE DUCHA
10- ESQUEMA DE CORTE DEL PLATO
11- LIMPIEZA, MANTENIMIENTO Y DURABILIDAD
EVALUATION
0- Attacked film.
1- Superficial degradation and/or formation of blisters
2- Important change of brightness and/or colour
3- Moderated change of brightness and/or colour
4- Slight change of brightness and/or colour, only
visible from certain inspection.
5- Without evident changes
11
CLEANING, MAINTENANCE AND
DURABILITY
If concrete or some other materials are in contact with the shower-tray, use appropiated products to clean the joints. Avoid to rub directly.
For usual cleaning is enough to wash out with water and dry off.
For a exhaustive cleaning use a soft cloth with neutral liquid not abrasive. In case of dirtiness or calcareous silt, clean with soapu wrater or anti-lime product. Rinse with tepid water and dry off.
The Solidstone shower-trays don´t need any specific maintenance.
In this following chart we specify the results of durability caused by the frequent chemical agents used in the bathroom.
DOMESTIC AGENTS
Bleach
"Salfumán"
"Don Limpio"
"Viakal"
Vinegar
Ammonia
"KH-7"
"Cilit Bang"
Acetone
Isopropanol
Tint of dark hair
Tint of normal hair
Lacquer of dark nails
Lacquer of clear nails
Oxygenated water
"Betadine"
DEGRADATION
24h (5)
4h (1)
24h (3)
24h (4+)
24h (2)
24h (4)
24h (5)
24h (5)
1min. (1)
5min. (5)
5min. (2)
5min. (2)
5min. (3)
1h (5)
24h (3)
1min. (3)
1
CONDICIONES GENERALES
Desde Baños10 le queremos dar la más sincera enhorabuena y el agradecimiento por haber adquirido un plato de ducha Solidstone de nuestra empresa.
Los platos Solidstone están fabricados con un material de alta resistencia (resistencia al impacto similar a cualquier piedra) y una mínima absorción (0,01%). Los platos son antideslizantes y poseen un
tratamiento que impide la proliferación de bacterias en los mismos.
Todos nuestros productos han sido fabricados bajo estrictos controles de calidad para certificar su óptimo funcionamiento.
Baños 10 garantiza sus productos y componentes contra cualquier falta de conformidad siempre y cuando se haya hecho un buen uso de los mismos y hayan sido instalados correctamente. La empresa no será responsable de los inconvenientes que existan debidos a una incorrecta instalación o un uso inadecuado del producto; por lo tanto, no se hará cargo de los gastos de sustitución de mamparas, azulejos o cualquier elemento que deba sustituirse como consecuencia de ese mal uso o mala instalación.
Para un correcto uso y mantenimiento del producto le invitamos a leer atentamente este manual.
2
GARANTÍA
Baños10 garantiza durante 24 meses este producto ante el primer usuario a excepción de las piezas de desgaste natural tal y como se indica en la ley de garantías. Para ello es necesario guardar este documento para posibles incidencias/consultas en el que se indica el número de serie del producto.
La garantía queda extinguida una vez transcurridos los 24 meses. A partir de este momento la asistencia técnica correrá a cargo del usuario según las tarifas de Baños10.
10
HOW TO CUT THE SHOWER-TRAY
10.1: Protect the zone to cut.
Todos los platos de la serie Solidstone son productos únicos y exclusivos, fabricados a medida y de manera artesanal. Las mallas, huellas, acabados y destonificados de color procuran representar los acabados de las maderas o pizarras; por tanto los colores y las texturas pueden variar sensiblemente. Tenga en consideración esta advertencia ya que no se cursarán reclamaciones por estos motivos.
La garantía de la empresa Baños10 no cubrirá:
- Los daños debidos al transporte.
- Los daños debidos a una instalación, reparación o una manipulación
incorrectas.
- Del mismo modo, esta garantía tampoco cubre los daños debidos
al desgate natural que tenga el producto, posibles malos usos que
éste sufriera o mantenimientos incorrectos.
- Los daños debidos a suciedades, incrustaciones, u otros defectos
físicos, químicos o electroquímicos que se produzcan debidos al
agua tampoco están incluídos en la garantía del producto.
- Otros defectos que no sean imputables a la empresa.
10.2: Mark with a pencil the cut line.
10.3: Cut the shower-tray with a diamond´s cut tool .
NOTE: The cutt parts have to be inserted into the wall.
* Shower-trays whose measure are lower to 900:
The shower-trays whose measure are lower to 900 in length have to be installed with their "cutted" part builted-in the wall. The shower screen couldn´t be installed if it doesn´t happens (see the associated drawing).
"Cutted" part
430
W
A
L
L
700-900
3
CARACTERÍSTICAS DEL PRODUCTO
COMPACT
800-2100
COMPLEX
900-1400
NATURAL / IRON / FOREST
800-2100
NOTA: Las dimensiones de los platos tienen una tolerancia de +- 2,5mm.
4
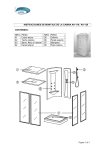
ARTÍCULOS SUMINISTRADOS
1 zona seca
2
(3 Sólo en IRON, FOREST y NATURAL)
3
(4 Sólo en IRON y FOREST)
4
5
ELEMENTOS NECESARIOS
SILICONA
Wall
Wall-Tiles
Máx. 10 mm
Lurching direction
Tilting direction
SILICONE
1400
Máx. 10 mm
Put the shower-tray in the definitive place. Coincidy the showertray´s hole with the drains previosly placed.
CEMENT
WALL-TILES
10 mm
BLOCK
STUFFING
WATERPROOF
TAPE
SHOWER-TRAY
NOTE: Don´t put the shower-tray more than 10mm. inside the wall between both sides. In this case, we will avoid problems with the shower-screen.
Adjust the shower-tray, check that it is leveled (in the lurching and tilting directions) and that it works correctly.
Take out the cardboard protector, silicone around the shower-tray with neutral silicon (non acetic) and clean the silicon rests.
Once the shower-tray is in the right position, put the grill (only in Natural,
Iron y Forest ranges) and the screw (only in Iron and Forest shower-trays).
The shower-tray has to be fixed and leveled, otherwise the screen´s doors won´t slide properly.
You can use the shower-tray one day after installation, when silicone gets totally dried.
Check that the shower-tray is installed and works correctly before tiling the rest of the bathroom.
6
PREINSTALACION DE PLATOS DE DUCHA
COMPACT / NATURAL / IRON / FOREST
430
0 90
Bajante vivienda
(debajo del plato)
800-2100 zona seca
Bajante vivienda
(debajo del plato)
250
Agujero para el desagüe
COMPLEX
0 90
430
900-1400
250
Agujero para el desagüe
NOTA: Todos los platos de la gama Solidstone están diseñados de modo que a partir de 1400mm. el plato tiene una zona de secado con una pendiente mínima (no normalizada).
7
ASPECTOS A TENER EN CUENTA ANTES DE
LA INSTALACIÓN
Antes de instalar el plato hay que tener en cuenta que:
- El plato desagüa correctamente.
- No existan desperfectos o anomalías en la superficie del mismo.
- El plato se conserva en posición horizontal y sobre una superficie
plana hasta el momento de la instalación.
9
SHOWER-TRAY INSTALLATION
9.0: Shower-tray preparation.
For a perfect installation of the Solidstone shower-tray sand the inferior surface for acquiring porosity so then it can be hold easier.
9.1: Base preparation.
For a perfect installation of the shower-tray the floor must be
PERFECTLY LEVELED and dry. The concrete has to be completely dry because it could bend the shower-tray if wet. If it happens, the shower-tray could be useless.
The base must be ready with concrete and never with sand.
A hole must be made on the floor in order to set the drain pipe (see the installation).
You have to do also a hole or channel on the floor to pass the pipes from lowering house till the drain´s pipe of the shower-tray.
9.2: Assembly of the drain pipe.
Put the drain´s pipe on the floor in its definitive position. Connect it with the lowering house. Read the instructions of the drain pipe.
Check that drain-pipe hasn´t water leaks and all elements don´t stnad out of the holes because the shower-tray wouldn´t seat correctly.
NOTE: It´s very important to get a slope from the drain´s pipe to the lowering house to guarantee the drainage.
9.3: Setting of shower-tray.
Take out the shower-tray from the packaging,use the cardboard to protect the shower-tray during the installation.
Put around the shwer-tray a waterproof tape between the wall and the shower-tray. It will prevent that the water takes out from the shower-tray.
Put on the concrete´s base some fragments of poliuretan mastic
(SICAFLEX / CEYS) to fix the shower-tray.
8
OPTIONS OF INSTALLATION
BUILD IN
8
OPCIONES DE INSTALACIÓN
EMPOTRADO EN EL SUELO
ON THE FLOOR INSTALACIÓN SOBRE EL SUELO
ON HIGH
SOBREELEVADO
NOTE: On high installation the shower-tray has to be installed on a leveled and smooth surface too.
NOTA: En el montaje sobreelevado el plato deberá estar apoyado también sobre una superficie plana y lisa.
9
INSTALACION DE LOS PLATOS DE DUCHA
9.0: Preparación del plato.
Para una correcta instalación del plato de ducha Solidstone lijar la superficie inferior del mismo para que adquiera porosidad y se pueda sujetar con mayor facilidad posteriormente.
9.1: Preparación de la base.
Para una correcta instalación del plato de ducha Solidstone hay que tener en cuenta que la base sobre la que se va a colocar el mismo debe estar
PERFECTAMENTE NIVELADA y seca, ya que el material de relleno puede llegar a "tirar" del plato y curvarlo de modo que éste quedase inservible.
La base debe ser de mortero y nunca de arena sólamente.
En la base hay que dejar un hueco necesario tal y como se indica en la preinstalación para la ubicación del desagüe (ver preinstalación).
Habrá que realizar también el hueco o canal necesario para poder pasar las tuberias de desagüe desde la "bajante" de la casa hasta el desagüe del plato.
9.2: Montaje del sifón.
Una vez que tenemos preparada la base lo que haremos será ubicar el sifón en su posición definitiva y conectarlo a la "bajante" de la casa. Para ello es muy importante ayudarse de las instrucciones de montaje del desagüe que nos proporciona el fabricante.
Hay que comprobar que no existan fugas, y que los elementos que hemos ubicado no sobresalen de los huecos que hemos realizado para los mismos pues en ese caso el plato no asentaría correctamente.
NOTA: Es muy importante que haya pendiente desde el desagüe hasta la "bajante" de la casa para que se garantize el desagüado del plato.
9.3: Colocación del plato.
Desembalar el plato y utilizar el cartón de embalaje para proteger la parte superior durante toda la instalación del mismo.
7
THINGS TO TAKE IN MIND BEFORE
INSTALLATION
Aspects to be considered before installing the shoer-tray:
- The shower-tray has to drainage correctly.
- The shower-tray has to be whithout any imperfections or damages to
be installed.
- Keep the shower-tray in horizontal position and iover plain surface to
prevent malformations until installs it.
6
SHOWER-TRAY PRE-INSTALLATION
COMPACT / NATURAL / IRON / FOREST
430
0 90
Lowering house
(Under the shower-tray)
800-2100 drying
area
Lowering house
(Under the shower-tray)
Hole for drain
COMPLEX
0 90
250
430
900-1400
250
Hole for drain
NOTE: All our Solidstone shower-trays are designed with a ligth inclinaction (not normalized) from 1400 where starts the drying area.
Colocar perimetralmente cinta impermeabilizante en los ángulos que forman las paredes con el plato para garantizar que no hayan fugas entre el plato y la pared.
Aplicar sobre la base de mortero unas tiras de masilla de poliuretano
(del tipo SICAFLEX / CEYS) para asegurar la fijación del plato.
Colocar el plato en el lugar destinado a tal efecto haciendo coincidir el agujero del plato con el desagüe que previamente hemos colocado en el suelo.
MATERIAL
DE
AGARRE
REVESTIMIENTO
10 mm
SECCIÓN DEL
PLATO DE DUCHA
TABIQUE
RELLENO
CINTA
IMPERMEABILIZANTE
NOTA: No encastrar el plato de ducha más de 10mm. en el revestimiento por ambos lados. Con ello evitaremos problemas de colocación y ajuste de la mampara.
Ajustar el plato correctamente, comprobar que está bien nivelado (en la dirección de cabeceo como de ladeo) y que el plato desagüa correctamente.
Quitar el cartón protector, siliconar perimetralmente con silicona neutra
(no acética) todo el plato y limpiar los sobrantes de silicona.
Finalmente colocar la rejilla embellecedora (sólo en Natural, Iron y Forest) y el tornillo de apriete (sólo en Iron y Forest).
El plato deberá estar bien sujeto y nivelado, de lo contrario las puertas de la mampara no ajustarán correctamente y el funcionamiento del plato puede ser defectuoso.
Deberemos dejar secar la silicona durante un día para poder hacer uso del plato.
Comprobar que el plato queda bien instalado y que desagüa correctamente antes de proceder al alicatado del resto del baño y al montaje de la mampara u otros elementos.
Pared
Revestimiento
SILICONA
Máx. 10 mm
Máx. 10 mm
1400
Dirección de cabeceo
Dirección de ladeo
4
SUPPLIED ELEMENTS
1 drying area
2
(3 Only in IRON, FOREST and NATURAL)
3
(4 Only in IRON and FOREST)
4
5
REQUIREDS ELEMENTS FOR INSTALLATION
SILICONE
3
PRODUCT FEATURES
COMPACT
800-2100
COMPLEX
900-1400
NATURAL / IRON / FOREST
800-2100
NOTE: Solidstone range has a tolerance between+- 2,5mm.
* Montaje de platos cuya longitud sea inferior a 900:
Los platos cuya medida de longitud sea inferior a 900 deben montarse con la parte "cortada" empotrada en una pared ya que de lo contrario no será posible el montaje de la mampara (ver dibujo adjunto).
Parte "cortada"
430
R
E
P
A
D
700-900
10
ESQUEMA DE CORTE DEL PLATO
10.1: Proteger la zona de corte.
10.2: Marcar con un lápiz la línea de corte.
10.3: Cortar con una herramienta de corte de diamante.
All solidstone´s shower-trays are unique products and exclusive because they are handmade and customized. The meshes, the marks, the finishes and colour tones try to represent woods or stones; therefore the colours and the textures can be changed sensibly. Claims in these cases will not be attented.
Baños 10 guarantee doesn´t cover:
- Transport damages.
- Damages due to an incorrect installation or incorrect use.
- the natural erosion of the shower-tray, wrong uses and incorrect
maintenance.
- The damages due to dirt, inlays or other physical, chemical or
electrochemical faults produced by the water.
- Other faults not attributable to the company.
NOTA: Las partes que hayan sufrido algún corte deben ir encastradas.
1
GENERAL CONDITIONS
Baños10 thanks you for acquiring a Solidstone shower-tray.
The Solidstone shower-trays are manufacturated with a high resistance material (impact resistance similar to any stone) and a minimum absorption (0,01%). The shower-trays are nonsliding and are
treated to avoid the proliferation of bacterians.
control.
All our products have been manufactured with a strictly quality
Baños 10 guarantee their products and components against any lack of conformity when the use of them and installation have been made correstly.The company won´t be responsible of the inconveniences caused by an incorrect or inadequate use of the products, so guarantee will never cover the expenses of substitution of shower screens, tile or whatever element that shouls be replace by this wrong use or bad installation.
guide.
For a correct use and good maintenance read carrefully this
2
GUARANTEE
Baños10 guarantee their products for 24 months. The pieces that have a natural erosion aren´t included in the guarantee. In this document you have the guarantee number wich it is necessary to any claim.
The guarantee will be finished in 24 months. In that moment, the technical assistance must be paid by the costumer.
11
LIMPIEZA, MANTENIMIENTO Y DURABILIDAD
Si tras la instalación quedasen restos de cemento cola y mortero en contacto con el plato de ducha, utilice desincrustante de juntas para elimiarlo.
Evitar frotar directamente.
secar.
Para la limpieza rutinaria basta con enjuagar con agua el plato y dejar
Para una limpieza exhaustiva es suficiente con utilizar un trapo suave con un detergente líquido neutro y no abrasivo. En caso de suciedad o sedimento calcáreo, limpiar con agua jabonosa o con un producto antical. Enjuagar con agua tibia y secar.
Los platos de la gama Solidstone de Baños 10 no requieren de ningún mantenimiento específico.
A continuación se presentan los resultados de durabilidad del plato frente a la exposición de diferentes agentes químicos utilizados habitualmente en los ambientes de baño.
AGENTES DOMÉSTICOS DEGRADACIÓN
Lejía
"Salfumán"
"Don Limpio"
"Viakal"
Vinagre
Amoníaco
"KH-7"
"Cilit Bang"
Acetona
Isopropanol
Tinte de pelo oscuro
Tinte de pelo medio
Laca uñas oscura
Laca uñas clara
Agua oxigenada
"Betadine"
24h (5)
4h (1)
24h (3)
24h (4+)
24h (2)
24h (4)
24h (5)
24h (5)
1min. (1)
5min. (5)
5min. (2)
5min. (2)
5min. (3)
1h (5)
24h (3)
1min. (3)
VALORACIÓN
0- Película atacada.
1- Degradación superficial y/o formación de ampollas
2- Cambio importante de brillo y/o color
3- Cambio moderado de brillo y/o color
4- Cambio ligero de brillo o color sólo visible desde
ciertos ángulos de inspección.
5- Sin cambios visibles.
GB
INDEX
1- GENERAL CONDITIONS
2- GUARANTEE
3- PRODUCT FEATURES
4- SUPPLIED ELEMENTS
5- REQUIRED ELEMENTS FOR INSTALLATION
6- SHOWER-TRAY PRE-INSTALLATION
7- THINGS TO TAKE CONSIDERED BEFORE INSTALLATION
8- OPTIONS OF INSTALLATION
9- SHOWER-TRAY INSTALLATION
10- HOW TO CUT THE SHOWER-TRAY
11- CLEANING, MAINTENANCE AND DURABILITY
advertisement
* Your assessment is very important for improving the workof artificial intelligence, which forms the content of this project
Related manuals
advertisement