Microtek LS-4600 User Manual
Add to my manuals
1 Pages
Microtek LS-4600, your newly acquired scanner, is a versatile device designed to meet your various scanning needs. With its ability to handle different types of materials, including photos, documents, and even 3D objects, this scanner offers great flexibility. The LS-4600 utilizes advanced technology to produce high-quality scans, making it ideal for both personal and professional use.
advertisement

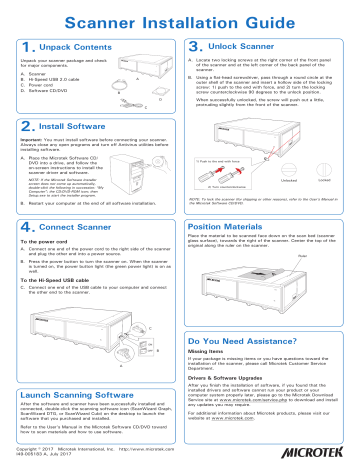
Scanner Installation Guide
1.
Unpack Contents
Unpack your scanner package and check for major components.
A. Scanner
B. Hi-Speed USB 2.0 cable
C. Power cord
D. Software CD/DVD
B
A
C
D
3.
Unlock Scanner
A. Locate two locking screws at the right corner of the front panel of the scanner and at the left corner of the back panel of the scanner.
B. Using a flat-head screwdriver, pass through a round circle at the outer shell of the scanner and insert a hollow side of the locking screw: 1) push to the end with force, and 2) turn the locking screw counterclockwise 90 degrees to the unlock position.
When successfully unlocked, the screw will push out a little, protruding slightly from the front of the scanner.
2.
Install Software
Important: You must install software before connecting your scanner.
Always close any open programs and turn off Antivirus utilities before installing software.
A. Place the Microtek Software CD/
DVD into a drive, and follow the on-screen instructions to install the scanner driver and software.
NOTE: If the Microtek Software Installer screen does not come up automatically, double-click the following in succession: “My
Computer”; the CD/DVD-ROM icon; then
Setup.exe to start the installer program.
B. Restart your computer at the end of all software installation.
1) Push to the end with force
2) Turn counterclockwise
Unlocked Locked
NOTE: To lock the scanner (for shipping or other reasons), refer to the User's Manual in the Microtek Software CD/DVD.
4.
Connect Scanner
To the power cord
A. Connect one end of the power cord to the right side of the scanner and plug the other end into a power source.
B. Press the power button to turn the scanner on. When the scanner is turned on, the power button light (the green power light) is on as well.
To the Hi-Speed USB cable
C. Connect one end of the USB cable to your computer and connect the other end to the scanner.
Position Materials
Place the material to be scanned face down on the scan bed (scanner glass surface), towards the right of the scanner. Center the top of the original along the ruler on the scanner.
Ruler
C
A
ON
OFF
B
Launch Scanning Software
After the software and scanner have been successfully installed and connected, double-click the scanning software icon (ScanWizard Graph,
ScanWizard DTG, or ScanWizard Cubi) on the desktop to launch the software that you purchased and installed.
Refer to the User's Manual in the Microtek Software CD/DVD toward how to scan materials and how to use software.
Copyright © 2017 Microtek International, Inc. http://www.microtek.com
I49-005183 A, July 2017
Do You Need Assistance?
Missing Items
If your package is missing items or you have questions toward the installation of the scanner, please call Microtek Customer Service
Department.
Drivers & Software Upgrades
After you finish the installation of software, if you found that the installed drivers and software cannot run your product or your computer system properly later, please go to the Microtek Download
Service site at www.microtek.com/service.php to download and install any updates you may require.
For additional information about Microtek products, please visit our website at www.microtek.com.
advertisement
* Your assessment is very important for improving the workof artificial intelligence, which forms the content of this project