advertisement
▼
Scroll to page 2
of
6

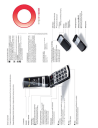
Fig 2
Fig 3
Fig 5
Fig 6
battery strength
new SMS
ringtone off
earphone
missed call
signal strength
Roaming mode
alarm on
call diversion
4 DISPLAY SYMBOLS (SCREEN)
Fig. 3: Insert battery (gold contacts on right front side).
Fig. 4: Close battery door: slide cover to closed position
with a ‘click’.
Fig. 5: Plug charging cable into the socket on the lower
narrow side of the phone or
Fig. 6: in the plug on the back of the desktop charger
Charging: Battery indication bars in upper right corner of
the display are moving
The led on the upper side of the closed phone is on.
Full battery: Bars in upper right display corner are solid.
Note: Charge battery for at least 2 hours before first use!
Fig 4
3 INSERT BATTERY AND CHARGING
Fig. 1: Remove battery cover (as shown).
Fig. 2: Slide SIM card in with the gold contact facing down.
Fig 1
2 INSERT SIM CARD
Redial list: press - key, scroll through call list with
(all
dialled, missed and received calls) and select a number and
start call with .
Handsfree Speaking:
During a call handsfree function can be switched on or off:
press
Options Æ Handsfree.
5 FIRST STEPS
Switch on the phone by pressing the power on/off-key
for
at least 2 seconds.
for 2 seconds again.
Switch off by pressing power on/off
When using a new SIM card, enter the 4 digit PIN Code
(Personal Identification Number) and confirm with .
PIN-Code: The PIN-Code is a 4-digit number combination
preventing others from switching on your mobile phone.
Switch off your PIN-Code: In menu: Settings Æ Security
Settings Æ PIN Æ PIN off.
Entering Menu:
- key.
Press
and .
Scroll through menu points: with
Confirm: with .
Note: due to inactivity, the phone lights and screen turn off
after a while. To turn on again, press any key.
Incoming Call:
Pick up call: Press
- key.
Reject call: Press - key.
End call: Press - key.
Dial: Enter the telephone number via the keypad (including
area code with 0) - start call with .
7 EMERGENCY FUNCTION
You can store a total of 5 emergency numbers (family,
neighbours, friends, emergency services). In case of
emergency these preselected numbers will be dialed
automatically in a sequence, if the emergency key on the
back of the phone gets pressed and held.
A continuous warning tone then starts in “loudspeaker mode”
during emergency, so you and people nearby are warned
due to the emergency! If the first number cannot be reached,
the second number will be called automatically. If the second
number in row cannot be reached, the third will be called.
(max. 3 rotations of the 5 numbers).
Searching phone book entries:
Open the phone book with :
and . Or:
Scroll through the entries with
Search names: enter the initial letters of the searched name
via the keypad (scroll through with ). When the requested
to start a call.
name is shown, press
Storing phone book entries (Name & Number):
Æ continue to Phone book: , , ,
Enter menu with
Æ continue to Add contact:
,
ÆEnter name via the
keypad (See chapter 8, Write SMS for text entry), , ÆEnter
to Save.
number, and
6 PHONE BOOK
Saving names and numbers (start with international prefix,
e.g. +44 for UK).
Enter menu in standby modus (Standby-Modus: chapter 5)
with , then , , , Æ Menu-Points: Search name, Add
contact, Own Number, Emergency numbers (add, change,
delete, status on/off), Copy All, Edit Contact, Delete,
Settings;
Æ Messages Æ SMS Æ
Write SMS: Enter menu with
Write new SMS: The text entry is done by the keypad.
(e.g. 2x , 2x , 3x , 3x , 3x
for Hello).
Receive SMS: A short signal and a registration on the
display inform you about a new, incoming SMS message.
With
you can read the message immediately or see a list
of messages which have already been received in the menu
Messages Æ SMS Æ Received SMS.
8 SMS MESSAGES
SMS (Short Message Service) are written messages with a
maximum of 160 characters.
Note: If you want to save emergency numbers from official
services, police, fire department, etc., you have to clarify this
with the certain institution. No liability will be assumed for
possible costs incurred if you dial accidentally.
Note: To avoid getting caught on a mailbox, the reached
person has to confirm your emergency by calling back.
If no emergency number is saved or if your calling card has
expired or you have no access to a foreign network (e.g.
roaming not permitted), 112 will be dialed.
Saving emergency numbers: Enter menu Æ Phone book Æ
Emergency numbers Æ Add emergency number Æ
choose Emergency number (1-5) Æpick contact from phone
book Æ done
Note: select emergency number: private number (has to
confirm as explained above) or official service number, f.i.:
ambulance, police, etc. (no confirmation call required).
Switch emergency function On / Off: In menu Phone book
Æ Emergency numbers Æ Status Æ On / Off.
jkl5£
wxyz9ýþ
mno6öøó
Space; 0
pqrs7ß$
Special
characters:
,. ?;:!“’@_ ~
tuv8üùú
&+-()<>{}[]
If you have problems at the first time sending MMS, contact
your operator to check MMS settings.
Send MMS: enter Menu with
Æ Messages Æ MMS Æ
Create new MMS:
(Edit) Æ
Add number: Enter number/ select phone
1.
Æ
book entry
to Subject (this will be the headline of the message)
2.
(Edit) Æ Insert message text Æ (Done).
Æ
Æ (Edit) Æ Insert text or picture:
3. Edit content: 1x
(Options) Æ
to Add picture:
Æ open phone: Æ
open pictures:
Æ scroll to picture with
Æ choose
Æ Æ (done).
picture with
9 MMS MESSAGES
MMS (Multimedia Message Service) are messages incl.
pictures, audio, etc.
First time use: Menu ÆMMSÆMMS SettingsÆMMS
accountÆchoose operator
Send SMS: Select Send with 2x
and enter number or
, select contact with
).
select from phone book (2x
to send SMS.
Press
Switch between different entry methods by pressing :
abc-only small ABC-only CAPITAL 123-Numbers
.,!?‘“@:1
abc2äæåà
def3èèê
ghi4ìíîï
Each key carries several characters, appearing by multiple
presses.
If the alarm rings, end with . Use mute function with
reactivate the alarm after 1 minute.
to
11 TOOLS:
Bluetooth:
Æ Bluetooth
Æ
Switch on: In menuÆ Tools
Bluetooth on/off
Æ Bluetooth
Æ Connections
Pairing: menu Tools
Æ Search for new device
to search for devices Æ
select the device you want to pair, select
. Next time you
turn on Bluetooth connection will start automatically.
Alarm
in menu Æ On/Off: to switch Alarm clock on
Standby 1x
or offÆ Change: to set the time and repetition (once, daily,
personal setting).
Camera settings: , : Settings, picture size, white
balance
Picture gallery: menu Æ select picture, scroll to next
picture with .
Pictures: Æ option: View, Send as MMS, Use as
background, Use for contact (choose the phone book
entry, (note: only contacts from phone memory, not from
SIM-card). Calls to/from this contact will then show the
linked picture on the display), Rename, Delete, Delete all
files
(OK).
press camera-button Æpicture detail OK,
Take picture:
press , store with
10 CAMERA:
Disposal of battery: Do not insert battery into
household trash for disposal! You are obligated to
return used batteries. These can be handed into
local collection areas or to specialty shops.
Disposal of Device: When this product is taken out of
service, please do not throw it into the household
trash. Take care of the environment by bringing it to a
collection place, where old devices are accepted and
brought into an environmentally-friendly disposal/
recycling procedure.
13 DISPOSAL
Disposal of packaging: Packaging materials are
recyclable and shall enter the recycling process.
12 OTHER FUNCTIONS IN SETTINGS
Enter menu with
Æ continue to Settings: ,
Æ
Sound & Alert: To choose a phone profile (f.i. Silent) and
configure your personal settings.
Call waiting: You can activate/deactivate and check status
to get a notification about an incoming call while having a
phone talk.
Network settings: Choose automatic (automatic boot in a
network) or manual selection (select a network manually).
Favorites
: your favorite functions pressing 1 button
Auto power on/Auto power off
Voicemail number: Change the voicemail number
Security settings: Activate, deactivate or change PIN and
phonecode (default phone code: 1234).
Restore Factory: Reset the phone to factory settings.
This device complies with part 15 of the FCC Rules. Operation is subject to the
following two conditions: (1) This device may not cause harmful interference, and
(2) this device must accept any interference received, including interference that
may cause undesired operation.
Changes or modifications not expressly approved by the party responsible for
compliance could void the user's authority to operate the equipment.
15 Warning
FCC Warning:
14 FREQUENTLY ASKED QUESTIONS
Screen shows “Insert SIM card! Only emergency call
112“: Check the direction of the SIM card
A call failed: Check the selected telephone number and
area code again for accuracy (area code entered?).
The mobile telephone display is blank/black: Telephone
is in energy saving mode (press any key) or it is switched off
(press
for 2 seconds to switch on).
The mobile phone does not react: Remove battery, reinsert and switch on the device. If there is still no reaction,
refer to the service centre.
The charging procedure does not begin: This can take
several minutes. If there is no reaction after 10 minutes, refer
phone to service centre.
SAR tests are conducted using standard operating positions accepted by the
FCC with the Phone transmitting at its highest certified power level in all tested
frequency bands, although the SAR is deter mined at the highest certified power
level, the actual SAR level of the phone While operating can be well below the
maximum value, in general, the closer you are to a Wireless base station
antenna, the lower the power output.
Before a new model phone is a available for sale to the public, it must be tested
and certified to the FCC that it does no t exceed the exposure limit established by
the FCC, Tests for each phone are performed in positions and locations (e.g. at
the ear and worn on the body)as required by the FCC.
For body worn operation, this model phone has been tested and meets the FCC
RF exposure guidelines when used with an accessory designated for this product
or when used with an accessory that Contains no metal and t hat positions the
handset a minimum of 1.5 cm from the body. Non-compliance with the above
restrictions may result in violation of RF exposure guidelines.
Specific Absorption Rate (SAR) information
advertisement
Related manuals


advertisement