- Industrial & lab equipment
- Measuring, testing & control
- Multimeters
- ennoLogic
- eM860T True RMS
- Quick start Guide
advertisement

EnnoLogic True RMS Multimeter eM860T
Quick-Start Guide
WHEN YOUR TRUE RMS MULTIMETER ARRIVES
1 Open the Package
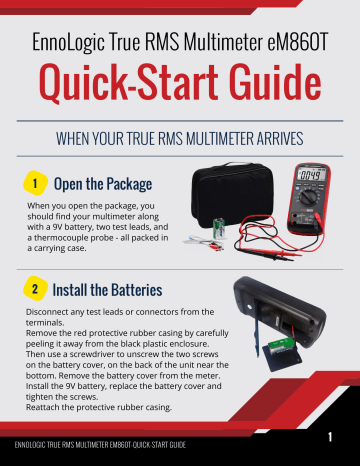
When you open the package, you should find your multimeter along with a 9V battery, two test leads, and a thermocouple probe - all packed in a carrying case.
2 Install the Batteries
Disconnect any test leads or connectors from the terminals.
Remove the red protective rubber casing by carefully peeling it away from the black plastic enclosure.
Then use a screwdriver to unscrew the two screws on the battery cover, on the back of the unit near the bottom. Remove the battery cover from the meter.
Install the 9V battery, replace the battery cover and tighten the screws.
Reattach the protective rubber casing.
ENNOLOGIC TRUE RMS MULTIMETER EM860T-QUICK-START GUIDE
1
GETTING FAMILIAR WITH THE TRUE RMS MULTIMETER
Main User Panel
1 LCD display: Used for displaying measurement results and various symbols.
2 Keypad: Measurement function keys.
3
Rotary switch: Used for selecting measurement functions.
• - Non-Contact Voltage Detection
• V~ - AC Voltage
• V - DC Voltage
• mV (~ or ) – AC or DC Millivolts
• - Resistance / Capacitance
• - Continuity Check / Diode Test
• Hz – Frequency / Duty Cycle
4
5
• °C / °F - Temperature
• A, mA and A - (~ or ) – AC or DC Current
: Connection terminal for the red test lead during voltage, resistance, capacitance, frequency, temperature, diode and continuity measurements.
A/mA : Connection terminal for the red test lead during A and mA current measurements.
6
7
A : Connection terminal for the red test lead during 6A and 10A measurements.
COM : Connection terminal for the black test lead (common reference.)
2
ENNOLOGIC TRUE RMS MULTIMETER EM860T-QUICK-START GUIDE
GETTING FAMILIAR WITH THE TRUE RMS MULTIMETER
Accessing Secondary
Functions
Press the Select key to switch to the secondary functions (indicated by blue symbols).
For example, to setup the meter for measuring capacitance, turn the rotary switch to the position, then press the blue Select key. Or, to measure AC currents in the mA range, set the rotary switch to the mA position, then press the
Select key.
Data Hold and Backlight
To freeze the current reading (Data Hold), press the Hold/Backlight key briefly. Press it again to turn Data Hold off.
To turn the backlight on and off, press and hold this key for 2 seconds.
3
ENNOLOGIC TRUE RMS MULTIMETER EM860T-QUICK-START GUIDE
FREQUENTLY ASKED QUESTIONS
What if I forget to turn off the multimeter?
To conserve battery power, the meter enters “Sleep mode” and blanks the display if it is on but not used for 15 minutes.
Press the key or turn the rotary switch to wake the meter up.
To disable Sleep mode, hold down the SELECT key while turning the meter on.
What is the NCV function, and how do I use it?
NCV stands for Non-Contact Voltage detect. It allows you to detect AC voltages in a cable or circuit without making an electrical connection with the test leads. The NCV function is mainly intended for scanning for a break in power cords. It should not be relied upon exclusively as the only instrument for testing if it is safe to work on an electrical system.
To use it, set the rotary switch to the / V~ mode. Press the SELECT key to switch to NCV detect mode. Hold the EF-DETECT area at the top of the Meter close to the AC power cable or power socket. If AC voltage is present, the meter will beep, and one or more bar symbols “-“ will be displayed on the LCD.
The lowest detectable voltage is around 50V, 50/60Hz.
WANT TO LEARN MORE?
You’ll find all the information you need to take all kinds of measurements with the eM860T multimeter in the detailed user manual downloadable at our website.
QUESTIONS? NEED ADDITIONAL SUPPORT?
(541) 525-9175
4
ENNOLOGIC TRUE RMS MULTIMETER EM860T-QUICK-START GUIDE
advertisement
* Your assessment is very important for improving the workof artificial intelligence, which forms the content of this project
Related manuals
advertisement