advertisement

IM 05G01B12-01E-S03
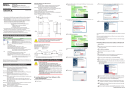
Model LL100
PC-based Parameters Setting Tool
Model LL200
PC-based Custom Computation Building Tool
2nd Edition: Feb. 2012
● The media for LL100/LL200 were changed into CD from the 3.5-inch floppy disk.
For the confirmation of the package contents and the setup method, see this
Notice of Alterations.
● The user’s manuals of LL100/LL200 on CD describe the usage with RS-232C serial communication. For the LL100/LL200 supporting USB, see this Notice of
Alterations for the following contents which are related to USB.
Contents related USB: ■ Confirmation of the Package Contents
■ Operating Environment and Wiring Specifications
■ Setup
Installing USB Converter Driver Software
Installing LL100/LL200
■ Connecting Controller to Personal Computer
● The applicable OS of the LL100/LL200 tool changed. For confirmation of the operating environment specifications, see this Notice of Alterations.
For the start-up of LL100/LL200 and the operation method, see the user’s manual.
User’s Manual (Reference) (CD version): IM 05D01A02-01
The release number of the LL100/LL200 tool is printed on the product CD.
Checking the Contents of the Package
Model and Suffix Code
Model
LL100
LL200
Suffix code
-E10
-U10
Description
PC-based Parameters Setting Tool
PC-based Custom Computation Building Tool
Model for use with IBM PC/AT compatible machine (English version), serial interface
Model for use with IBM PC/AT compatible machine (common to English and Japanese version), USB interface
−E10
−U10
CD (2 disks):
LL100 or LL200 (1 disk)
User’s Manual (Reference) (CD version) (1 disk)
Dedicated adapter (for serial interface, with two AAA-size batteries) and dedicated cable (for serial interface):
For connecting a personal computer to optical communication interface on the front of controller (1 set)
CD (2 disks):
LL100 or LL200/USB converter driver software (1 disk)
User’s Manual (Reference) (CD version) (1 disk)
Dedicated adapter (for USB interface) and dedicated cable (for USB interface):
For connecting a personal computer to optical communication interface on the front of controller (1 set)
Note
While the CD is being accessed, do not remove the CD from the CD-ROM drive, cut the power to the PC, or reset the computer.
Operating Environment Specifications
PC
Applicable OS: Windows XP (Home Edition/Professional (32-bit version)
Windows Vista Business (with Service Pack 1) (32-bit version)
Windows 7 Professional (32-bit/64-bit versions)
.NET Framework 3.5 installed.
Recommended CPUs: Pentium Processor 300 MHz or higher
(3.0 GHz or higher in Windows Vista Business/Windows 7 Professional)
Recommended Main Memory:
Windows XP (Home Edition/Professional); 128 MB or more
Windows Vista Business/Windows 7 Professional; 2 GB or more
Hard disk space:
Memory space required to store the tool’s programs; 10 MB for LL100 and 15 MB for LL200
Memory space required to store the parameter data; 2 MB minimum
Memory space required to store the driver for USBSerial converter; 1 MB
Display: 800 x 600 pixels or more
Color: 256 or more colors
USB communication port: One channel (COM1 to COM16), with SeriesA connector, compliant with USB Specification Rev1.1.
Network: 10BASE-T/100BASE-TX (required for Ethernet communication)
CD-ROM drive: One (required for installation)
Printer: Paper size; Letter or A4 (required for printing)
Dedicated Adapter (for USB interface)
Communication method:
Controller; optical, contactless, bidirectional serial communication
Personal computer; compliant with USB Specification Rev1.1
Power supply: Supplied from USB bus power (no internal battery)
Input rating; 4.4 to 5.25 V DC, 100 mA (including a dedicated cable)
* No plug for external power supply, no power switch
Ambient temperature range: 0 to 50°C
Ambient humidity range: 20 to 90% RH (no condensation)
Transport and storage conditions: -20 to 65°C, 10 to 90%RH (no condensation)
Dust- and water-proof construction: Not applied.
Standard: CE Marking (EMC only) to be approved
3
36
Unit: mm
Cable
45.5
96
96
(100)
Controller
41
11
3
To adapter To PC (USB)
Note: The dedicated cable for USB interface is for the dedicated adapter for USB interface. It can not be used for the dedicated adapter for serial interface.
Installing USB Converter Driver Software
CAUTION
• Logon in Windows XP:
- Log on using the user name of Administrators group.
- The program does not start normally if the user name not belonging to the Administrators group is used for loggong on.
• In Windows Vista/Windows 7, install USB converter driver software as an administrator.
• Avoid entering just the drive as the installation location, such as
C:\. Enter the full directory path.
• Before installing USB converter driver software, quit all running applications.
• When reinstalling USB converter driver software, uninstall the installed USB converter driver software first, and then reinstall
USB converter driver software.
n
Installing USB Converter Driver Software in Windows Vista/Windows 7
Operating procedures and screens in Windows Vista.
1.
Start Windows.
96
2
CAUTION
The dedicated adapter and the dedicated cable are not waterproof.
Do not use them in locations that are likely to be exposed to splashes of water or other liquids.
Dedicated Cable (for USB interface)
Built-in USB-Serial converter
Personal computer side: USB SeriesA plug
Adapter side:
Cable length:
RJ45 (8-pin) plug
Approx. 2.7 m
224±50 107 35±10
Unit: mm
2.
Insert the CD of LL100 or LL200 into the CD-ROM drive. The start-up screen appears automatically.
Note: If the start-up screen does not appear automatically and the AutoPlay screen appears, click
Run startup. exe to display the start-up screen.
3.
4.
5.
6.
Click
The User Account Control screen appears. Click
Installshield Wizard screen appears. Click
Click
USB Driver Installation.
Install.
Next.
Continue.
7.
8.
9.
The Windows Security screen appears. Click
The Windows Security screen appears. Click
When installation is complete, the Finish dialog box appears. Click
The dialog box closes. You have completed installing the driver software in Windows
Vista.
When you connect the dedicated cable to a USB port on your computer, the driver becomes available automatically.
For installation of USB converter driver software in Windows 7, follow the message given in each dialog box.
n
Installing USB Converter Driver Software in Windows XP
1.
Start Windows.
2.
Insert the CD of LL100/LL200 into the CD-ROM drive. The start-up screen appears automatically.
3.
Click USB Driver Installation.
4.
Installshield Wizard screen appears. Click Next.
5.
Click Install.
6.
A message appears to warn that the software you are installing has not passed Windows Logo testing. Click Continue Anyway.
7.
The same warning message appears. Click Continue Anyway.
8.
When installation is complete, the Finish dialog box appears. Click Finish.
9.
Connect the connector of the dedicated cable to the USB communication port of a personal computer.
The Found New Hardware Wizard appears automatically. Select No, not this
time. Click Next.
10.
11.
Select
Install. (USB device driver)
Install. (COM port driver)
Finish.
Install the software automatically (Recommended). Click Next.
A message appears to warn that the software you are installing has not passed Windows Logo testing. Click Continue Anyway.
12.
Copying of the USB device driver for the dedicated cable begins. When installation is completed, a confirmation message appears. Click Finish.
13.
Installation of the virtual COM port driver begins continuously. Select
not this time. Click Next.
No,
14.
Select Install the software automatically (Recommended). Click Next.
IM 05G01B12-01E-S03 page 1/2
15.
A message appears to warn that the software you are installing has not passed Windows Logo testing. Click Continue Anyway.
16.
Copying of the virtual COM port driver begins. When installation is completed, a confirmation message appears. Click Finish.
You have completed installing the driver software in Windows XP.
n
Verifying Installation
Operating procedures and screens in Windows Vista
1.
From the Start menu of Windows, select Control Panel > Device manager.
Note 1: From the Start menu of Windows, select Control Panel > System and Maintenance >
Device manager if the control panel's display method is “Control Panel Home.”
Note 2: In Windows XP, from the Start menu of Windows, select Control Panel > System >
Hardware > Device manager and verify the steps 3 and 4.”
2.
In Windows Vista, the User Account Control screen appears. Click Continue.
3.
Verify that the virtual COM port driver (1) “YOKOGAWA USB Serial Port
(COMn)” is displayed under “Ports (COM & LPT)” as COM port and the USB device driver (2) “YOKOGAWA USB Serial Converter A1053UR” is displayed under “Universal Serial Bus controllers.”
(1)
(2)
4.
The COM port number assigned to the dedicated cable can be verified by the port number displayed in (1) “YOKOGAWA USB Serial Port (COMn)” of
Device Manager (see the step 3). To change the COM port number, doubleclick (1), select Port Settings tab of Properties screen and click Advanced.
Change the COM port number in the Advanced Settings for COMn screen.
n
Uninstalling USB Converter Driver Software
Operating procedures in Windows Vista
Unplug the dedicated cable if it is connected to a personal computer.
CAUTION
1.
Unplug the dedicated cable if it is connected to a personal computer.
2.
From the
Features.
Start menu of Windows, select Control Panel > Programs and
Note 1: From the Start menu of Windows, select Control Panel > Uninstall a program if the control panel's display method is “Control Panel Home.”
Note2: In Windows XP, from the Start menu of Windows, select Control Panel > Add or Remove
Programs and uninstall the driver software.”
3.
Select YOKOGAWA A1053UR Installer and click Uninstall.
4.
In Windows Vista, the
Continue.
User Account Control screen appears. Click
5.
The Confirm Uninstall screen appears. Click Yes.
6.
The Uninstall Complete screen appears. Click
You have completed uninstalling the driver software.
Finish.
Installing LL100/LL200 Tool
CAUTION
• Logon in Windows XP:
- Log on using the user name of Administrators group.
- The program does not start normally if the user name not belonging to the Administrators group is used for loggong on.
• In Windows Vista/Windows 7, install the software as an administrator.
• In Windows Vista/Windows 7, do not set LL100/LL200 user file save directory in Program Files folder. The LL100/LL200 will not work properly.
Also if LL100/LL200 user file save directory is set in Program
Files folder on Windows XP personal computer, do not upgrade its OS to Windows Vista/Windows 7.
• Before installing LL100/LL200 Setting Software, quit all running applications.
• Avoid entering just the drive as the installation location, such as
C:\. Enter the full directory path.
• When .NET Framework 3.5 SP1 is not installed on Windows XP/
Windows Vista/Windows 7 personal computer, .NET Framework
3.5 SP1 is installed to start LL100/LL200.
• When reinstalling LL100/LL200, uninstall the installed LL100/
LL200 first, and then reinstall LL100/LL200.
n
Installing LL100/LL200 Parameter Setting Software
Operating procedures and screens in Windows Vista
1.
Start Windows.
2.
Insert the CD of LL100 or LL200 into the CD-ROM drive. The start-up screen appears automatically.
Connecting Controller to Personal Computer
(for USB
Follow the procedure below to connect the controller to a personal computer.
1. Connect the dedicated adapter to the USB communication port of a personal computer using the dedicated cable.
2. As shown in Figure 4, hand the dedicated adapter from the top groove of the controller.
3. Push the adapter to the controller’s front panel to securely fix it in place.
Dedicated adapter
Controller
1. Connect the dedicated cable to the dedicated adapter and connect the other cable end to the PC’s communication port.
Personal computer
To USB terminal
Dedicated cable
CAUTION
• Make sure the dedicated adapter is attached to the controller in a vertical orientation. Communication is not possible if the dedicated adapter is attached in a slanting position.
• Do not remove the dedicated cable (for USB interface) while
LL100/LL200 communicate, or it may affect the stability of the operation system.
• Do not suspend while LL100/LL200 communicate, or the system may fail to recover subsequently form the suspension.
Controller
2. Hang the dedicated adapter's bracket from the groove.
Top of the controller
Push
Groove
3. Bring the dedicated adapter into contact with the controller’s front panel.
Note: If the start-up screen does not appear automatically and the AutoPlay screen appears, click
Run startup. exe to display the start-up screen.
3.
Click LL100 Installation or LL200 Installation.
4.
To continue, follow the message given in each dialog box.
n
Verifying Installation
From the Start menu of Windows, point to All Programs, then Green Series and verify that the Green Series contains Green Series LL100 or Green Series LL200.
n
Uninstalling LL100/LL200
From the Start menu of Windows, select Control Panel > Programs and
Features (*1) > LL100 or LL200 and uninstall it.
In Windows Vista, the User Account Control screen appears. Click Allow. The LL100 or LL200 is uninstalled.
*1: From the Start menu of Windows, select Control Panel > Uninstall a program if the control panel's display method is “Control Panel Home.”
In Windows XP, Add or Remove Programs.
Trademarks:
• Windows XP, Windows Vista, and Windows 7 are registered trademarks of Microsoft Corporation, USA.
• Pentium is a registered trademark of Intel Corporation, USA.
• Ethernet is a registered trademark of XEROX Corporation, USA.
• Other company and product names are trademarks or registered trademarks of their respective holders.
YOKOGAWA ELECTRIC CORPORATION
Network Solutions Business Division
2-9-32, Naka-cho Musashino-shi, Tokyo 180-8750 JAPAN
YOKOGAWA CORPORATION OF AMERICA
Head office and for product sales
2 Dart Road, Newnan, Georgia 30265, USA
YOKOGAWA EUROPE B.V.
Headquarters
Euroweg 2, 3825 HD Amersfoort, THE NETHERLANDS
www.yokogawa.com/ns
IM 05G01B12-01E-S03 page 2/2
advertisement
* Your assessment is very important for improving the workof artificial intelligence, which forms the content of this project
Related manuals

advertisement