advertisement

Using the Hypertherm 65/85/105 Air Plasma
Units with the CandCNC DTHCII &
HyT-Connect Dynamic Cut Control (DCC)
Upgrade to Provide Advance Cut Features
CandCNC Offers:
? High speed microprcessor based DTHCII 4th generation control.
?
Wide range of Motion Controllers with integrated Torch Height Control
?
Single cable connections with no internal modifications to the plasma.
?
Digital noise immune plasma side pickup for accurate readings from 50:1 voltage divider. Total isolation of all signals.
?
Only vendor that offers low cost Digital Current Probe to read and display the actual current at the cut in AMPS.
?
Remote communication and control capability using industry leading
RS485 to USB.
?
?
All interface is via custom Operator Screens.
Unlimited Stored Settings uses Hypertherm cut charts. Settings for 45, 65
?
85 and 105.
Dynamic Control of Plasma Cut Current and Air Pressure.
?
?
Readout on the screen of any plasma faults.
Advanced THC features including Anti-dive (tip saver) and options to Stop
?
on Fault and Retract Torch on Fault.
No-pause THC enable/disable during a cut.
?
?
DTHC settings from G-CODE job file using SheetCAM.
Only low cost system to offer industrial level features.
?
First vendor to offer Dynamic Cut Control including Feedrate reduction,
Cut Current reduction, THC ON/OFF, in real time, in a low cost system.
Hypertherm offers:
? Industry leading air plasma vendor with advanced torch technology.
?
Low cost air plasma with CNC connection options and internal voltage divider.
?
Only vendor to provide advanced communications and control via industry
?
standard RS485 in smaller plasma cutters (65 to 105 size).
Industry leading support. Help when you need it most.
?
?
Strong industry reputation for reliability and quality.
Built in the USA.
All content is copyrighted 2012 - 2015 by Fourhills Designs parent company of CandCNC. Any reporduction without permission is prohibited. HyT-Connect and Smart-Kut are registered trademarks of Fourhills Designs.
CandCNC
TABLE of CONTENTS
UPGRADING YOUR Hyperherm Plasma Cutter to DCC using CandCNC DTHCII and new software
I. DCC features and required options Chart
A. BETA release disclaime
B/ DCC Features and Required Options chart
C Hypertherm Part # for DCC Charts
D. Upgrade sequence
II. Updating/Installing MACH3 Software
A. Updating MACH3 software from download or CD.
1. Install warnings
2. Checking Install with earlier working profiles
B. Installing CandCNC drivers and Screens
1. Checking install
2. Confirm operation with earlier working Profiles
C. New Screen functions and DCC controls.
III. Loading and installing SheetCAM TNG Development Version
A. Installing the development version
1. Runs separately from SheetCAM TNG lockdown
2. Checking version numbers
3. Install License
B. Setting up Application Options and Default Directories
C. Installing CandCNC posts and toolsets
1. Setting running POST file
2. Using Toolsets
IV. Using Action Points for DCC and plasma cutting
A. Action Points
1. Defined b. Feedrate changes b. START and END points
1. Code Snips
2. DCC special codes
2. Setting Action Points (AP’s) on a contour a. Action Point Tool b. Adjusting START and END locations c. Moving, editing and deleting AP’s
B. Posting valid G-Code
1. Sample G-Code using MP3000-DTHCII-DCC+scriber scPost
2. Notes about using DCC a. Base level Presets act as Stored Settings b, Dynamic Cut Control during a cut.
1. Suggestions for DCC AP’s
CandCNC
Page
2
PRODUCT DISCLAIMER
BETA RELEASE DISCLAIMERS. PLEASE READ THIS PAGE!
The software covered in this special DCC release
may be BETA level code
. The MACH3 version an updated version and has custom features available only from the CandCNC install. The Action Point Tool and the Development version of the software is a special version of SheetCAM TNG, and is the first release of the AP tool. We have loaded and tested all of the software but only on a limited number of PC’s all running Windows XP and all setup and optimized to run MACH3.
The SheetCAM TNG version should work with later OS versions but we cannot verify that claim. Since SheetCAM TNG Development is installed as a separate application and can co-exist on a PC with the normal SheetCAM TNG it will not alter a running setup if you are using it on WIN7.
AS WITH ALL BETA SOFTWARE
: There may be bugs and changes that impact other operations or the stability of the software. If you encounter what appears to be a bug in the software and it is repeatable, document it and send it to me at: [email protected]
and I will investigate and interface to the appropriate development team.
Fourhills Designs / CandCNC makes no claim of any usability of this release and specifically disclaims ANY liability for ANY lost time. materials or profits from its use. Any disclaimers and warnings from the specific software vendors referred to pass through.
The User should read and understand each vendors disclaimers and that such disclaimers supercede any statements in this document
The use and operation of CNC machinery in general and CNC plasma cutting in specific is dangerous and can cause injury and possible death.
The CNC machine should incorporate sufficient safeties and shields to protect any operator, observers or nearby equipment from damage.
Under no circumstances is Fourhills Designs /CandCNC responsible for any damages or loss of revenue either direct or indirect or damage/injury to any person, structure or contents resulting from the installation or use of any hardware or software provided by us.
Installation and/or use of the software or hardware referred to herein is at the risk of the user and such install and/or use constitutes an acceptance of these terms.
If you are not experienced with CNC plasma cutting or not competent or unable to understand and avoid possible dangerous situations DO NOT INSTALL OR USE
THIS PRODUCT.
CandCNC
Page
3
DCC FEATURES and REQUIRED OPTIONS
OPTION
NUMBER
3
4
1
2
5
6
7
8
9
10
DESCRIPTION
Any plasma cutter.
DTHCII Digital Torch Height Control
DTHCII Digital Torch Height Control with REV 1.4 or higher firmware
Hypertherm model 45/65/85/105 plasma cutter w/CPC port
Hypertherm model 65/85/105 plasma cutter w/CPC and optional RS485 port
MACH3 update version 3.043.067 or laater
SheetCAM update/install to SheetCAM TNG Development
DTHCII screen and drivers update
CandCNC Advanced Connection Kit for Hyperthem 65/85/105
Special SheetCAM version (not yet available)
Part of HyT-Connect Update installer pavkage (CD)
WHAT OPTIONS YOU NEED FOR ADVANCED FEATURES
FEATURE:
DESCRIPTION
REQUIRES::
STORED SETTINGS
(Basic)
Real Time setting of
Preset Volts, Preset
Amps and THC Delay
Cut Current settings to
Hypertherm from
Screen
Preset Volts setting from G-CODE
Preset Volts AND
Preset AMPS setting from G-CODE
No-Pause DTHC
ON/OFF
FULL DYNAMIC CUT
CONTROL (DCC)
Library of stored settings for the DTHCII.
Allows setting of certain stored settings from the main operator screen in MACH instead of
Popup
Allows setting of Cut Current (Torch AMPS) from the screen (while cutting or from a Cut
Profile.)
Allows CAM operator to define certain plasma presets to use at run-time. Preset Volts overrides current Cut Profile settings for
Allows CAM operator to define certain plasma presets to use at run-time. Presets override current Cut Profile settings for DTHCII
Allows CAM operator to define THC ON and
THC OFF commands While cutting with no motion pause. Manual insertion or via G-Code
Allows CAM operator to define ACTION
POINTS in the contour to automatically insert
Feedrate changes, Cut Current Reduction,
DTHC ON/.OFF.
OPTION1
OPTION 2:
OPTION1
OPTION 2
OPTION 7:
OPTION 2
OPTION 5
OPTION 8
OPTION 2
OPTION 6
OPTION 7
OPTION 4
THRU
OPTION 9
OPTION 3
THRU
OPTION 8
OPTION 3
THRU
OPTION 10
CandCNC
Page
4
HYPERTHERM PART #
CROSS REFERENCE
AT THIS TIME: Hypertherm is the ONLY air plasma manufacturer that has seen the opportunity to provide advanced cutting features and remote commination to the smaller 65 to 100 A air plasma market. The HyT-
Connect technology from CandCNC was developed with the assistance of Hypertherm Enginnerig and is exclusive to their machines.
Hypertherm
MODEL #
45
No Torch
With CPC
(CNC) port only
CandCNC Part for interface
088013
With CPC +
RS485 serial
CandCNC Part for interface
N/A
N/A
NOTES
Comes stock with CPC
45
Mechanized
65
No Torch
65
Mechanized
85
No Torch
85
Mechanized
105
No Torch
105
Mechanized
088034
083266
083294
087104
087132
059731
059380
MIC-01 cable
MIC-01 cable
MIC-01 cable
MIC-01 cable
MIC-01 cable
MIC-01 cable
MIC-01 cable
MIC-01 cable
N/A
083267
087105
087105
087139
059732
059386
N/A
Advanced
Connection Kit
Advanced
Connection Kit
Advanced
Connection Kit
Advanced
Connection Kit
RS485 Serial Option not available
CPC & Voltage divider is an option
CPC & Voltage divider is an option
CPC & Voltage divider is an option
CPC & Voltage divider is an option
Advanced
Connection Kit
Advanced
Connection Kit
CPC & Voltage divider is an option
CPC & Voltage divider is an option
CPC-voltage
Divider Kit
RS485 Serial
Interface Kit
228696
228539
MIC-01 cable
Advanced
Connection Kit
These parts are for Hypertherm units that are not ordered from the factory with the listed options.
These kits can be added in the field to the listed models. Model 45 cannot be used with RS485 option.
Mechanized model part numbers shown above are for North America voltages and have the
Duramax full length mechanical torch with 25 ft leads. If you need other configurations please contact you Hypertherm reseller or Hypertherm Tech Support for the appropriate part numbers.
OLDER HYPERTHERM MODELS
None of the Older Models listed have the option to add the RS485 Serial so will not do full DCC control with Dynamic Cut Current
MODEL
600, 900,
1100
CandCNC Interface
HyT-Connect RETRO1
(Universal Connection Kit)
1000, 1250,
1650
HyT-Connect 1000 (Semi
Automated
NOTES
Has all cards and modules for connection to any plasma
Includes cabel for CPC connecter (standard) and voltage divider card
CandCNC
Page
5
Upgrade for HyT-Connect
Plasma System and DCC Option
Make sure the normal Install of your BladeRunner AIO Dragon-Cut or the MP3000-DTHCII has been done and all of the setup and calibration is finished. You should have a fully functional plasma cutting system BEFORE you attempt the upgrade to the HyT-connect DCC Dynamic Cut Control system. The HyT-Connect DCC
INSTALL updates several files and requires a different version of MACH3 provided by CandCNC. You will also need to update your SheetCAM TNG version. There is a separate installer for SheetCAM and you will need to run that on the PC workstation where SheetCAM is installed (not on the MACH3 control computer!)
BEFORE YOU START THE UPGRADES and INSTALLS:
another folder or memory stick
Make SURE you do a complete backup to a
of the ENTIRE MACH3 folder. Rename the Folder so it will not conflict with the
MACH3 folder and you can open and retrieve files if necessary. Keeping backups of your setup(s) is vital to save hours or even days of trying to recover.
INSTALL INSTRUCTIONS FOR UPDATING THE MACH3 PROFRAM to use DCC
CandCNC has updated the version of MACH on the Support CD and Software CD to MACH release 3.043.067. so you MAY NOT NEED TO PREFORM THE UPDATE STEPS 1 - 9 below.
Check your installed version of MAch by opening MACh and using the HELP/ABOUT top menu/
1. NOTE: Install this on the CNC Control computer already running MACH3 and the CandCNC setup.
2. BACKUP your existing MACH3 folder on the C:\ drive to an external storage device
(memory stick?)
3. Make a new folder on the C;\ named MACHUpgrade
4. If you have an older existing version of MACH3 installed Unzip the MACHUpgrade.zip file into that folder. You should have one file: MachVer3.043.067.exe (final two numbers may be higher)
5. Run the update by clicking on the MachVer3.043.067.exe file
6. During the Update do not let it create any profiles
7. During the install be SURE to let it load the Parallel Port Driver
8. Open MACH and run your existing profile and make sure everything is working
9 Close MACH
INSTALLING NEW DCC UPDATE
Create a folder on the C: drive named DCC-Upgrade
2. Unzip the DTHCII-DCC-Update file into the new folder
3. You will have one file in the folder named HyT_DynamicCutControl_Install.exe
4 RUN the HyT_DynamicCutControl_Install.exe to add in the new DCC screens and drivers for MACH
5. Start MACH and use the MACH LOADER to select the DTHCII-HyTConnect Profile
6. You will need to transfer the motor tuning and any other setting that were changed
(like PORT 1 address) from your older Profile
7. The new profile is used with both BladeRunner and MP3000/Plazpak units
8. If you run router profiles you can continue to use the older profile for that operation
CandCNC
Page
6
NOTE: MACH3 REL 3.043.067 is a standard release from MACH and may not display the special labels above
PROGRAM TO RUN Located at: Actions - Results
MACH3 UPDATE version
3.043.067
www.candcnc.com/Downloads
/MACH-Update.zip
OR
On HyT-Connect DCC
Support CD
HyT_DynamicCutControl_Inst all.exe
www.candcnc.com/Downloads
/DTHCII-DCC-Update.zip
OR
On HyT-Connect DCC
Support CD
Unzip and read the
MACHUpdate-Instructions File
Unzip and READ THE
OPENING Instructions FILE during the install. This adds drivers and custom screens for MACH
AFTER YOU RUN THE MACH3 UPDATE
. Start MACH3 and run your prior BladeRunner or MP3000 profile with the new version and make sure everything still works
Check the chart on page 4 To use some of the FEATURES you must have a recent version of the DTHCII
Firmware. The firmware version sticker is on the top of the DTHCII module (inside the BladeRunner AIO or the MP3000DTHCIUI case).
To get updated firmware the module must be returned. We have setup a web based page to allow several return methods at http://www.candCNC.com/DTHCII_Firmware.html
OTHER THINGS TO CONSIDER:
IF YOU HAVE THE HYT-CONNECT RS485 SIM KIT from CandCNC and have installed it using the
HyT_CONNECTRS485_Install.exe (or PN200 version of that installer) and you have connection to your
Hypertherm 65/85.105 than you need not do any other installs other than those above,
IF YOU DO NOT HAVE the RS485 option on your Hypertherm or you DO NOT HAVE the CandCNC HyT-
Connect RS485 SIM OR it is NOT INSTALLED than you will not be able to use
some of the features of DCC
.
If you have a Hypertherm model 65/85 or 105 and want to upgrade it to have full DCC features contact your
Hypertherm reseller/dealer or Hypertherm Support and order the RS485 Interface Kit to update your machine.
Contact CandCNC and order the Advanced Connection Kit for the 65.95.105 OR if you already have the basic connection kit (single cable MIC-01) than order the RS485 SIM module and the DCP-01 Digial Current Probe lower down the page.
CandCNC
Page
7
MACH3 Screen for HyT-Connect
Plasma System and DCC Option
UP/DOWN Preset Volts
Adjust
Buttons. Bumps Preset value UP or DOWN on volt per click. Applied instantly
CURRENT FAULT
Indicates a condition where the actual Cut
Current is higher/lower than the
PRESET AMPS by the percentage set in Current
Tolerance. DCP-01 Digital
Current Probe required .
PRESET AMPS. This is the current you want the plasma to cut at. It sets the point for the
Current Fault. IF you have the
Hypertherm 65/95/105 with
RS485 and HyT-Connect SIM this sets the Cut Current on the plasma cutter
PRESET VOLTS
DRO
. Shows value for Preset (target) torch volts.
Most important parameter.
This is the value the DTHC will attempt to adjust the torch UP or
DOWN to match.
TORCH VOLTS
DRO
Shows actual volts while cutting. Torch
Volts are displayed constantly and may show zero with torch off. This value will vary with the ARC
GAP
This is the DTHC section of the new screen set that is installed with the
HyT_DynamicCutControl Install program
Interaction of PRESET VOLTS and
TORCH VOLTS: During cutting with the THC engaged and DTHC active the TORCH VOLTS should stay within 1 or 3 volts of the PRESET
VOLTS. MACH will adjust the Z based on commands from the
DTHC. ARC VOLTS is proportiaonal to the ARC GAP so moving the torch
UP incresase the voltage whie moving down decreases the voltage
TORCH AMPS
. This is the actual current in AMPS that is flowing in the cut.
DCP-01 must be installed and working
for this to display the acutal cutting current.
DTHC STATUS
when on indicates the DTHC is enabled
(active) DTHC can be disabled from G-Code
DTHC DELAY
Shows when the THC DELAY is active
(tyoically during the pierce
% of PRESET
DRO (no input)
This DRO is only used with the
DCC function and shows the
percentage of reduction
in
CUT CURRENT being used during a DCC cut. See DCC
THC ON.OFF Button
. Turns on/off the THC logic in MACH.
When off MACH ignores commands from DTHC to move the Z.
AUTO button/LED
turns on./off tje AUTO THC ON
TORCH FIRE BUTTON. Manual torch fire. Turns on OUTPUT1 in
MACH and activates the Torch
Relay in the THC SENSOR
PWM MODULE
TIP SAVER LED & ON-OFF
BUTTON.
Tip saver is a dynamic anti-dive that keeps the torch from diving into the work if a sudden voltage change is detected. It senses running across a void and the end of a cut where the torch hits the lead in area.
UP & DOWN LEDS
the UP and DOWN
Show commands coming from the
DTHC as seen by MACH3 at the UP and Down inputs.
ARC OK
Indiactes a valid arc has been sensed Lack of arc when THC is active will stop motion
DTHC ONLINE.
Shows valid communication between MACH3 (PC) and DTHC module.
REQUIRED for DTHC operation
HT ONLINE
Shows valid communication from
MACH3 to Hypertherm
RS485 port
ACTION CODE. Part of new DCC system.
Shows action codes being passed from the running G-Code to
MACH and to the
DTHC to control cut parameters in real time.
SMART-KUT (Auto Laern)
Allows DTHCII to “Learn” the proper PRESET VOLTS for a given cut by measuring the first
2 secs (after the pierce cycle) of a cut and changing the PRESET
VOLTS dynamically. Torch must be setup and cutting properly with the correct touch-off (IHS) and Cut Height set fro Auto
LEGEND: SYMBOLS USED
Inducates a new control feature added.
Indicates a feature needed for Dynamic Cut Control
(DCC)
Some existing controls have
For an interactive help web page go to http://www.candcnc.com/HyT-ConnectScreen-help.html
CandCNC
Page
8
The DCC in conjunction with
SheetCAM can store the
PRESET VOLTS value and loads it when the G-code starts
UP/DOWN Preset Volts
Adjust Buttons. Bumps Preset value UP or DOWN on volt per click. Applied instantly
Tolerance. This action will overide any previous settings either from the Cut Profile or from the DCC G-Code.
MACH3 Screen for HyT-Connect
DCC Specific functions
PRESET VOLTS
DRO
. Shows value for Preset (target) torch volts.
Most important parameter.
This is the value the DTHC will attempt to adjust the torch UP or
DOWN to match.
TORCH VOLTS
DRO
Shows actual volts while cutting. Torch
Volts are displayed constantly and may show zero with torch off. This value will vary with the ARC
This is the DTHC section of the new screen set that is installed with the
HyT_DynamicCutControl
PRESET AMPS. IF you have the Hypertherm 65/85/105 with
RS485 and HyT-Connect SIM this sets the Cut Current on the plasma cutter. The DCC will generate code that sets this value when the code starts
DTHC STATUS
when on indicates the DTHC is enabled
(active) DTHC can be disabled from G-Code
DTHC DELAY
Shows when the THC DELAY is active
(tyoically during the pierce
TORCH AMPS
. This is the actual current in AMPS that is flowing in the cut.
DCP-01 must be installed and working
for this to display the actual cutting current.
% of PRESET DRO (no input)
This DRO is only used with the
DCC function and if you have the Full DCC with active current control of a Hypertherm It shows the percentage of reduction in
CUT CURRENT being used during a DCC cut. The ACTUAL cut current will show in the
TORCH AMPS DRO IF you have the DCP-01 installedand working
THC ON.OFF Button
. Turns on/off the THC logic in MACH.
When off MACH ignores commands from DTHC to move the Z.
AUTO button/LED
turns on./off tje AUTO THC ON function that turns on the THC
Button automatically when the torch is fired. THIS function is different than the new DTHC
ON/OFF from the G-Code. It is
recommended you keep the
THC button on all of the time when using DCC
ACTION CODE.
Shows action codes being passed from the running G-Code to
MACH and to the DTHC to control cut parameters in real time.
See DCC details
About DTHC ON/OFF versus
THC ON/OFF: THC on/off turns the logic for THC in
MACH on or off whereas the
DTHC on/off sends a signal to the DTHCII module to quit sending commands. YOU
MUST have REV1.4 or higher firmware in your DTHCII module.
The Stored Settings (Cut Profile). The Stored settings button opens a popuup window of all the DTHCII settings. There are several, but in most circumstances the default settings are fine. The three most critical settings are: PRESET VOLTS.
PRESET AMPS and DTHC DELAY. (THC Fault delay) These settings will vary based on the material being cut and the plasma settings. The new DCC in conjunction with
SheetCAM TNG outlined in thsi document allows the CAM operator to call out those three settings as part of the Toolset parameters. The three settings are then part of the JOB and do not need to be selected or changed by the machine operator/
For an interactive help web page go to http://www.candcnc.com/HyT-ConnectScreen-help.html
CandCNC
Page
9
What you will do with the SheetCAM TNG upgrade depends on which version of SheetCAM you are currently running. You MUST have a licensed copy of some version of SheetCAM TNG to do the Development install and use it to produce code for DCC plasma.
IF YOU ARE RUNNING SHEETCAM TNG Stable Version than you will need to download the
SheetCAM TNG Development Version and run a full install. You can run both versions on the same computer but the Development version has it’s own environment and folder structure.
PROGRAM TO RUN Located at: Actions - Results
SheetCAM TNG Development version 4.1.14
http://www.sheetcam.com/downloads
.shtml
Or HyT-Connect DCC Support
CD
SheetCAM-updater.exe
www.candcnc.com/Downloads
/SheetCAM-Update.zip
OR
On HyT-Connect DCC
Support CD
Download and Do a base level install unless you already have the development version installed. This goes on the PC used for CAM operations
This adds in custom toolsets and posts for use with DCC
CandCNC
Page
10
SELECTING THE RIGHT POST
PROCESSOR
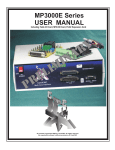
SHEETCAM TNG (Special Version) showing Post Processor That includes added TOOL parameters to assign Preset Volts and Preset AMPs. NOTE you must be running the
CandCNCDCC version of MACH3 and matching CandCNC Plug-ins for this feature to work. The MP3000-DTHCII-DCC+Scriber.scPOST must be used.
refDistance:
Is the distance in MM you allow of XY motion (total) before doing a Z REF (touch off) default is 500 mm (20 inches)
refFeed.
Sets the Z speed in IPM when doing a REF (touch-off) move
switchOffset.
The overtravel distance of the Z touch off switch. See DTHCII User manual for setup and calibration/
slowRadius:
Sets the arc radius below which the feedrate is lowered. If set to 0 the slowdown function is ignored
slowPercent :
The percentage (in decmial ) the slow Radius will slow the feedrate to (.4 = 40%) for
100 IPM .4 would slow to 40 IPM on the arc section
Disabled if slowRadius = 0
markerZ
Sets travel height during rapids when a Marker Tool is being used.
“true” means lift the Z to full Rapid Height during a rapid. NOT USED with plasma.
CandCNC
Page
4
DCC CUSTOM PARAMETERS for DCC
NOTE: Three new Custom TOOL parameters added using the specified
MP3000-DTHCII-DCC+scriber
POST.
If you do not have the input boxes shown you either do not have the correct SheetCAM version running or you have not selected the correct
POST to generate code in SheetCAM.
for the equipment you have.
Not All of the parameters are added as shown and listed below. The values of
PRESET CURRENT and Preset Air
PRessure only appear if you are using the
MP3000-DTHCII-DCC-
HYT+scriber This post is for users that have the Hypertherm RS485
Option installed and the CandCNC
HyT-Connect RS485 Sim Kit
(included in the Advanced
Connection Kit for the 65/85/105)
DCC Custom Parameters Added via Special POST
KERF WIDTH.
Based on the nozzle orifice you are using. The width of the cut used for calculating offsets for inside or outside type cuts. Actual kerf width can vary based on the feedrate, current setting, air pressure and age of the consumables.
FEEDRATE. The speed in IPM the job will be cut at. This does not set rapid speed and feedrate can vary based on the ability of the machine and the toolpath. Plasma cutting has recommended feedrate values for each type of material and current setting
PIERCE HEIGHT
This is the height above the material the arc is started and and a pierce of the metal is started. On material thicker than 063 (1.5mm) that height is normaly 2X or more the normal Cut Height.
It is done to prevent molten metal form splashing back and fouling the nozzle (tip).
PLUNGE RATE
The speed in IPM you move from Pierce Height to Cut Height. The slower this rate the longer the delay is before the torch reaches proper cutting height and horizontal motion starts.
Excessive delay will cause the starting hole to grow in size and the ARC VOLTS to start to climb. Typical rates are from 1./2 to 3/4 of the Z max velocity as set in motor tuning
PIERCE DELAY.
The amount of time the motion is paused AFTER the torch fires but
BEFORE the plunge to Cut Height. Total delay is a sum of all delays before XY motion has started. Be sure to reduce the pierce delay so the plunge time (from pierce to cut height) is included
TIPSIZE. The AMP rating of the consumable tip (Nozzle). It is stored in the G-Code and just reminds the operator the check for the correct tip. It has no other function.
DTHC DELAY; Sets the total delay time from when the torch fires until the DTHC takes over Z control. Time should allow cut to start and motion to reach full speed.
CandCNC
CUT HEIGHT This is the height the torch moves to begin the cut. Normally the recommend ARC GAP from the plasma manufacturer. Sometimes called Beginning
Cut Height it defines where the torch is above the material when a horizontal cut is
NO DTHC. Overrides ALL DTHC signals for THIS TOOL so the DTHC will be turned off for the entire run of this tool if the value is set to “0”.
Default is 1 so DTHC IS on
PRESET AIR PRESSURE
: Sets air pressure in PSI on Hypertherm’s with
RS485
Pause at End of Cut. Sets the end of cut delay. The time between when theTORCH OFF signal and the Z lift at the end of a cut. Most plasma arcs needs from .2 to .5 seconds to die out
PRESET VOLTS.
Sets the value for
PRESET VOLTS if you are running a
DTHCII system and the DCC drivers.
Overrides a PRESET VOLTS value from the
Cut Profile when code starts. It provides a way to set the parameter at the time the job is defined. If the value is set to 0 the value is ignored.
This value will be picked up in the G-CODE and displayed in the G-Code comments.
PRESET CURRENT .
Sets the value for
PRESET AMPS (Cut Current) if you are running a DTHCII system and the DCC drivers. If you are running a HyT-Connect
RS485 SIM install with a compatible plasma it will automatically set the plasma cut current. If you are using the DCP-01 the
Preset Amps also sets the trip point for a
Current Fault. This set the BEGINNING cut current in the code. That value can be changed during a cut but is the Default value if the override is canceled
Yellow Highlights indicate DCC values.
ORANGE Titles indicate values only available to RS485 equipped Hardware
Page
12
USING NEW SHEETCAM TNG WITH DCC
The following pages will show you how you can use a special version of SheetCAM to take advantage of Dynamic Cut Control. If you have the full DCC set of options (including the
RS485 options with a Hypertherm 65/85/105) than you can do some interesting cut control during a cut. There are two parts of the DCC for SheetCAM. The first is the ability to define PRESETS (same as calling up a CUT PROFILE. The previous page shows the custom parameters added to the tool table (toolset). If your setup will use Preset AMPS than that value can be used to setup the default job Cut Current.
The Preset Volts and
DTHC Delay values will work with any DTHCII based system and the DTHC ON/OFF function will work if you have a DTHCII REV1.4 or higher rev level card.
Setting up a new toolset
?
Open SheetCAM TNG Development and make sure you have applied the license using the Help/Install License File
?
Open OPTIONS/Application Options/Default Directories
? Once you have the Default Directory set for Toolsets (other directories are optional) than you can have access to the custom toolsets we have provided for the Hypertherm
45/85/85/105. You also have toolsets for older 1000, 1250 and 1650 and you can build your own tool tables in SheetCAM (or make chages to ours) and store them under new names.
Since you can now do the major parameter setting for plasma cutting in the G-Code you no longer need to match the CUT PROFILE in MACH to the job.
CandCNC
Page
13
With SheetCAM setup and before you import a drawing (DXF, SVG) to process you should setup the environment. The setup of the Machine Options is essential. The values for Working envelope and Table display is setup for your specific table and covered in the SheeTCAM instructions. The important parameter for the DCC is to select the correct POST PROCESSOR before you start building Operations and using tools. Open the Post processor tab
1
Because this version of SheetCAM is a development version, if you have the standard version of SheetCAM installed you have a different application environment where all of the files are in a folder structure like (not all folders shown);
C:\Program Files
SheetCam TNG Development
Posts
The installer will put the MP3000-DTHCII-DCC+Scriber.scPost in that folder and the list of post processors if you click on button 1 will contatin that POST. Select it and then hit the OK button
CandCNC
Page
14
SETTING A PAIR OF
ACTION POINTS
? Select the Operation you wish to add the Action Popints to in the OPERATIONS list on the lower left of the screen. When you select an operation it will highlight the contours associated with that operation and any custom operations like start points, and Action Points will show. Only one operation can be selected at a time and the other operations wil not show special operations, The Action points DO show on the contours as “X” points .
OPERATIONS WINDOW lower left of screen
This example is not intended to be a tutorial on how to use SheetCAM and how to build
OPERATIONS and assign TOOLS to a LAYER to build an operation. You should already know how to do that,
CandCNC
Page
15
1. To understand how action points work open the TestCut-Basicshapes-APTest.job file in SheetCAM using FILE.Open Job and go to the C:\ SheetCAM-CandCNC\TestFiles
Folder and load that job. You will see a job setup with several basic shapes that we use for test cuts. There are a series of squares and in the job file the outside two sqaures have been put on different named LAYERS and using the Hypertherm 45 Toolset two operations have been defined.
START
POINT
This example is not intended to be a tutorial on how to use SheetCAM and how to build
OPERATIONS and assign TOOLS to a LAYER to build an operation. You should already know how to do that,
CandCNC
Page
16
.
?
Go to the Cursor Menu and select the Action Points arrow cursor.
?
Click on the Contour where you want to set the points the direction (Start and End arrows will show as a hollow (START) and solid (END) arrow.
?
The width of the span from START to END will be the last value used. Do not worry if it is not the right size for what you want.
?
Note the direction of the Action Points will match the cut direction of the contour.
?
Move the Cursor around the contour (you can move around corners or features which is handy) and left click to set the Action Points. If you move you mouse over the
START or END Coursor and pause (no click) you will see a popup selection box like the one below.
The same box pops up regardless if you hover over the START or the END Arrows.
(may change in later releases of the software). Each field in the box is used to set a
Action to happen at that point.
Feedrate
Start Code
End Code
this value sets a
PERCENTAGE of the normal feedrate you have definedfor this OPERATION (slected at the time you build the
OPERATION. This can let you define a slowdown point and will slow the commanded feedrate to that percentage.
The END value for
FEEDRATE ALWAYS returns the feedrate back to the original value
Do not use this to set the feedrate of your whole operation...it is temporary
This allows a “Code Snip “ to be used at that point. We have included a large set of canned codes The button allows a selection of different codes. Using a special code system the DCC can turn the
DTHC on or off and (in the same code), set a
PERCENTAGE of the normal
PRESET AMPS (Cut Current) for the Hypertherm units with the RS485 option.. Other
“actions” can be defined in the toolset. If you change a value via a CODE then it stays that value until you change it back
This allows a “Code Snip “ to be used at that point. It is used to cancel any Start
Code action. The values DO
NOT return to default automatically
EXCEPTIONS: The
Feedrate is always returned to the last running value before the reduction if used.
The DTHC is automatically turned back on at the beginning of the next cut. If you have set the tool to have no DTHC (No DTHC= 0) that
OVERRIDES the automatic re-set of the DTHC
CandCNC
Page
17
? In the toolbar located at the top there are a series of Cursor Tools. A new Cursor Tool has been added to this version and it is highlighted
END
ACTION
POINT
CandCNC
START
ACTION
POINT
THE TWO POINTS
TOGETHER MAKE UP AN
ACTION POINT PAIR
To move/position the START (Hollow) and END (solid)
ACTION POINTS after they are set, simply have the Action
Point Cursor selected and move over an arrow, click and hold the left mouse button and drag the arrow along the contour and release to reset it at the new locations. You can do this with any arrow on the contour if there are multiple
Action Point pairs
If you “hover” over an action point with it unselected for abut 1 sec the Parameters window will popup and you can see the LENGTH of the Span between the points (this number will change if drag the points) and Both the Start Mode and End Mode
Code Snip names. In this example we have define a set of action points and selected a canned code from the Hyperthem-45_Plasma Tools toolset. The code reduces the feedratte at the START arrow to
70% of the normal feetrate for this operation (from
225 IPM to 157 IPM) and leaves the DTHCII active
(ON) and reduces the cut current to 70% of the defined PRESET AMPS. The END Code leaves the
DTHC active and takes the cut current back to
100%
Page
18
Special Notes about the Action Tool:
1. The action tool “remembers” the last settings (Length, Feedrate and
START and End Codes) so when building a cut file if you have several points you want to treat the same way (like corners) you can select the
Action Point Tool, left click along an active contour, drag the action
PAIR, and release and they will have the same settings as the last pair you used. This can let you build a multi-pair operation very quickly. If there are other points you want that are different you can come back and add them in after the repeat points are put down.
2. At this time you can drag a set of Action Points around a START point on a contour and it will perform the END action BEFORE it performs the START Action. This may cause some confusing code.
This is a bug that will be fixed in a later release.
3. You cannot select the lead-in as part of the Action Point area.
4. The Feedrate and Cut Current are REDUCTION percentages so you cannot define values > 100% to INCREASE the base level
Feedrate or Cut Current.
BUILDING CUSTOM CODE SNIPS FOR DCC
We have provided most of what you will need in the toolsets loaded during the install. It is recommended that if you want to build a new toolset you use one of the provided toolsets , edit it and save it off as another name in the same location. That way the existing The CODE Snips can be retained..
To build a CODE SNIP of your own remember the following.
1. It has to be a valid G-code command. IF you don’t know what you are doing in G-Code BE CAREFUL!.
2. The Action Point processes that G-CODE at the exact spot in the toolpath shown on the screen. Some codes can cause the motion to hesitate while that line of code is processed. Calling a MACRO (M code) is an example.
10 - 19.
SPECIAL S Codes used by the DTHCII:
The first digit (1) turns the DTHC off. The second digit
20 - 29
. The first digit (2) turns sets the percentage times 10.
the DTHC ON. The second
Example: S!5 would turn the digit sets the percentage times
DTHC off (stop Z axis UP and
10.
DOWN commands) and set the
Example: S!5 would turn the
Cut Current to 50% of the
DTHC off (stop Z axis UP and normal PRESET AMPS
DOWN commands) and set the
NOTE: The letter “I” in
Cut Current to 50% of the elecronics is “Current “ normal PRESET AMPS measured in AMPS
CandCNC
Continued next page
Page
19
SPECIAL S Codes used by the DTHCII:
310 - 3300. The first digit (3)Indicates this is a volts Preset value. The next 3 digits set the actual value (in volts).
Example: S3117 send 117 volt value to the
PRESET VOLTS DRO and transfer that value to the memory of the DTHCII. This is done using the value defined in the Toolset parameters window for Preset Volts/ This is automatically put at the beginning of the
Code to set the values BEFORE cutting starts. The POST translates the value sent into the correct code. Wile it is possible to send a new Preset value during a cut using this code it is NOT RECOMMENDED since it changes the actual job (tool) preset value and has to be reversed out by changing it back in a code snip that could change with every tool
410 - 4200. (Hypertherm RS485 equipped
models only)The first digit (4)indicates this is a cureent (amps) Preset Value. The next three digits sets the actual value (in AMPS)
Example: S445 would send 45 amps to the
PRESET AMPS DRO. IF you have a Hypertherm plasma cutter with the optional RS485 port and the
CandCNC RS485 SIM Kit that value would be loaded into the Hypertherm automatically. This is put at the beginning of the Code to set the values
BEFORE cutting starts. The POST translates the value sent into the correct code. While this code could be used in a Code snip to send a specific value and cahnge the Cut Current DURING a cut it is nuch better to use the PERCENTAGE reduction in the 10 or 20 type codes.
50 - 520.9
. The first digit (5)Indicates this is a DTHCII Delay (in seconds) value. The next 2 digits plus decimal sets the actual value.
Example: S51.5 sends the value of 1.5
seconds to the DTHCII delay DRO and transfers that value to the memory of the
DTHCII. This is done using the value defined in the Toolset parameters window for DTHC delay-sec This is automatically put at the beginning of the Code to set the values BEFORE cutting starts A value of
ZERO (50) is ignored by the control and it uses the stored Setting from Cut Profiles for the DTHC Delay.
NOTE: a value of 0.5 is
VALID and shows a fractional (½) second.
60 - 699.
Sets the number of volts (in volts) the Preset Volts can be
changed
DURING a cut. This is an
INCREASE that in value to change in the event of a feedrate reduction. Example” a Code Snip with the code S65 would raise the PRESET VALUE by
5 volts. So a PRESET of 117 would raise it to
122. This has the effect of canceling the down motion of going into a feedrate slowdown.
CAUTION: be careful with this tool. Each plasma cutter will behave somewhat different and moving the PRESET VOLTS too far can have ugly consequences. NOTE 699 cancels the command and reverts back to normal PRESET value (in this case 117) Be SURE to cancel and increase on the END point.
70 - 7199 (Hypertherm RS485 equipped models only)
Not currently used at this time. Will be used to provide variable current piercing (ramped current during a pierce cycle)
80 - 8199 (Hypertherm RS485 equipped models only)
Sets the AIR PRESSURE in PSI for cutting.
This setting does nothing on Plasma Cutters that do not support remote setting of air pressure
900
Turns ON the DTHCII signals (typically used to reset the DTHCII to ON after it has been turned off by a 999 code. This is a GLOBAL command meaning it overrides any other DTHC off.
999
Turns OFF the DTHCII signals This is a GLOBAL command meaning it overrides any other DTHC on. Command. It is set in the Tool Table as the
DTHC OFF parameter. It disables the DTHC signals
for that tool
.
It will override a 10 or 20 command as far as the DTHC being turned on/off
CandCNC
Page
20
USING SHEETCAM WITH DCC
TOOLSETS & DCC VALUES
? Once you have the new SheetCAM TNG Development REV 4.1.14 (or higher) loaded and setup and the acces to the new toolsets, use the FILE/Open Toolset menu and find the toolset that matches your plasma. Yopuw will se something similar to the screen below
The screen above is a toolset for a Hypertherm 45 and we have selected the 10Ga Steel setting. Note that the tool definition window shows a range of parameters that are set. Anny value can be changed by the user and if you save the toolset before you close SheetCAM that value will be stored in that toolset for futire use. For DCC the three lower values will allow you to store the DTHC settings for that material.
It is importatn to understand how the DTHCII stores and uses the settings.
1. The DTHCII has numersous settings that can be changed by the user. Most of the settings will remain at the default (like the SPAN VOLTS, ARC OK Value and Min-MAX values for faults.
2. The DTHCII module has it’s pwn processor and memory independent of MACH or the application. The CUT PROFILES show the “Current Settings” (Current meaning the settings in the memory) and that is what the DTHCII uses to cut from. When you make a change it gets loaded inot the DTHCII memory via a SERIAL (COM) which why you MUST have the DTHC ONLINE indicator ON so the DTHCII talks to the PC. The changes canbe made via the cut profile of the specific DRO or buttons on the screen. See your DTHCII
USer Manual for a more in depth explaination.
3. When you load a g-code generated by this version of SheetCAM and the special
MP3000-DTHCII-DCC+Scriber POST included with this version than it will display the
DTHC para,eters as information text in the G-code (Window in MACH Screen).
CandCNC
Page
21
SAMPLE G-CODE using MP3000-DTHCII-DCC+Scriber POST
N0000 (Filename: TestCut-Basicshapes-APTest.txt)
N0010 (Post processor: MP3000-DTHCII-DCC+scriber.scpost)
N0020 (Date: 07/09/2012)
N0030 G20 (Units: Inches)
N0040 F1
N0050 G53 G90 G40
N0060 S10 (DTHC off)
N0070 (Part: TestCut-Basicshapes)
N0080 (Operation # : 1)
N0090 G00 X0.0000 Y0.0000 Z2.2500
N0100 (Tool Name: HT-45 {45 amp} 10ga Steel .135 Tool number: 5 Feedrate: 225)
N0110 (Pierce Height: 0.15 Arc Gap: 0.06)
N0120 (DTHCII Settings: Preset Volts: 117 Preset AMPS: 45)
N0130 S3117 (set volts)
N0140 S445 (set Amps)
N0150 (Default DTCH Delay )
N0160 G00 X4.6304 Y6.9833 Z2.2500
N0170 Z0.1500
N0180 G28.1 Z0.12 F19.685 (Touch-off sequence)
N0190 G92 Z0.0
N0200 G00 Z0.0591
N0210 G92 Z0.0
N0220 G00 Z0.1500
N0230 M03
Note the opening lines of G-code through line N0150 above. The values defined in the ToolSet will show up in the information section. Anything in a pair of () brackets is information and is ignored by the G-Code engine when running. The values indicated will be sent to MACH and to the DTHCII memory through MACH from ablove. You will see the changes happen in the MACH Screen and the matching
DRO’s *i.e. PRESET VOLTS and PRESET AMPS.
NOTE IF YOU DO NOT HAVE THE HYPERTHERM RS485 PORT AND THE
CANDCNC ADVANCED CONNECTION KIT YOU CANNOT SET THE ACTUAL
CUT CURRENT EVEN THOUGH IT WILL CHANGE THE VALUE IN THE CUT
CURRENT (RESET AMPS) ON THE MACH SCREEN,
CandCNC
Page
22
advertisement
* Your assessment is very important for improving the workof artificial intelligence, which forms the content of this project
Related manuals
advertisement