WarmlyYours PLS750C Programmable Timer Quick Programming Guide
Add to my manuals
1 Pages
WarmlyYours TW-F10BS-HW-TI:
The WarmlyYours TW-F10BS-HW-TI is a programmable timer that gives you precise control over when your electrical devices turn on and off. With its intuitive interface and a wide range of customizable settings, you can easily create schedules that suit your lifestyle and needs.
Here are some of the key capabilities of the WarmlyYours TW-F10BS-HW-TI:
- Programmable: Set up to 21 "On" and 21 "Off" programs to automate your devices throughout the day or week.
- Manual and Automatic Modes: Choose between manual mode for direct control or automatic mode to follow your programmed schedules.
advertisement

QUICK PROGRAMMING GUIDE
FOR PLS750C PROGRAMMABLE TIMER
1. QUICK START-UP
Set the time and date before using the timer for the first time.
1.1 Time Menu
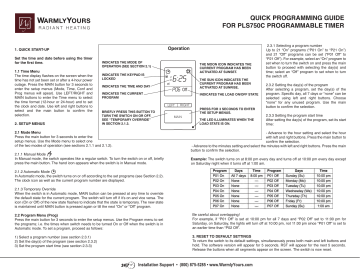
The time display flashes on the screen when the time has not yet been set or after a 4-hour power outage. Press the MAIN button for 3 seconds to enter the setup menus (Mode, Time, Conf and
Prog menus will apear). Use LEFT/RIGHT and
MAIN buttons to enter the Time menu to select the time format (12-hour or 24-hour) and to set the clock and date. Use left and right buttons to select and the main button to confirm the selection.
2. SETUP MENUS
INDICATES THE MODE OF
OPERATION (SEE SECTION 2.1)
INDICATES THE KEYPAD IS
LOCKED
INDICATES THE TIME AND DAY
INDICATES THE CURRENT
PROGRAM
BRIEFLY PRESS THIS BUTTON TO
TURN THE SWITCH ON OR OFF.
SEE “TEMPORARY OVERRIDE”
IN SECTION 2.1.3.
2.1 Mode Menu
Press the main button for 3 seconds to enter the setup menus. Use the Mode menu to select one of the two modes of operation (see sections 2.1.1 and 2.1.2).
2.1.1 Manual Mode
In Manual mode, the switch operates like a regular switch. To turn the switch on or off, briefly press the main button. The hand icon appears when the switch is in Manual mode.
Operation
Off
LEFT RIGHT
MAIN
THE MOON ICON INDICATES THE
CURRENT PROGRAM HAS BEEN
ACTIVATED AT SUNSET.
THE SUN ICON INDICATES THE
CURRENT PROGRAM HAS BEEN
ACTIVATED AT SUNRISE.
INDICATES THE LOAD ON/OFF STATE
PRESS FOR 3 SECONDS TO ENTER
THE SETUP MENUS.
THE LED ILLUMINATES WHEN THE
LOAD STATE IS ON.
2.3.1 Selecting a program number
Up to 21 “On” programs (“P01 On” to “P21 On”) and 21 “Off” programs can be set (“P01 Off” to
“P21 Off”). For example, select an “On” program to set when to turn the switch on and press the main button to proceed with selecting the day(s) and time; select an “Off” program to set when to turn the switch off.
2.3.2 Setting the day(s) of the program
After selecting a program, set the day(s) of the program. Specific day, all 7 days or “none” can be selected using left and right buttons. Choose
“none” for any unused program. Use the main button to confirm the selection.
2.3.3 Setting the program start time
After setting the day(s) of the program, set its start time:
- Advance to the hour setting and select the hour with left and right buttons. Press the main button to confirm the selection.
- Advance to the minutes setting and select the minutes with left and right buttons. Press the main button to confirm the selection.
Example: The switch turns on at 8:00 pm every day and turns off at 10:00 pm every day except on Saturday night when it turns off at 1:00 am.
2.1.2 Automatic Mode
In Automatic mode, the switch turns on or off according to the set programs (see Section 2.2).
The clock icon as well as the current program number are displayed.
2.1.3 Temporary Override
When the switch is in Automatic mode, MAIN button can be pressed at any time to override the default state for the current program. The switch will turn off if it’s on and vice versa. The icon (On or Off) of the new state flashes to indicate that the state is temporary. The new state is maintained until MAIN button is pressed again or till the next “On” or “Off” program.
2.2 Program Menu (Prog)
Press the main button for 3 seconds to enter the setup menus. Use the Program menu to set the programs; i.e. the times when switch needs to be turned On or Off when the switch is in
Automatic mode. To set a program, proceed as follows:
1) Select a program number (see section 2.3.1)
2) Set the day(s) of the program (see section 2.3.2)
3) Set the program start time (see section 2.3.3)
Be careful about overlapping!
For example, if “P01 Off” is set at 10:00 pm for all 7 days and “P02 Off” set to 11:00 pm for
Saturday, on Saturday, the lights will turn off at 10:00 pm, not 11:00 pm since “P01 Off” is set to an earlier time than “P02 Off”.
3. RESET TO DEFAULT SETTINGS
To return the switch to its default settings, simultaneously press both main and left buttons and hold. The software version will appear for 5 seconds. RST will appear for the next 5 seconds.
Release the buttons when all segments appear on the screen. The switch is now reset.
Installation Support • (800) 875-5285 • www.WarmlyYours.com
advertisement
* Your assessment is very important for improving the workof artificial intelligence, which forms the content of this project
Related manuals
advertisement