
advertisement

Go-pedSport&Liqui 11/8/1999 7:20 AM Page 1
GO-PED
®
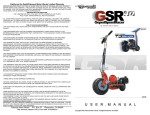
ACCESSORIES LIST GO-PED
®
PARTS LIST
PART# DESCRIPTION
9058 Canvas Carry Bag
9061 Tool Kit
9062 Go-Mix (Go-Ped Oil Pack)
9063 Go-Ped T-Shirt (M,Lg,XLg)
GO-PED
1049
1051
®
1062
FRAME PARTS
1054
1047
1046
PART# DESCRIPTION
1001 Frame
1002 Latch Assembly
1006 Wooden Deck
1007 Deck Hardware Kit
1013 Drive Spindle
1014 Drive Spindle Belt
1018 Engine Hardware Kit
1019 Frame / Muffler Connect Tube
1021 Gas Tank Hardware Kit
1022 Handle Lock Tube
1027 Front Fork
1028 Front Fork Bearing Kit
1030 Front Brake Caliper
1031 Front Axle Assembly
1032 Quick Release Axle Assy.
1034 Kick Stand
1039 Wheel Bearings
1043 Handle Hinge FTG Assembly
1046 “T” Handle
1047 Brake Lever Assembly
1049 Grip Set
1050 Throttle Cable Assembly
1051 Throttle Lever
1053 Plastic Cable Tie Set
1054 Brake Cable Assembly
1056 Handle Hinge Pin
1059 Wheel & Tire Assembly
1062 Automatic Safety Spring &
Grip Kit
3114 Enduro Tank
3116 Gas Cap
3120 Fuel Filter Assembly
1050
1022
1001
3114
1030
1059
1027
1006
1034 1032
1019
California
Instruction Manual for Sport
®
and Liquimatic
®
Copyright 1999 Patmont Motor Werks. All Rights Reserved.
Go-pedSport&Liqui 11/8/1999 7:21 AM Page 2
OIL & FUEL INFORMATION
BE SURE TO READ THESE INSTRUCTIONS
CAREFULLY BEFORE ATTEMPTING TO START
OR OPERATE THIS UNIT.
Using old or improper fuel, or improperly mixing the oil and fuel can cause engine damage. This type of damage will void engine warranty.
The Go-Ped® has a two-stroke engine that requires oil to be mixed with the gasoline. Use a high quality two-cycle oil that is formulated for small air-cooled engines. Go-Mix® oil comes in gallon and tank size packets for a proper mix every time. Go-Mix is available from your authorized Go-
Ped® reseller and is the factory recommended oil for the all two stroke Go-Ped® products.
OIL AND FUEL MIXING INSTRUCTIONS
NOTE:
For proper engine operation and maximum reliability, pay strict attention to the oil and fuel mixing instructions.
Use a 40:1 fuel/oil ratio. Using improperly mixed fuel can severely damage the engine. Use the following procedure to ensure complete mixing:
1. Put a small amount of fresh gasoline into a clean 1 (U.S.) gallon (3.785 liter) fuel can.
2. Add 3.2 ounces of 2-cycle oil.
3. Fill the remainder of the fuel can with gasoline (1 gallon).
4. Screw the fuel can cap on tightly and SHAKE THE CAN
VIGOROUSLY FOR 30 SECONDS.
Technical Support Hotline (925)373-7827
ENGINE PARTS FOR G23-LH ENGINE
35
36
37
38
39
40
26
32
33
34
20
21
22
23
12
16
18
19
7
8
9
11
Index Part # Description
4800 Engine
1
2
4001
4002
Cylinder
Muffler Bolt
5
6
3
4
4003
4004
4005
4006
Cylinder Gasket
Cylinder Screw
Insulator Gasket
Insulator Manifold
4007
4008
3009
4011
4012
4016
4018
4019
Carburetor Gasket
Insulator Screw
Carburetor Screw
Muffler Gasket
Muffler
Crankcase
Crankcase Gasket
Oil Seals Set
3020 Main Crank Bearing Set 88
3021 Snap Ring 107
3022 Flywheel Key
4023 Crankcase Screw
108
109
110 4026 Fan Cover
4032 Fan Cover Screw
4033 Engine Cover
4034 Cover Screw
111
112
116 3035 Piston
3036 Piston Rings Set (2)
3037 Piston Pin
3038 Snap Ring Set
3039 Pin Bearing
3040 Pin Washers
76
77
79
81
60
61
66
67
Index Part # Description
41 4041 Crankshaft Complete
44
45
3044
4045
Flywheel Nut
Cover Screw
54
55
58
59
4054
4055
4058
4059
Flywheel
Ignition Coil
Coil Screw
Cord Complete
4060
4061
3066
4067
4112
4113
4079
4115
Grommet
Coil Screw
Spark Plug
Starter Assy
Cap (plug)
Spring
Starter Screw
Cap (seal)
4088 Carburetor Assy.
3107 Cleaner Assy.
3108 Filter Screen
3109 Air Filter
3110 Cover Cleaner
3114 Gas Tank Assy.
3111 Rear Filter Housing
3117 Gas Cap Packing
3116
3123
3120
Gas Cap Assy.
Kill Switch
Fuel Filter
Go-pedSport&Liqui 11/8/1999 7:21 AM Page 3
1) Open quick release axle to unlock and allow free movement of wheel
(wing nut may need to be loosened also).
2) With Quick Release Axle opened and loosened, rotate purple engine protection washer (EPW) down, away from rear gas tank support stud.
3) Apply up to 75 lb of weight to rear part of Go-Ped® deck (one knee on the “D” works pretty good) with rear wheel on the ground. (To apply proper wheel/spindle contact).
4) Rotate engine protection washer
(EPW) up to contact rear gas tank stud while weight is still applied, this will prevent overload to engine bearings and crankshaft.
5) Lock Down quick release lever with snug pressure. This will lock axle in position until readjustment is required.
FUELING AND PRE-OPERATIONAL
• Gasoline is extremely flammable and its vapors can explode when ignited. Always stop the engine and allow it to cool before filling the tank. Keep sparks and open flames away from the area.
• Add fuel in a clean, well-ventilated area. Avoid spilling the fuel when mixing the oil. Wipe up spilled fuel immediately. If fuel has been spilled allow it to dry completely before starting the engine.
• Move unit at least 10 ft. (3 m) from the fueling point before starting the engine.
• Pressure can build up in the fuel tank. Loosen the fuel tank cap slowly to relive any pressure in the tank.
• Store gasoline and fuel only in containers designed and approved for the storage of such materials.
FOLDING FEATURE
BEFORE YOU RIDE
- Be certain the handle lock tube is in its full down position, locking the handle bar upright. The latch hook on the rear fender locks the handle in the folded position for carrying or storage.
CONTROLS
BEFORE YOU RIDE
- familiarize yourself with how your
Go-Ped® works.
• The left-hand lever operates the front wheel caliper brake, and stops the engine when approaching 2 mph.
Or less. Upon deceleration, the engine itself will act as a rear brake via engine compression.
• The right hand lever operates the engine throttle.
The red button is the engine kill switch, and usable for rear wheel braking.
Go-pedSport&Liqui 11/8/1999 7:21 AM Page 4
• The handlebar supports the rider and steers the
Go-Ped®, just like a bicycle.
• Always use both hands on the handlebar when riding.
SAFE BRAKING
1) Your Go-Ped® is capable of going up very steep hills and is therefore equipped with a VERY effective braking system through the use of your front brake in conjunction with engine compression that acts as an anti-skid rear brake.
2) Your Go-Ped® is designed to be as compact as possible, so therefore has a short wheelbase.
Because of 1) and 2) mentioned above it is very important to understand that your body weight and distribution plays a key role in your riding safety and overall control of your
Go-Ped®.
• When braking, using the primary front wheel brake control lever located on the left side of handlebar, always
LEAN BACK enough to resist forward inertia as to keep
REAR wheel on the ground.
• The engine kill button, located on the handlebar, serves as a rear anti-skid brake control.
SAFE ACCELERATING
When accelerating, using throttle control lever located on the right side of handlebar, always LEAN FORWARD enough to resist rearward inertia as to keep the front wheel on the ground.
LIQUIMATIC® GO-PED®
INSTRUCTIONS
The Liquimatic® Go-Ped® is equipped with a revolutionary hydraulic torque converter transmission designed and patented by the engineers of Patmont Motor Werks. The purpose of the Hydraulic Torque Converter on the
Liquimatic® is to greatly increase the user friendliness and to ease operation of the Go-Ped®.
Each unit is assembled, sealed and tested before shipment from the factory. Any problems or questions should be referred to the factory technical support help line found below.
Starting procedure is similar to the standard Sport Go-
Ped®. Once running, keep the front break caliper applied with front wheel firmly on the ground to prevent the
Liquimatic from rolling forward. At engine idle there will be a gentle tug, which is normal.
Simply stand on the Liquimatic® Go-Ped®, release the brake, gently squeeze the throttle and accelerate to a comfortable speed.
Deceleration and stopping is similar to the standard Sport
Go-Ped®, using the front wheel braking, but with a much smoother stop, as the engine remains at idle.
NOTE: As engine power is applied through a friction drive roller to the tire surface it is very important to maintain proper tire/drive roller adjustment as outlined in this manual.
Technical Support Hotline (925)373-7827
On the internet - www.goped.com
Go-pedSport&Liqui 11/8/1999 7:21 AM Page 5
FREE WHEEL SCOOTING
Unlock the rear wheel quick release lever. Pull wheel down to bottom of axle adjustment slot. Rotate EPW to contact lug and lock down Quick Release Lever. Check for free rotation of rear wheel. Riding in this mode should be legal anywhere bicycles are allowed.
NOTE: Rear wheel adjustment will be required more frequently when tire is new, to prevent drive system slippage.
If drive system is allowed to slip excessively, high temperatures will result and damage the drive spindle, extreme or uneven tire wear will also result, causing uneven overloading to engine crankshaft and bearing. Refer to ìHow to adjust the rear wheelî section in this manual to correct drive system engagement issues.
MAINTENANCE / PARTS AND TIRES
• Parts and service are also available through your Go-
Ped® dealership. To locate a dealer closest to you visit our web site - www.goped.com or call the technical support line - 925-373-7827.
• Use only manufactureís original equipment replacement parts when servicing this unit. These parts are available from your authorized Go-Ped® dealer The use of nonstandard parts, or other accessories or attachments not designed for this unit could result in serious injury to the user, damage the unit and / or void all warranties.
TIRES
Non-pneumatic tires require no maintenance but must be replaced when normal wear and tear makes the tire diameter reach the wear limit dimple found on the side wall of the tire. Split, cracked or torn tires should be replaced immediately.
Technical Support Hotline (925)373-7827
TIPS
BEFORE YOU RIDE-
• Thoroughly inspect the unit for loose or damaged parts before each use. Do not use until adjustment or repairs are made.
• New engine break in period is a few hours, so avoid full throttle operation during this time.
• Position your feet in any location that is comfortable to you. Most prefer a parallel stance with the left leg slightly behind the right and bearing most of the weight, lean back slightly and your Go-Ped® will handle much like water skiing.
• Keep the air intake clear of debris.
• Do not touch the muffler or cylinder these parts get extremely hot from operation and remain hot for a short time after the equipment is turned off.
DRIVING DEFENSIVELY
Although the engine noise has been reduced, it is difficult to hear vehicles approaching you - head check often and before changing direction. The Go-Ped® has been designed to operate on any hard pack, dry smooth surfaces: avoid wet and or oily surfaces, loose sand, gravel, pot holes, etc. Always use both hands on the handle when riding.
• Do not wear loose fitting clothing or articles such as scarves, strings, chains, ties, etc.
STARTING
STARTING INSTRUCTIONS
1) Pump primer bulb until fuel flows steadily through clear overflow tube.
2) Move choke lever to the closed position.
3) Set throttle to start position (half).
4) Pull starter until engine starts.
5) Allow engine to warm up before using.
6) To stop, idle engine, push red kill button.
Go-pedSport&Liqui 11/8/1999 7:21 AM Page 6
BEFORE YOU RIDE
- The Go-Ped® should be warmed up. Simply use the center stand, so that the rear wheel is off the ground, and place your foot on the deck while you pull the pull-start handle. After warming up the engine (30 seconds to one minute), kill the engine by depressing the red kill button. Now the Go-Ped® can be compression push started (this may take a little practice, but adequate skill should be come within a couple of hours) Holding on to the hand grips, with the throttle off, briskly push the Go-Ped® forward, then step on the deck (requires at least 70 lbs.) with one straight leg after pushing off with the other. It may require a few kicks to get the engine started, but once its running you may put your other foot on the deck and accelerate. All this may be easier on a slight downhill grade until you have your technique down. An accomplished rider can get under way in one single natural motion.
MOTORIZED RIDING
Power transmission is through a drive spindle connected directly to the engine crankshaft. The rear wheel must be engaged to the engine drive spindle for motorized operation. Your Go-Ped® is shipped with the rear wheel in the engaged position. The rear wheel may be engaged / disengaged by use of the quick release axle. If the rear wheel is incorrectly adjusted, slippage of the friction drive spindle will greatly increase rear tire wear and prevent compression push starts. Refer to “How to adjust rear wheel” section of this manual to correct drive system slippage.
Operate this unit only in a well-ventilated area outdoors - carbon monoxide exhaust fumes can be lethal in a confined area.
NOTE:
• The status of the Go-Ped® as a “motor vehicle” is subject to drivers licensing, insurance requirements and registration which varies from state to state.
• You should check with a reliable authority in your state to see if the Go-Ped® must be registered as a motor vehicle. Your police department or local department of motor vehicles may be able to answer your questions or direct you to a reliable authority.
• Your insurance policies may not provide coverage for accidents involving the use of this vehicle. To determine if coverage is provided you should contact your insurance company or agent.
• The recommended age and minimum weight for the
Go-Ped® is 16 years or older and 100 pounds, but this is subject to the physical coordination of the rider, the ability of the rider to wear protective gear and to take responsibility for their own actions.
Technical Support Line - 925-373-7827
advertisement
* Your assessment is very important for improving the workof artificial intelligence, which forms the content of this project
Related manuals


advertisement