advertisement

© ADT 2006
Safewatch VideoView
Operator's Manual
OI321 5/06
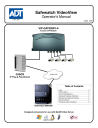
VIP-GATEWAY-A
4 Camera IP Module
G-BOX
IP Plug & Play Module
Internet
Table of Contents
Login................................................................2
Stored Videos ..................................................2
Account Management ......................................3
Advanced Features (Optional) .........................4
Standard and Alternate Viewers.......................4
Security Options ..............................................7
Frequently Asked Questions ............................8
VideoView SERVER
Designed exclusively for use with MyADTvideo Server
COMPATIBLE
1
2
LOGIN
1. Enter the following Internet address in the
Web browser: http://www.myadtvideo.com
...and the following webpage appears:
Log in to your account, type your User-
name and Password, then click Login to continue.
2. Upon entry, the Welcome! screen appears as shown in the image at right.
From here, you can
• View the live viewer in My Gateways
•
•
•
View stored videos in My Videos
(optional)
View User Settings in My Account
Logout
Click My Videos to view stored videos in your MyADT Video account (for new accounts, My Videos will be empty).
Click My Gateways to view video screens assigned to your MyADT Video account.
3. Click on My Account and the Account
Management screen appears. Any registered user ID will be listed, together with other account attributes, as displayed in the image at right. Note: This option only appears for the Primary user (the User that activates the VIP-GATEWAY-A)
Edit a user by clicking the "pencil and pad" icon at right in the Users table (see screen at right).
Delete a User by clicking on the garbage can icon
4. Click Add a New User and the User De-
tails screen opens, allowing you to add new users in the fields shown.
DO NOT enter an Email address if you do not want the New User to have the option of receiving email alerts.
• Check Authorize Live Video View to allow the user to view live videos at any time.
• Check Receive Alerts and Review
Stored Videos to notify the User via email when a triggered event occurs and review stored videos.
• By default, Auto-detect 'Best Video
Viewer'... should always be enabled.
In the section entitled "Security", designate the new user's own unique User ID and Password to be used for all future access to their account. Enter the Pass-
word twice (in the Password Verifica-
tion field), to ensure it is typed correctly. turn to the previous screen, or click Can-
cel to exit and return to the previous screen.
Once saved, "Done! Close" will appear at the bottom of the page. Click to exit this screen.
3
ADVANCED FEATURES (OPTIONAL)
1. To access Advanced Features, simply enter the following Internet address in the Web browser: http://www.myadtvideo.com
...and the following webpage appears:
Log in to your account, type your
Username and Password.
2. To access Advanced Features, click on My Gateways and a Live image from the VIP GATEWAY-A appears.
Right-click
Note: Right-click menu cannot be accessed via the Alternate Viewer. See below for a comparison of the two types of viewers, the Standard Viewer and the Alternative Viewer.
4
Standard Viewer Alternative Viewer
Standard Viewer – Recognizable by the control buttons to the right of the image, ALL functions are accessible.
Alternate Viewer – Recognizable by the control buttons below the image, not all functions are accessible. The
Alternate Viewer is typically displayed when using the Safewatch VideoView system through a corporate or service provider firewall. In addition, live views in the Alternate Viewer are only active for 5 minutes. If you wish, you can refresh the screen or log back in for additional time. This 5 minute timer is designed to reduce the risk of accidentally displaying the viewer "live" for unintended periods of time.
opens:
3. In the Advanced Settings window, Main tab, the following information is displayed:
MAC Address - The system ID located on the bottom of the Gateway.
Video Input Format - Select NTSC (National TV Standards Committee) or PAL (Phase Alternating Line). Note: NTSC is the default value and should be used for North American applications. Changing selections requires your PC be restarted before changes will take effect.
Sequenced Video Output Dwell Time - Default is 3 seconds. Increase this time if you are using a TV connection from the video output and want the video to be displayed longer on the TV between cameras.
Video Gateway Internal Time - You can select what method the VIP-GATEWAY-A will use to update the day, date and time. To synchronize the VIP-GATEWAY-A with the existing
PC, check Use this PC Current Time to Update Internal Time. to update and save the new settings.
5
6
4. Note: In most cases, the default settings are sufficient for a fully operational and well performing system. Only use this screen for extreme cases, and for minor adjustments only. Click the Chan-
nel tab to select options to customize image attributes:
Activate Motion Detect - Check to enable the camera to detect moving objects (to alert optional external devices). Not recommended for continuous use.
Sensitivity Level - When Activate Motion Detect is enabled, set the sensitivity by clicking either the
Low, Med. or High radio button.
Images (Trigger) Buffer - Select the number of images to be stored in the pre-alarm and post alarm buffers and to be sent to the VideoView.net server in the event of a trigger activation.
Brightness - Select the light level displayed on the video screen.
Contrast - Change the difference between the lightest and darkest areas displayed on the video screen.
Saturation - Increase to intensify each color displayed.
Hue - Select the predominant wavelength of color displayed.
Default - Click to display the original Brightness, Contrast, Saturation and Hue settings assigned to the application before changes were specified.
Select Channel - Click to display the features associated with each video input.
Trigger - Check to select optional triggered output devices. Examples include relays to be triggered when a specific event occurs or
Image Trigger Resolution - Select the desired resolution of the images to be sent to the VideoView.net server in the event of a trigger input activation.
Click Reload to revert to the original settings before changes were selected, click Save to update and save the new settings or click Reboot to restart the system.
5. Click the Security tab to select options to customize data protection settings.
This section only needed if event triggers are to be used. Please consult with your ADT
Security Services representative for proper use in this area.
Trigger Receiver Server URL or IP - Enter the IP address or URL of the Safewatch VideoView server or (www.myadtvideo.com) for the VIP-GATEWAY-A to send video to the Safewatch VideoView server when triggered.
Trigger Output - When the camera detects moving objects, or one of the (4) trigger inputs is activated, the trigger output is activated, which may be used to trigger a zone on a security system, etc. Enter the duration of the trigger output signal (in seconds), and the camera will continue to trigger the device for the length of the time specified. Note: The Manually Activate Trigger Output button controls the output manually. If left at zero seconds, output upon trigger will be deactivated. Note:
The Red and Black wires from the power supply are the Trigger Output wires.
Suggested events for triggering:
•
•
•
Latchkey Kids – Program the control panels to trigger the camera upon system disarm by kid’s codes. The camera will capture video of kids coming home, disarming the system and locking the door behind them. The parents will then be emailed a "video alert" notifying them that an event has occurred – all they have to do is simply click a link to view the video for the ultimate peace of mind.
High Security Areas - Place a contact on the door of a special storeroom, cash room, etc. If the door is opened, video will be captured, sent to the server and archived, maintaining a video record of activity. The motion sensor feature of the camera may also be used to trigger an event.
Summer / Vacation Home – Monitor who is accessing your vacation home while you are away.
Each time the security system is disarmed; video will be captured, sent to the server and archived, maintaining a video record of activity.
LAG time to Start Guard - Specify the exit delay time (in seconds) allowing the exiting of the protected area.
Activate Security Function - Click the radio button to select the Security Function type, either
Always ON or Daily. Select Always ON to enter security mode when the Trigger In or Motion
Detection functions are activated; select Daily to enter security mode at the specified Video
Gateway Internal Time (in 24-hour military time). See the Main tab, "Video Gateway Internal
Time" on page 2 for more information. Note: Selecting Always ON overwrites the ARM function on the 'arming' (white input jumper) on the RJ12 power connector.
Click Reload to revert to the original settings before changes were selected, click Save to update and save the new settings or click Reboot to restart the system.
7
Safewatch VideoView Frequently Asked Questions
1. What software do I need in order to view live video on a Mobile phone or PDA?
VideoView has built-in support for WML and HTML on mobile devices. Any "data" enabled wireless device request is automatically re-directed to the proper login page. Some PDA's (ie. Blackberry) require that Javascript and Image display be enabled.
No additional software or applets are needed.
2. Can I set up the VIP-GATEWAY-A to function as an off-premises Digital Video Recorder to record full time video?
No, the system is not set up for full time recording. It is designed to send 30 second video clips to the VideoView.net server that are the result of triggered events that are transmitted by an event such as the opening of a protected door, disarming of the system, etc. If the server receives an inordinate volume of video streamed to an account, it will automatically suspend the account for 24 hours and generate an email to ADT, informing them of the suspension. After 24 hours, the account will automatically be re-enabled.
3. I have a wireless router connected to my broadband modem. How can I keep my network settings after the G-
BOX is installed?
After the installation is completed, the G-BOX becomes your "primary" router. You can connect any PC or device on a unused G-Box port (including your VoIP adapter). Remember: a second router is NOT required to share your internet connection.
Advanced user note on avoiding IP conflicts: The G-BOX is factory configured IP is 192.168.8.1 and provides DHCP server service on the range of 192.168.8.201, 192.168.8.20x and up.
4. Do I still need a router to share my internet connection after the VIP-GATEWAY-A and G-Box are installed?
After the installation is completed, the G-BOX becomes your "primary" router, you can connect any PC or devices on a unused G-BOX port (including your VoIP adapter). If more ports are required, a "network switcher" can be installed on any port for expansion.
5. After installing the G-BOX and the VIP-GATEWAY-A, I lost my internet connection. Why?
Verify that your connection is indeed an ALWAYS ON service (i.e. Cable ISP), then "power cycle" all your devices including your PC(s).
If your internet connection is provided by a DSL service, verify with your ISP that your connection is initiated by the modem and not your PC or an existing router. If that is the case, refer to “bridge mode” below.
6. My DSL modem is connected directly to my PC and must initiate the connection from the PC (PPPoE), how do I set up the G-BOX to do this automatically?
First, locate your PPPoE User ID and Password, then refer to “bridge mode” in the next question to allow the G-BOX to automatically initiate this connection for you. The G-BOX will also function as a router (share your internet connection among all the PC's) and maintain your DSL connection Always ON.
7. Where are the disks, programs or software?
No software is provided, all the required applications are web enabled via www.myadtvideo.com. Internet Explorer with
ActiveX enabled (default security settings) is required to access the full featured Live Viewer.
Windows ®, and the Windows logo are registered trademarks of Microsoft Corporation
Apple ® and the Apple logo are registered trademarks of Apple Computer, Inc.
Linux ® is a trademark of Linus Torvalds. The Linux penguin logo was created by Larry Ewing .
8
ADT Security Services
One Town Center Road
Boca Raton, FL 33486
Copyright © 2006
Internet: http://www.adt.com
9
advertisement
* Your assessment is very important for improving the workof artificial intelligence, which forms the content of this project
Related manuals
advertisement