advertisement
▼
Scroll to page 2
of 12

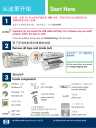
Start Here Ң䖭䞠ᓔྟ 1 ⊼ᛣ˖16ℹПࠡ䇋ϡ㽕䖲USB⬉㓚ˈ৺߭ৃ㛑᮴⊩ℷ⹂ᅝ㺙䕃ӊDŽ 䇋ᣝ乎ᑣᠻ㸠Ͼℹ偸DŽ བᵰᅝ㺙ᳳ䯈䘛ࠄ䯂乬ˈ䇋খ䯙᳔ৢϔ㡖Ёⱘ⭥䲒ᥦ㾷DŽ Important: Do not connect the USB cable until Step 16 or software may not install properly. Follow the steps in order. If you have problems during setup, see Troubleshooting in the last section. 2 পϟ᠔᳝ⱘ㛊ᏺ䞠䴶ⱘᠷ䫕 Remove all tape and inside lock ᢀ䍋Ẕׂ䮼ˈᑊপϟ㡆ⱘ䖤 䕧ֱᡸ䫕DŽ Lift the access door and remove the orange shipping lock. 3 Title in HP Futura Book 14-20 pt., centered Subtitle in 10-14 pt., centered, white Magyar Italiano Japanese Español Norsk Português Russian Simplified Chinese © 2004 Hewlett-Packard Development Company, L.P. Slovencina Slovenšcina Español Svenska TraditionalChinese Thai Türkçe Ukrainian Suomi Français Deutsch Greek Hangul Hebrew Magyar Italiano Español English Arabic Bahasa Português Hrvatski Cesky Dansk Nederland Title in HP Futura Book 14-20 pt., centered Subtitle in 10-14 pt., centered, white Magyar Italiano Japanese Español Norsk Português Russian Simplified Chinese © 2004 Hewlett-Packard Development Company, L.P. English Arabic Bahasa Português Hrvatski Cesky Dansk Nederland Slovencina Slovenšcina Español Svenska TraditionalChinese Thai Türkçe Ukrainian ᶹᡒ㒘ӊ Locate components WindowsⲬܝ Ⲧ ࠊ䴶ᵓⲪ˄ৃ㛑Ꮖ㺙Ϟ˅ Windows CD print cartridges control-panel overlay (may be attached) ⬉⑤㒓䗖䜡఼ ⬉䆱㒓 power cord and adapter phone cord MacintoshⲬܝ Suomi Français Deutsch Greek Hangul Hebrew Magyar Italiano Español Macintosh CD HP Photosmart 2600/2700 series all-in-one User Guide ljՓ⫼ݠNJ Horizontal cover image: Replace this guideline area with either a cropped product photograph or a straight-on front-view illustration Ϟ˄ߎ㒌˅Ⲧ User Guide USB⬉㓚 USB cable* 䳔㽕ऩ⣀䌁фDŽ ࣙ㺙Ⲧⱘݙ⠽કৃ㛑᳝᠔ϡৠDŽ top (output) tray * Purchased separately. The contents of your box may differ. ϟ㒌Ⲧ HP Officejet 6200 series all-in-oneᅝ㺙ݠ bottom paper tray HP Officejet 6200 series all-in-one Setup Guide 4 ᅝ㺙ࠊ䴶ᵓⲪ˄བᵰᇮᅝ㺙ⱘ䆱˅ Attach the control-panel overlay (if not attached) a᷵ࠊޚ䴶ᵓⲪⱘᷛㅒ䆒Ϟⱘԡ㕂ˈ✊ৢᬒϟ䴶ᵓⲪDŽ b⫼ᣝय़䴶ᵓⲪⱘ䖍Ё༂ˈᇚ݊㋻㋻वԣDŽ a Align the tabs of the control panel overlay with the device, and then lower. b Press down firmly on all edges and in the center of the overlay until it snaps into place. া᳝ᅝ㺙њࠊ䴶ᵓⲪПৢˈᠡ㛑Փ⫼HP all-in-oneʽ The control-panel overlay must be attached for the HP all-in-one to work! 5 㺙ܹ᱂䗮ⱑ㒌 Load plain white paper aᬒܹϟ㒌ⲦDŽ b䕏䕏Ϟᢀ䍋䇗㒌఼DŽ cᬒܹ㒌ᓴDŽ a Insert the bottom paper tray. b Slide the paper adjuster over. c Insert paper. d ᬒܹϞ˄ߎ㒌˅ⲦDŽ eᢝߎ㒌ⲦᓊԌᵓDŽ d Insert the top (output) tray. e Pull, and then flip the tray extender out. 2 • HP all-in-one 6 䖲⬉⑤㒓䗖䜡఼ Connect the power cord and adapter ⊼ᛣ˖16ℹПࠡ䇋ϡ㽕䖲USB ⬉㓚ˈ৺߭ৃ㛑᮴⊩ℷ⹂ᅝ㺙䕃ӊDŽ䇋ᣝ 乎ᑣᠻ㸠Ͼℹ偸DŽ Important: Do not connect the USB cable until Step 16 or software may not install properly. Follow the steps in order. 7 䖲䜡༫ᦤկⱘ⬉䆱㒓 Connect the supplied phone cord ᇚ⬉䆱㒓ⱘϔッ䖲ࠄᎺջ(1-LINE)ˈ 䖯㒓 ⱘ⬉䆱ッষЁˈ✊ৢᇚϔッ ᦦܹϞⱘᦦᄨЁDŽ Connect one end of the supplied phone cord to the phone port on the left (1-LINE) and the other to a wall jack. 㢹㽕䖲ㄨᔩᴎ㗙Փ⫼݊ᅗⱘ⬉䆱㒓ˈ䇋খ䯙ljՓ⫼ݠNJDŽ To connect an answering machine or use a different phone cord, see the User Guide. ᣝϟᠧᓔᣝ䪂ࠡˈ䇋⹂ֱҢ䆒䞠䴶পϟ㡆䖤䕧ֱᡸ䫕DŽ Make sure to remove the orange shipping lock from inside the device before you press the On button. 3 • HP all-in-one 8 ᠧᓔ ᣝϟĀᠧᓔāᣝ䪂ᑊ䖯㸠䜡㕂 Press the On button and configure On aᣝϟĀᠧᓔāᣝ䪂ৢˈ㓓㡆ⱘᣛ⼎♃䮾⚕ˈ䱣ৢজ䕀ܹᘦᅮ⢊ᗕDŽ䖭ৃ㛑䳔㽕1ߚ䩳ⱘᯊ䯈DŽ b䇋㗤ᖗㄝᕙˈⳈ㟇ߎ⦄䇁㿔ᦤ⼎DŽՓ⫼ㆁ༈䬂䗝ᢽⳌᑨⱘ䇁㿔ˈ䕧ܹҷⷕˈ✊ৢ䖯㸠⹂䅸DŽՓ⫼ㆁ༈䬂 䗝ᢽⳌᑨⱘᆊഄऎˈ䕧ܹҷⷕˈ✊ৢ䖯㸠⹂䅸DŽ a After you press the On button, the green light flashes, and then becomes solid. This may take up to a minute. b Wait for the language prompt. Use the arrow keys to select your language, type the code, and then confirm. Use the arrow keys to select your country/region, type the code, and then confirm. 9 ᠧᓔẔׂ䮼 Open access door ᢀ䍋Ẕׂ䮼ˈⳈࠄ݊ϡ㛑ࡼЎℶDŽ⹂ֱⲦ⿏ে 䖍DŽ Lift the access door until it stops. Make sure the print carriage moves to the right side. 10 ᇚϸϾⲦϞⱘ㛊ᏺপϟ Remove tape from both cartridges ᢝࡼ㉝㡆ᷛㅒˈᇚϸϾⲦϞⱘ㛊ᏺপϟDŽ Pull the pink tab to remove the tape from both print cartridges. 䇋࣓㾺ᩌ䪰㡆㾺⚍ⲦϞ䞡ᮄ㉬䌈㛊ᏺDŽ Do not touch the copper-colored contacts or retape the cartridges. 4 • HP all-in-one 11 ᬒܹϝ㡆Ⲧ Insert the tri-color print cartridge া᳝ᠧᓔ䆒ৢˈᠡ㛑ᬒܹⲦDŽ aᦵԣϝ㡆ⲦˈՓHPᷛㅒᳱϞDŽ bᇚϝ㡆ⲦᬒᎺջᦦῑⱘࠡᮍDŽ c⫼ᇚⲦܹ䆹ᦦῑЁˈᇚ݊㋻㋻वԣDŽ The device must be On before you can insert the print cartridges. a Hold the tri-color print cartridge with the HP label facing up. b Place the tri-color print cartridge in front of the left slot. c Push the cartridge firmly into the slot until it snaps into place. 5 • HP all-in-one ᬒܹ咥㡆Ⲧ 12 Insert the black print cartridge aᦵԣ咥㡆ⲦˈՓHPᷛㅒᳱϞDŽ bᇚ咥㡆ⲦᬒেջᦦῑⱘࠡᮍDŽ c⫼ᇚⲦܹ䆹ᦦῑЁˈᇚ݊㋻㋻वԣDŽ d݇䯁Ẕׂ䮼DŽ a Hold the black print cartridge with the HP label facing up. b Place the black print cartridge in front of the right slot. c Push the cartridge firmly into the slot until it snaps into place. d Close the access door. 6 • HP all-in-one 13 ᷵ޚⲦ Align the print cartridges a↣ᔧߎ⦄ᦤ⼎ˈ㽕∖ᓔྟ᷵ޚⲦᯊˈ䇋ᣝϟࠊ䴶 ᵓϞⱘĀ⹂ᅮāDŽ ᷵ޚ䖛ৃ㛑䳔㽕ߚ䩳ⱘᯊ䯈DŽ bᔧᠧॄߎ᷵ޚ义ৢˈ᷵ޚ䖛֓㒧ᴳњDŽ䗮䖛ᰒ⼎ሣ ᶹⳟⳌ݇⢊ᗕˈ✊ৢᣝĀ⹂ᅮāDŽབᵰ᷵ޚ༅䋹ˈ䇋 খ䯙᳔ৢϔ㡖Ёⱘ⭥䲒ᥦ㾷DŽ ಲᬊ϶ᓗ᷵ޚ义DŽ a Press OK at each of the prompts on the control panel to start print cartridge alignment. The alignment may take a few minutes. b After the page prints, alignment is complete. Check the display for the status, and then press OK. If it fails, see Troubleshooting in the last section. Recycle or discard the alignment page. བᵰ≵᳝ᇚ䆒Ϣ䅵ㅫᴎⳌ䖲ˈ䇋ⴔᶹ䯙ljՓ⫼ݠNJЁⱘFax Setup˄Ӵⳳ䆒㕂˅ˈњ㾷བԩᅠ៤ Ӵⳳ䆒㕂DŽ If you are not connecting the device to a computer, continue to the Fax Setup chapter in the User Guide for information on how to finish fax setup. 7 • HP all-in-one ਃࡼ䅵ㅫᴎ 14 Turn on your computer aਃࡼ䅵ㅫᴎˈḍ䳔㽕䖯㸠ⱏᔩˈ✊ৢㄝᕙ Ḡ䴶ߎ⦄DŽ b݇䯁ӏԩᏆᠧᓔⱘᑣDŽ a Turn on your computer, login if necessary, and then wait for the desktop to appear. b Close any open programs. ᬒܹ䗖ᔧⱘⲬܝ 15 Insert the correct CD Windows⫼᠋˖ Macintosh⫼᠋˖ aᬒܹHP all-in-oneWindows CDDŽ ᬒܹHP all-in-one MacintoshCDDŽᅝ㺙䕃ӊ Пࠡˈ䇋䕀㟇ϟϔℹDŽ bᣝ✻ሣᐩϞⱘ䇈ᯢᠻ㸠᪡ DŽ Windows Users: a Insert the HP all-in-one Windows CD. b Follow the onscreen instructions. བᵰ≵᳝ߎ⦄ਃࡼሣᐩˈ䇋ձঠߏĀ៥ⱘ⬉ 㛥āǃ“CD-ROM”ᷛ“setup.exe”DŽ If the startup screen does not appear, double-click My Computer,double-click the CD-ROM icon, and then double-click setup.exe. 8 • HP all-in-one Macintosh Users: Insert the HP all-in-one Macintosh CD. Go to the next step before installing software. 䖲USB⬉㓚 16 Connect the USB cable Windows⫼᠋˖ ᙼৃ㛑䳔㽕ㄝᕙߚ䩳ˈᠡ㛑ሣᐩϞⳟࠄ䖲 USB⬉㓚ⱘᦤ⼎DŽ Macintosh⫼᠋˖ ᇚUSB⬉㓚ⱘϔッ䖲ࠄHP all-in-one 㚠䴶ⱘッষЁˈ✊ৢݡᇚ⬉㓚ⱘϔッ䖲 ࠄ䅵ㅫᴎϞӏᛣⱘUSBッষЁDŽ ᔧߎ⦄Ϟ䗄ᦤ⼎ৢˈ䇋ᇚUSB⬉㓚ⱘϔッ䖲ࠄ HP all-in-one㚠䴶ⱘッষЁˈ✊ৢݡᇚ⬉㓚ⱘϔ ッ䖲ࠄ䅵ㅫᴎϞӏᛣⱘUSBッষЁDŽ Windows Users: You may have to wait several minutes before you see the onscreen prompt to connect the USB cable. Once the prompt appears, connect the USB cable to the port on the back of the HP all-in-one, and then to any USB port on your computer. བᵰ≵᳝ⳟࠄ䖭ѯሣᐩˈ䇋খ䯙᳔ৢϔ㡖Ёⱘ⭥䲒 ᥦ㾷DŽ If you do not see these screens, see Troubleshooting in the last section. 9 • HP all-in-one Macintosh Users: Connect the USB cable to the port on the back of the HP all-in-one, and then to any USB port on your computer. 17 㒻㓁ᅝ㺙䕃ӊ Continue software installation Windows⫼᠋˖ Macintosh⫼᠋˖ ᣝ✻ሣᐩϞⱘ䇈ᯢ䖯㸠᪡DŽĀӴⳳ䆒㕂 ᇐāĀゟे⊼ݠāሣᐩϞᅠ៤Ⳍᑨⱘ᪡DŽ aঠߏ“HP All-in-One Installer”ᷛDŽ b⹂ֱᏆᅠ៤᠔᳝ሣᐩϞⱘ᪡ˈ݊Ёࣙᣀ Setup Assistant˄ᅝ㺙ᐂࡽ˅DŽ Windows Users: Macintosh Users: Follow the onscreen instructions. Complete the Fax Setup Wizard and the Sign up now screen. 18 a Double-click the HP All-in-One Installer icon. b Make sure you complete all screens, including the Setup Assistant. ⼱䌎ᙼʽ Congratulations! HP Photosmart 2600/2700 series all-in-one User Guide ᔧⳟ㾕Ā⼱䌎ᙼʽāሣᐩᯊˈህৃҹՓ⫼ HP all-in-oneњDŽ Horizontal cover image: Replace this guideline area with either a cropped product photograph or a straight-on front-view illustration 䇋ᶹ䯙ljՓ⫼ݠNJሣᐩϞⱘᐂࡽֵᙃˈ ҹ֓ⴔՓ⫼ᴀ䆒DŽ When you see the Congratulations! screen, you are ready to use your HP all-in-one. See the User Guide or onscreen help to get started. 10 • HP all-in-one ⭥䲒ᥦ㾷 www.hp.com/support 䯂乬˖ ᣝϟĀᠧᓔāᣝ䪂ৢߎ⦄Āᬃᶊवԣā⍜ᙃDŽ 㾷˖⊩ࡲއ ᠧᓔẔׂ䮼DŽҢ䞠䴶পߎ㡆ⱘ䖤䕧ֱᡸ䫕DŽᣝϟ⹂ᅮᣝ䪂DŽ 䯂乬˖ 㺙ܹⲦৢˈߎ⦄ĀপߎᑊẔᶹⲦā⍜ᙃˈ㗙᮴⊩ᠧॄⲦ᷵ ޚ义DŽ 㾷˖⊩ࡲއ পߎⲦDŽ⹂ֱᏆপϟ᠔᳝䪰㡆㾺⚍Ϟⱘ㛊ᏺDŽ䞡ᮄᬒܹⲦˈ✊ ৢ݇䯁Ẕׂ䮼DŽ 䯂乬˖ 㾷˖⊩ࡲއ 䯂乬˖ 㾷˖⊩ࡲއ 䯂乬˖ 㾷˖⊩ࡲއ 䯂乬˖ 㾷˖⊩ࡲއ ˄ҙ䰤ѢWindows˅≵᳝ⳟ㾕ਞ䆝ᙼԩᯊ䖲USB⬉㓚ⱘሣᐩDŽ পߎᑊ䞡ᮄᬒܹHP all-in-oneWindowsCDDŽ䇋খ䯙15ℹDŽ ˄ҙ䰤ѢWindows˅ߎ⦄ĀMicrosoft⏏ࡴ⹀ӊāሣᐩDŽ ऩߏĀপ⍜āDŽᢨᥝUSB⬉㓚ˈ✊ৢᬒܹHP all-in-oneWindows CDDŽ䇋খ䯙15ℹ16ℹDŽ ˄ҙ䰤ѢWindows˅ߎ⦄Ā䆒ᅝ㺙༅䋹āሣᐩDŽ Ẕᶹࠊ䴶ᵓⲪᰃ৺Ꮖᅝ㺙⠶DŽᮁᓔ䆒䖲ৢˈݡ䞡ᮄ䖲 䆒DŽẔᶹ᠔᳝ⱘ䖲DŽ⹂ֱUSB⬉㓚Ꮖᦦ䅵ㅫᴎϞDŽϡ㽕ᇚ USB⬉㓚ᦦ䬂Ⲭ᮴⑤䲚㒓఼ϞDŽ䇋খ䯙4ℹ16ℹDŽ ˄ҙ䰤ѢMacintosh˅᮴⊩ᅝ㺙Macintosh䕃ӊDŽ ᅝ㺙䕃ӊПࠡˈ䇋⹂ֱUSB⬉㓚Ꮖᦦ䅵ㅫᴎϞDŽϡ㽕ᇚUSB ⬉㓚ᦦ䬂Ⲭ᮴⑤䲚㒓఼ϞDŽ䇋খ䯙16ℹDŽ ᳝݇䆺㒚ֵᙃˈ䇋খ䯙ljՓ⫼ݠNJDŽᴀкᰃ⫼⫳ݡ㒌ॄࠋⱘDŽ℆ᇏ∖ᐂࡽˈ䇋䆓䯂www.hp.com/supportDŽ © Copyright 2004 Hewlett-Packard Development Company, L.P. Printed in []. Troubleshooting *Q5800-90122* *Q5800-90122* Q5800-90122 Problem: A Carriage Jam message appears after you press the On button. Action: Open the access door. Remove the orange shipping lock from inside. Press the OK button. Problem: The Remove and check print cartridges message appears after you insert print cartridges or the print cartridge alignment fails. Action: Remove print cartridges. Make sure you remove all tape from copper contacts. Re-insert the cartridges, and then close the access door. Problem: (Windows only) You did not see the screen telling you when to connect the USB cable. Action: Remove, and then re-insert the HP all-in-one Windows CD. Refer to Step 15. Problem: (Windows only) The Microsoft Add Hardware screen appears. Action: Click Cancel. Unplug the USB cable, and then insert the HP all-in-one Windows CD. Refer to Steps 15 and 16. Problem: (Windows only) The Device Setup Has Failed To Complete screen appears. Action: Verify that the control-panel overlay is firmly attached. Unplug the device and plug it in again. Check all connections. Make sure the USB cable is plugged into the computer. Do not plug the USB cable into a keyboard or non-powered hub. Refer to Steps 4 and 16. Problem: (Macintosh only) The Macintosh software does not install. Action: Make sure the USB cable is plugged into the computer before installing the software. Do not plug the USB cable into a keyboard or nonpowered hub. Refer to Step 16. Refer to the User Guide for more information. Printed on recycled paper. Visit www.hp.com/support for assistance. © Copyright 2004 Hewlett-Packard Development Company, L.P. Printed in [].
advertisement
* Your assessment is very important for improving the workof artificial intelligence, which forms the content of this project
Related manuals
Download
PDF
advertisement