- No category

advertisement

Rain Master Irrigation Systems DX2 User Manual
Appendix D
Access Codes
A
ccess codes are used to restrict unauthorized access to sensitive program data. There are two levels of access available, level 1 and level 2. Both levels prevent creation, modification and deletion of programs and ISCs, including setup data. In addition, level 1 code prevents the user from using "manual on/off" operations.
Entering an Access Code
Procedure
:
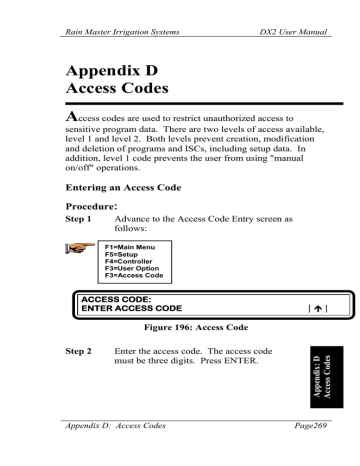
Step 1 Advance to the Access Code Entry screen as follows:
F1=Main Menu
F5=Setup
F4=Controller
F3=User Option
F3=Access Code
ACCESS CODE:
ENTER ACCESS CODE |½|
Figure 196: Access Code
Step 2 Enter the access code. The access code must be three digits. Press ENTER.
Appendix D: Access Codes Page269
Rain Master Irrigation Systems DX2 User Manual
Note: The first time an access code is entered, any three-digits may be used. Thereafter, the access code you enter is checked against the code stored in the controller.
The code you enter must match the stored code, or access is denied to certain menu options, as shown in the table in the next section of this Step 4 Press F1=Restrict
Access or F2=No Restrictions. The previous menu is displayed .
If the access code is correct, the following three options are displayed:
| F1|=ENABLE/DISABLE ACCESS
| F2|=CHANGE LEVEL |F3|=CHANGE CODE |½|
Figure 197: Access Code Options
•
•
•
Select ENABLE/DISABLE ACCESS to turn on and off the use of the access code.
Select CHANGE LEVEL to change the access code level.
Select CHANGE CODE to enter a new access code.
Step 3 Access Restriction
Select F1=ENABLE/DISABLE ACCESS. The following two options are displayed:
| F1|=RESTRICT ACCESS
| F2|=NO RESTRICTIONS |½|
Page 270
Figure 198: Access Restriction Status
Appendix D: Access Codes
Rain Master Irrigation Systems
The two options are:
•
DX2 User Manual
Select RESTRICT ACCESS to use the access code to control use of the controller.
•
Select NO RESTRICTIONS to not use the access code.
Step 4 Press F1=RESTRICT ACCESS to select Restrict
Access or F2=NO RESTRICTIONS to select No
Restrictions, or No Access Code Required. The
Access Code Options menu is displayed.
Step 5 Access Change Level
Select F2=CHANGE LEVEL.
SELECT ACCESS LEVEL
| F1|=LEVEL 1 |F2|=LEVEL 2 |½|
Figure 199: Level Access Selection
There are two options, LEVEL 1 and LEVEL 2.
The Access Level Options table lists the restrictions applicable for each level.
Press F1 to select Level 1 or F2 to select Level 2.
The Access Code Options menu is displayed.
Step 6 Change Code
Select F3=CHANGE CODE.
Enter the new access code (the code must be three digits), then press ENTER.
The Access Code Options menu is displayed.
Appendix D: Access Codes Page271
Page 272
Rain Master Irrigation Systems DX2 User Manual
Using Access Codes
After the access code is entered, access to the menu items shown in the following table is restricted.
Table 5: Access Level Options
Menu
Main Menu
Access Level
1
Access Denied
F1, Program
F2, ISC
F4, Manual Operation
Set Up
Setup Menu, F4,
Controller
1,2
1,2
F2, ISC
F1, Program
F2, ISC
F3, Stations
F5, Sensors
F2, Omit By Date
F2, Language
Appendix D: Access Codes
Rain Master Irrigation Systems DX2 User Manual
When access codes are used, the menu items listed in the Access
Level Options table are denied and the following screen is displayed:
ACCESS DENIED
|½|
Figure 200: Access Denied Display
Gain Access Procedure
:
Step 1 To gain access to all controller menu options, from the base screen, advance to the Access Code Entry menu as follows:
F1=Main Menu
F5=Setup
F4=Controller
F3=User Option
F3=Access Code
ACCESS CODE:
ENTER ACCESS CODE |½|
Figure 201: Access Code
Step 2 Enter the correct three-digit access code, then press
ENTER.
If the access code is correct, the Access Code
Options Menu is displayed:
Appendix D: Access Codes Page273
Rain Master Irrigation Systems
| F1|=ENABLE/DISABLE ACCESS
DX2 User Manual
| F2|=CHANGE LEVEL |F3|=CHANGE CODE |½|
Figure 202: Access Code Options
Step 3 Select F1=ENABLE/DISABLE ACCESS. The following two options are displayed:
| F1|=RESTRICT ACCESS
| F2|=NO RESTRICTIONS |½|
Figure 203: Access Restriction Status
Step 4 Select F2=NO RESTRICTIONS if access code is not used.
This completes the Access Code procedure.
Press the QUIT key to return to the base screen.
Page 274 Appendix D: Access Codes
advertisement
* Your assessment is very important for improving the workof artificial intelligence, which forms the content of this project
