
advertisement
◉
Touch to zoom

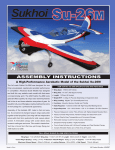
DY8970
DY8970
Wingspan:..................
Length:........................
Wing Area:...................
Wing Loding:...............
Esc:...............................
Motor:.............................
Servos:..........................
Battery:............................
Weight:............................
Radio:..............................
Propeller:..........................
1600mm (63in)
1660mm (65.3in)
48.7dm2
63.6g/dm2
80A
G601 5030 KV400
standard*3PCS 25G*2PCS
22.2V4500Mah 30C
2400-2500g
6ch
AP16*12-APC17*12
over
Warning
This RC aircraft is not a toy!
If misused,it can cause serious bodily harm and damage to property.
Fly only in open areas,preferably in official flying sites,following all
instructions included with your radio and motor.
This plane is a compromise between Aerobatics and 3D flying,and not
a pylon racer.It is built with a very light light structure and for this reason
we hardly recommend:
Dynam RC
dynam-rc.cn
Do NOT fly your airplane at high speeds,because this
may cause structural failures or flutter due to the extremely
large control surfaces.
of
This product contains chemicals known to the State of California to cause cancer, birth defects or other reproductive harm. Please recycle.
1
Use CA with accelerator to glue in the
aileron hinges (be careful not to bind the
hinges up with excessive glue).
2
Aileron hardware kit.
3
7
Use CA with accelerator to glue in the
elevator hinges (be careful not to bind
the hinges up with excessive glue).
8
Cut out the slot for the servo horn position.
9
13 Use pliers to bend the tail wheel Rod
90 degrees.
14 Use CA to glue in the rod into the rudder.
Cut the slot positions for hinges.
Use CA to glue the servo horn in place.
15 Use CA to glue in the 2 Servo horns to
the rudder.
4
Use CA to glue the servo horn in place.
5
Install the elevator servo in place.
6
Install the servo push rod/links.
10 Rudder hardware kit.
11 Install the elevator servo in place.
12 Install the pushrod/links.
16 Use CA glue to hinge the rudder to the
the provided screws to secure the
17 Use
tail wheel guide to the bottom of the
18 Tighten the collet to secure the tail
fuselage. (be careful not to bind the hinges
up with excessive glue).
wheel up/down position in place.
fuselage.
Use CA to glue in the left and right section
of the elevator to the fuselage, first make sure
the servo connection are correctly installed.
19 Tighten collet to secure the wheel in
20 Cut out the bottom air cooling outlet
21 Install the Rod into the elevator
22 Use a 1.6mm drill to drill the marked
23 Use the provided screw to secure the
24
25 Install the Rudder servo in position.
26 Install rudder push/pull ball link to the wire.
27 Attach the ball link to the rudder servo
28 Landing gear hardware.
29 Install the wheel bolt/axel to the frame.
30 Tighten the collet to secure the wheel in
31 Position the wheel pants and drill a
32 Secure the wheel pant with screws
33 Secure the landing gears to the fuse
34 Glue the landing gear covering to the
35 Motor/Esc hardware.
36 Install the motor mount to the fuselage.
41 Install the propeller.
42 Install the spinner.
position.
1.6mm hole.
provided.
horns making sure the wires are tight
and not slack.
by screws provided.
position on the elevator.
metal frame.
Rod from the above drilled hole.
position.
2mm
37 Install the motor to the motor mount.
38 Secure ESC in place with zip ties.
43 Install the left and right wing in place
44 Secure the canopy by thumb screws.
and secure to fuselage by screws.
39 Align and secure the cowl to the fuse
with screws.
40 Install the backing for the spinner, making
sure there is a 2mm clearance gap.
advertisement
* Your assessment is very important for improving the workof artificial intelligence, which forms the content of this project
Related manuals
advertisement