The Neat Company Neat Receipts Neatdesk Desktop Scanner 698 User's Manual
Add to my manuals
13 Pages
advertisement
▼
Scroll to page 2
of 13

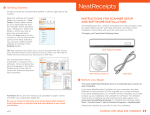
Getting Started with Neat
Neat’s scanner, software, and cloud solutions create the ultimate
Digital Filing System, making it easier for you to stay organized.
This Getting Started Guide will help you get the most out of Neat.
Getting Started with Neat
Transforming your Information
Before you Scan / Item Types
3
Making your First Scan
Scanner Settings / Folder Creation
4
Scanning Options
Scan from Hardware / Scan from Software / Scan Orientation
5
After you Scan
Intelligent Text Recognition
6
More ways to get things into Neat
Send to Neat / Import / Manual Entry / Reviewing
7
Organizing with Neat
Folders / Drag & Drop Items
8
Viewing your Items
Thumbnail View / List View / Item View / Filtering
9
Editing Items and Adding Detail
Thumbnail View / List View / Item View
10
Using your Information
Advanced Search / Expense Reports / Tax Reports / Spending Reports
11
Exporting Data
Exporting a PDF / Syncing with Outlook / Exporting to TurboTax / Other ways to Export
12
Using Neat Everywhere
NeatCloud + NeatMobile
13
Transforming Your Information
Every time you scan, Neat uses “Intelligent Text Recognition” to read
and recognize the text in your documents. It even understands the
type of document and fills in appropriate data fields.
BEFORE YOU SCAN
It’s important to understand how Neat categorizes the items you add to the Digital Filing System. Neat recognizes every item as
a Receipt, Contact, or Document, each with its own characteristics.
Receipts
Contacts
Documents
Neat instantly captures information
Neat transforms business cards
Neat runs Intelligent Text Recognition
like Vendor, Date, Amount, and
into digital contacts, recognizing
on every word of every document,
Payment Type. You can choose a
and recording Name, Address,
making everything you scan keyword
tax category for each receipt, add
Company, Email Address, Phone
searchable, so it’s easy to find exactly
comments, and run reports.
Number, and more.
what you’re looking for.
e-Receipts and Digital Documents
You can use the Send to Neat feature to add any digital document (web page,
MS Word document, PDF, etc) or image to your Digital Filing System.
Learn more about Send to Neat.
Getting Started with Neat
3
MAKING YOUR FIRST SCAN
Your Neat scanner is the easiest way to transform paper information into organized digital files. Here’s how to get your paper into Neat!
Select your settings
Before scanning an item, it’s important to check your scan settings in Neat. You can specify your item type, set color options, and more.
Note that scan settings will be different depending on whether you are using NeatDesk or NeatReceipts.
SCANNER SELECTION
If you have multiple Neat scanners, you can choose which
one to use here.
ITEM TYPE
Neat can detect item types automatically, or you can select
a specific item type here.
BLACK & WHITE/COLOR
Select black & white for speed, or make full-color scans.
SIMPLEX/DUPLEX (NeatDesk only)
Select single- or double-sided scanning for NeatDesk.
COMBINE PAGES
This setting lets you save multi-page documents as a single
item in Neat.
REMOVE BLANK PAGES
This setting will automatically delete blank pages – useful
when scanning many pages at once.
Organize your information
You’ll need to create a folder to keep your scanned items.
Click here to learn about creating and organizing folders.
Getting Started with Neat
4
SCANNING FROM YOUR HARDWARE
Scan button
Use the Scan button on your scanner to quickly
scan an item. Items will appear in whatever folder
you have open.
PDF button
Use the PDF button on your scanner to make a
PDF file for easy sharing.
SCANNING FROM YOUR SOFTWARE
You can also scan items using the Scan button in
Neat’s software.
Select PDF from the dropdown menu if you want to
scan directly to PDF.
Getting Started with Neat
5
AFTER YOU SCAN
Whenever you add an item to Neat, you’ll notice it goes through a processing queue before appearing in your Inbox. This is where
our intelligent software automatically crops, rotates, and enhances your images, and where we perform Intelligent Text Recognition
to bring your data to life. All of this only takes a moment or two, and your item will appear on your screen as soon as it is ready.
Getting Started with Neat
6
MORE WAYS TO GET THINGS INTO NEAT
Scanning isn’t the only way to get things into Neat.
Send to Neat
Select “Send to Neat” as your printer to send documents from other applications (web browsers, email clients, word processors)
directly into Neat.
Import
Use the Import command to bring any PDF file or image already stored on your computer into Neat.
Manual Entry
If you don’t have anything to scan, just use the New (Receipt, Contact, Document) command from the Actions menu to manually
create a new item in Neat. For example, you could use this to record tolls or other expenses that don’t include a receipt.
Review your items!
Items will show up in Neat as “Unreviewed” until the first time you take
a look at them. Review each item to make sure it has scanned properly
and that key information has been correctly read and recorded.
Click here to learn more about editing items and adding information.
Getting Started with Neat
7
Organizing with Neat
Neat makes it easy to arrange your files any way you want.
Maintaining an organized folder tree in Neat is key to managing
your Digital Filing System.
FOLDERS
The heart of Neat’s digital organization is the intuitive folder tree system. Everything you scan in or send to Neat can be organized
any way you want it.
INBOX
Your Inbox contains several folders, each dedicated to items
from NeatCloud. Please note that you cannot scan directly
into the Inbox. Click here to learn more about NeatCloud.
MY CABINET
Your Cabinet contains all of your Neat files and folders.
Create folders and subfolders, and keep everything exactly
where you choose. Note that folders will always be arranged
in alphabetical order.
ADDING/EDITING FOLDERS
Creating new folders is easy in Neat. Either use the New
Folder button at the top of the folder tree, or right-click within
the tree and select New Folder from the menu that appears.
Drag-and-Drop Organization
Folders can be dragged and dropped to create subfolders for detailed organization.
Dragging a folder to the trash will remove it from your Neat Digital Filing System.
Getting Started with Neat
8
VIEWING YOUR ITEMS
Neat provides several ways to view your items, making it easy to see exactly what you’re looking for.
Thumbnail View
List View
Item View
Thumbnail View shows a grid of
List View lets you see all the
Item View displays all of the detailed
“cards” for your items, each with
contents of a folder, but also quickly
information of your files and allows you
key data and a thumbnail image
edit content. Customizable columns
to browse your folder, item by item,
of the file. This view makes it easy
for each item type let you sort
and easily edit the information.
to see many items at once, so you
receipts by total, contacts by name,
can quickly change item types,
documents by date created, and
or open an item to further edit its
more.
properties.
Filtering items
Use the Filters toolbar to restrict what item types are displayed in
a folder. Filtering by item type will provide more specific columns in
List View, giving you more detailed information for those items. You
can customize columns by right-clicking on the column header.
Getting Started with Neat
9
EDITING ITEMS AND ADDING DETAIL
Each type of folder view provides different options for editing items and adding detail. Neat will automatically recognize information
for many of these values and fill them in for you.
Thumbnail View
List View
Item View
Thumbnail View lets you quickly
List View makes it easy to edit many
Item View lets you add comments,
change item types through a drop-
items at once, as you can work directly
change details, and make other important
down menu in the lower right cor-
within each column to change values.
edits to an item. Each item type will have
ner of each thumbnail. For more
Be sure to set your item filters to get
different informational fields to work with.
detailed changes, double-click an
more detailed columns for the specific
To learn more about editing items, includ-
item to open it in Item View.
item type – see the section above for
ing how to add tax categories to receipts,
more about item filters.
see the Neat 5 PDF User Guide.
Getting Started with Neat
10
Using your information
Once your information is in Neat, there’s so much you can do with it.
Neat brings your files to life, making them easier to find and allowing
you to create reports, export data, and share with others.
SEARCHING YOUR NEAT FILES
One of the biggest benefits of Neat is our keyword search
capability. When you search in Neat, we check every word
of every document to find what you’re looking for.
Advanced Search
Select Advanced Search from the Tools Menu to set up more
detailed searches with multiple criteria – all bills paid for the
month of April, for example.
Watch a video on using Advanced Search
CREATING REPORTS
You can use Neat to quickly generate expense, tax, and spending
reports from your receipts. Our helpful Report Wizard will walk you
through creating any kind of report in only four easy steps.
Expense Reports
Expense reports show the money spent by a person or business.
Whether you want to see what your company has spent on office
supplies or your family’s spent on groceries, Neat will quickly
analyze your receipts to create the report you need.
Tax Reports
You can use tax categories to create reports that help analyze
and organize your financial information for tax purposes. For
example, you could create a tax report of charitable donations to
make tax time a little faster.
Spending Reports
Spending reports let you group your expenses by type, such as
vendor or date. You can then summarize by payment type, client,
and more. It’s a good way to get a holistic view of your spending.
Watch a video about Creating Reports
Getting Started with Neat
11
EXPORTING DATA
Neat makes it easy to export data, send receipt information to popular accounting software, or instantly add contacts to your digital
contact list. Here’s how Neat connects with other software to put your information to use.
Exporting to PDF
Exporting an item as a PDF makes it easy to share with others as an email attachment.
In the Export menu, select “To PDF.” You can choose to export a single item or an entire
folder. See Chapter 7 of the Neat 5 User Guide to learn more.
See the Neat 5 User Guide
Syncing contacts with Outlook
Neat transforms business cards into organized digital contacts that are easy to sync with
Outlook. Manage your Outlook synchronization through the Settings menu in the top
right of the software. Syncing works both ways, so your Outlook contacts can also be
imported into Neat. See Chapter 7 of the Neat 5 User Guide to learn more.
Watch a video about syncing with Outlook
See the Neat 5 User Guide
Exporting to TurboTax
Deduct stress from tax time by quickly exporting your Neat data to TurboTax.
In the Export menu, select “To TurboTax.” You can choose to export a single item or an
entire folder. See Chapter 7 of the Neat 5 User Guide to learn more.
See the Neat 5 User Guide
Other ways to export your data
Neat’s versatile software lets you export to Quicken, QuickBooks, Excel, and more.
Explore the “Exporting” section of the Neat 5 User Guide to learn more, or visit the
video tutorials on our site.
Watch video tutorials on our site
Getting Started with Neat
See the Neat 5 User Guide
12
Using Neat everywhere with
NeatCloud connects your Digital Filing System, allowing you to access it, or add to it – anytime, anywhere.
• Scan with your mobile device
• Securely back up your data
• Access your information anywhere
• Share entire folders
• Sync files across multiple devices
• And so much more
Already have NeatCloud?
Getting Started with Neat
13
advertisement
* Your assessment is very important for improving the workof artificial intelligence, which forms the content of this project
Related manuals
Download
PDF
advertisement