advertisement
▼
Scroll to page 2

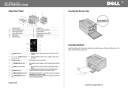
Dell™ 1250c Color Printer
Quick Reference Guide
About Your Printer
Locating the Service Tag
1
2
3
4
Service Tag
xxxxxxx
12
1
3
5
7
9
11
11
Operator Panel
Output Tray Extension
Toner Access Cover
Paper Width Guides
Front Cover
MPF Extension
10
9
8 7 6
2
4
6
8
10
12
Express Service Code
000 000 000 00
5
Output Tray
Print Head Cleaning Rod
Power Switch
Multipurpose Feeder (MPF)
Length Guide
Paper Cover
1
2
3
5
1
(Jam) indicator
(Toner) indicator
2
3
(Error) indicator
4
• Indicates that the toner is low or empty, or toner error
occurred.
Indicates that an error occurred.
(Ready/Data) indicator
Indicates the printer status, such as receiving and printing
data.
5
(Start) button/indicator
6
(Cancel) button
• Press this button to start duplex printing after loading
paper.
• Press and hold this button to print the Report pages.
Press this button to cancel a job or clear an error.
7
(Manual Duplex) indicator
(Load Paper) indicator
Load the letterhead in the printer with the print-side facing up. Ensure that the title on the
letter head enters the printer first.
• Indicates that a paper jam occurred or the rear cover
is open.
4
8
Loading Letterhead
Indicates that the printer is ready to print the second side
(odd) pages for duplex printing.
Indicates that no paper is loaded or a paper jam occurred
in the multipurpose feeder.
September 2010
www.dell.com | support.dell.com
Loading Envelopes
Identifying the Location of Paper Jams
Load envelopes in the printer as shown below:
The paper jams may occur at any of the locations shown below:
NOTE:When you print on envelopes, be sure to specify the envelope setting on the printer
driver. If not specified, the print image will be rotated 180 degrees.
CAUTION: To avoid permanent damage to your printer, do not attempt to clear paper
jams using any tools or instruments.
Envelope#10
1
3
2
To prevent DL and Monarch from being wrinkled, they are recommended to be loaded with
the print-side facing up, flap opened, and facing you.
1
Output Tray
2
Transfer Belt
3
Fuser Release lever
4
Rear Cover
5
Front Cover
6
Multipurpose Feeder (MPF)
4
6
C5, Monarch, or DL
5
Printing the Printer Settings Page
1 Ensure that the green LED on the
(Ready/Data) indicator is on and not blinking, and
then press and hold the (Start) button for over three seconds.
The printer settings page is printed.
Finding Information
For more information, see the following documents
available on the Drivers and Utilities disc.
• Setup Guide
Setup instructions for printer hardware. Access to
software and drivers.
• User’s Guide
Additional information about printer components,
paper jam clearance, and consumable replacement.
Troubleshooting
Clearing jams
Æ See "Clearing Jams" in the User's
Guide
Print quality and other printing
problems
Æ See "Troubleshooting" in the User's
Guide
Common error messages
Cleaning the Printer
Vertical blanks in prints
Replacing Toners
To replace toners
Æ See "Maintaining Your Printer" in the
Æ See "Maintaining Your Printer" in the
User's Guide
An alert for the CTD sensor appears
Æ See "Maintaining Your Printer" in the
User's Guide
User's Guide
Æ See "Understanding Printer Messages"
in the User's Guide
support.dell.com
advertisement
* Your assessment is very important for improving the workof artificial intelligence, which forms the content of this project
Related manuals
advertisement