advertisement

JVA PET Series User Manual
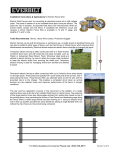
4.2 Connecting to the Fence
1. The electric fence requires an
„earth‟. Drive a galvanized earth rod into the earth. Attach a wire from the Green Earth Connector on the front of the energiser to the earth stake.
2. Connect a wire from the fence connector on the front of the energiser to the live wire of the fence.
3. Powering the Energiser:
Mains Power Source (PET100, PET80, PET80R): Plug the 12 volt power adapter supplied with the energiser into an AC power source and the other end into the DC socket on the side of the energiser. Turn the mains power switch on and then press the power button on the front of the energiser.
External battery Power Source (PET100): For information on selecting a battery see the specification table in section 3.2. Plug the battery power cable into the DC socket on the side of the energiser. Then connect the alligator clips to the battery. Red to positive and black to the negative battery terminals. Press the power button on the front of the energiser.
If the battery is low, the red LED will flash as the green LED flashes to indicate it is running in battery maximisation mode.
If the battery is flat, the energiser will not start and the red LED will flash twice to indicate the battery requires a recharge.
D Cell Battery Power Source (PET80): Put two D cells into the battery backpack and plug the battery backpack onto the back of the energiser.
Press the power button on the front of the energiser.
If the batteries are low, the red LED will flash as the green LED flashes to indicate it is running in battery maximisation mode.
The PET80 will continue to run for as long as it can as the D Cell batteries are assumed to be disposable (non-rechargeable). As a result, the red LED may not flash twice to indicate the battery is flat.
Rechargeable Battery Power Source (PET80R): Plug the rechargeable backpack onto the back of the energiser. Press the power button on the front of the energiser.
If the battery is low, the red LED will flash as the green LED flashes to indicate it is running in battery maximisation mode.
If the battery is flat, the energiser will not start and the red LED will flash twice to indicate the battery requires a recharge.
© JVA Technologies Pty Ltd 18 March 2012 Page 10
advertisement
* Your assessment is very important for improving the workof artificial intelligence, which forms the content of this project