advertisement

DIGITAL TIMER SWITCH N1600
Thank you for purchasing our Woods Model N1600 Digital Timer Switch.
Your In-Wall Switch Timer replaces any 120-volt regular two-wire toggle wall switch, and controls regular household lights with a maximum load of
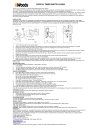
600 watts. The control module detaches f rom the hard-wired power module (Fig. 1) for easy installation and operation.
The control module features user-friendly 3-button programming. You can programs up to 7 events to cover a 7-day period. The choice of singleday or multiple days for each event permits a large variety of operating patterns, both to suit your lifestyle and your security needs. A userreplaceable AAA battery (not included) is required to operate the clock and program controls. It also protects the program and clock memory in the event of a power interruption.
INSTALLATION
CAUTION: IF YOU ARE NOT FAMILIAR WITH SAFE ELECTRICAL WIRING PRACTICES, DO NOT ATTEMPT TO INSTALL THIS TIMER
WITHOUT THE HELP OF A QUALIFIED ELECTRICIAN. THE DESCRIPTION OF THE INSTALLATI ON PROCEDURES THAT FOLLOW DOES
NOT IMPLY THE ASSUMPTION OF RESPONSIBILITY BY WOODS FOR ANY DAMAGE OR INJURIES CAUSED BY IMPROPER
INSTALLATION.
Fig. 3
Cover
Control module plate
Power module
Fig.
Fig.1
1. Turn off the power at the main service panel.
2. Remove the screw(s) from the switch cover plate (Fig.1). Keep the screws and cover plate to replace after installation is complete
3. Release two screws holding the existing switch (save the screws f or installing the power module of the timer).
4. Pull switch out of box and disconnect wire from switch.
5. Connect one of power module’s wire with one wire disconnected from switch and secure connection with enclosed wire connector. Repeat this for the second wire from power module and wire disconnected from switch
6. Gently push the power module and the wires back into the box. Secure the power module to the box using the screws saved earlier.
7. Replace the cover plate.
8. Install a size AAA battery in the control module after removing the two screws and the back plate (Fig.2).
9. Secure the back plate with the two screws. (Do not over-tighten).
10. Plug the control module into the power module by engaging the pins in the holes through the rectangular opening in the cover plate.
Make sure that no pins are crossed or shorted. Secure the control module to the power module with the screw provided.
Restore power and test installation by moving switch to the ON and OFF positions. For your programs to take effect place the slide switch in the
AUTO position.
SETTING THE CLOCK
If this is immediately following installation of AAA battery , skip step 1
1. Press PROG
2. The Day setting will be flashing. Press ADV until the current day is reached, then press SET to accept.
3. The Hour setting will now be flashing. Press ADV, then SET when the current hour is displayed.
4. The Minute setting will be flashing. Select current minute by pressing ADV and then press SET to accept.
EVENTS PROGRAMMING
5. Press SET again to program ON time for event #1. Set of days will be flashing.
6. Press ADV to select one of the following set of days for the ON time in Event #1:
MO, TU, WE, TH, FR, SA or SU (for one day)
MO TU WE TH FR (for the same setting all weekdays)
SA SU (for the same setting all weekend)
MO TU WE TH FR SA SU (for the same setting all week)
7. Press SET to accept your choice. The hour will flash.
8. Press ADV until the desired ON hour is displayed. Press SET to accept the hour. The minute will flash.
9. Press ADV until the desired minutes are displayed. Press SET to accept.
10. The current setting for Event #1 OFF will be displayed with the word OFF flashing.
11. Press SET again and repeat steps 6 through 10 above to set the OFF days and time for Event #1.
To program the ON/OFF settings for any subsequent events, repeat steps 6 through 10.
If you do not wish to program any other events, press PROG until the current day and time are displayed, or leave it to automatically return to clock mode in 15 sec.
To change events programming press PROG twice, then follow steps 2 through 4.
IMPORTANT NOTES:
Ø Switch box should be properly grounded for timer to function properly
Ø Avoid setting ON time the same as OFF time for the same day
Ø Leave any unused event blank
PROGRAMS REVIEW
To review all program s, press the PROG button repeatedly.
To clear any ON/OFF event in review mode, press ADV button, and the event will be cleared
MANUAL ON/OFF
To override current program , just tap the cover for lights TO turn ON/OFF
To disable programs and permanently turn lights ON/OFF, slide switch to the corresponding ON or OFF position
THE LIGHT BULB ICON
A light bulb icon on display indicates that timer is in automatic mode and output is energised
CAUTION: When changing a light bulb in a fixture controlled by this timer, always move the slide switch to the OFF position first
WARRANTY
Woods Industries (Canada) Inc. warranties this product to be free from defects in workmanship and materials for a period of two (2) years from the date of purchase. The warranty is limited to replacement of the original product only and does not include any other warranties, nor any undertaking to cover consequential damages from the non-functioning or malfunctioning of this product. Please keep your original purchase receipt for any warranty inquiries.
For all warranty inquiries, please write:
CONSUMER SERVICE
Woods Industries (Canada) Inc.
375 Kennedy Road, Scarborough, ON, Canada, M1K 2A3
www.woods.com
ASSISTANCE HOT LINE
1-800-561-4321.
416-267- 4614 (Toronto and surrounding regions) Monday to Friday 8:30AM to 5PM Eastern Standard time.
advertisement
* Your assessment is very important for improving the workof artificial intelligence, which forms the content of this project
Related manuals
advertisement