advertisement

eScan SharePoint
Quick Start Guide
Tutorials
Online Guide
USA/CA
714-670-7713
9:00-17:30 PST (MON-FRI) [email protected]
UK
01256-741-513
9:00-16:00 (MON-FRI) [email protected]
1
Unpack and Assemble
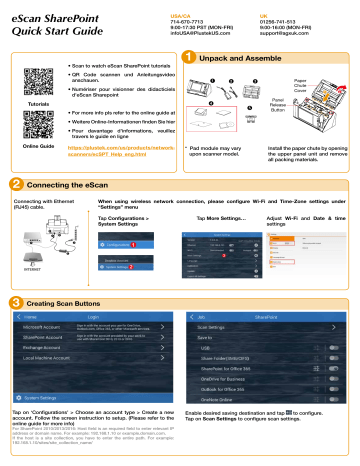
• Scan to watch eScan SharePoint tutorials
• QR Code scannen und Anleitungsvideo anschauen.
• Numériser pour visionner des didacticiels d'eScan Sharepoint
1 2
4
• For more info pls refer to the online guide at
• Weitere Online-Informationen finden Sie hier
• Pour davantage d'informations, veuillez travers le guide en ligne https://plustek.com/us/products/networkscanners/ecSPT_Help_eng.html
* Pad module may vary
upon scanner model.
5
3
Panel
Release
Button
Paper
Chute
Cover
1 2
Install the paper chute by opening the upper panel unit and remove all packing materials.
2
Connecting the eScan
Connecting with Ethernet
(RJ45) cable.
When using wireless network connection, please configure Wi-Fi and Time-Zone settings under
“Settings” menu
Tap Configurations >
System Settings
Tap More Settings… Adjust settings
Wi-Fi and Date & time
6
1 4
5
PWR PC SEND RECV SVNC READY VOIP LINE1 LINE2
INTERNET
3
Creating Scan Buttons
Tap on ‘Configurations’ > Choose an account type > Create a new account. Follow the screen instruction to setup. (Please refer to the online guide for more info)
For SharePoint 2010/2013/2016: Host field is an required field to enter relevant IP address or domain name. For example: 192.168.1.10 or example.domain.com.
If the host is a site collection, you have to enter the entire path. For example:
192.168.1.10/sites/site_collection_name/
Enable desired saving destination and tap to configure.
Tap on Scan Settings to configure scan settings.
Job Button Configurations
duplicate job button
edit job settings
rename job button
delete job button
Scan Settings Configurations
Tap the checkbox in the Selectable column to enable the respective settings adjustable in the user’s interface.
Administrator’s view
User can then adjust scan settings in the user’s interface.
User’s view
How to organize job buttons into “Groups”
Enter a
© 2019 by
Group name when creating the scan job if necessary, to organize and sort job buttons (You many also edit group name, under the job menu)
Groups are displayed in the upper right corner of the menu, tap to view the full list of groups created. Each group can include up to 12 job buttons.
. All rights reserved. All registered trademarks are the property of their respective owners.
P/NO.: 17-07-2BB1060-C
advertisement
* Your assessment is very important for improving the workof artificial intelligence, which forms the content of this project
Related manuals
advertisement