advertisement
▼
Scroll to page 2
of 12

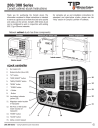
200/300 Series
CompX cabinet eLock Instructions
For complete set up and installation instructions for
networked and stand-alone eLocks, please see the
“Help” section in CompX’s LockView v4 software.
Thank you for purchasing the CompX eLock. The
information contained in these instructions is intended
to serve as a guide so as to allow the eLock to be quickly
and easily put into service. CompX’s 300 Series eLock
can be configured to work in conjunction with existing
802.11g or Ethernet networks.
Network cabinet eLock has three components:
Controller
Motorized gear-driven latch
Battery compartment
Interior mount
Exterior mount
eLock controller
1.
Dot matrix LCD
2.
Network button (blue LED)
3.
“UP” button
4.
“NEXT/SELECT” button
5.
“BACK/CANCEL” button
6.
“MENU” button
7.
“DOWN” button
8.
+ Button
9.
- Button
10. Low battery indicator
(yellow LED)
11. Magstripe reader location
(if equipped)
12. HID Prox or HID iCLASS
reader location (if
equipped)
13. “ENTER” button
14. “CLEAR” button
1
15
2
14
3
13
4
12
5
11
6
7
8
9
10
15. Alpha-numeric keypad
200/300 Series — CompX cabinet eLock Instructions
1
200/300 Series Cabinet eLock — Components
Installation example
Cabinet door installation shown.
eLock can also be installed on
drawers.
latch
battery
compartment
controller
Front view:
eLock controller
9V Battery
Jumper Port
USB Port for direct connection
to LockView software
Integrated Wi-Fi
antenna cable
included for 300
Series Wi-Fi version
Back view: eLock controller
Battery cable connector
200/300 Series Cabinet eLock Components
continued on page 5
2
200/300 Series — CompX cabinet eLock Instructions
200/300 Series Cabinet eLock — Installation
Screws to be used for mounting
eLock controller:
w 2 – 10 x ½" philips pan head hilow blunt point (type B) SEMS
mounting screw (use on sheet metal
application) – OR –
#
200 & 300 Series
CompX Cabinet eLock
Controller Mounting Template
Drill ½"
through hole
for cable
w 2 – 10 x 1 /32" philips pan head
hi-low blunt point (type B) SEMS
mounting screw (use on MINIMUM
5/ " thick application; do not use
8
on sheet metal application)
#
7
page and measure the line
above. It is ONE INCH
LONG. If it measures less
than or more than one inch,
the template measurements
also need to be scaled
accordingly.
FAILURE TO DO SO
COULD RESULT IN
MISDRILLED HOLES.
#3
#4
#2
Drill 7/32"
through hole
(#2) for
mounting
w #1, 2 and 3 are REQUIRED
IMPORTANT: Use template on outside
surface where eLock is to be mounted.
*DRILL FROM THIS SIDE*
1"
WARNING: Print this
Drill 3/8" through
hole only if unit
is Wi-Fi
#1
Drill 7/32"
through hole
(#1) for
mounting
Screws to be used for mounting
eLock latch:
w 4 – #10 x 1¼" philips pan head wood
screw for mounting motorized latch
200/300 Series — CompX cabinet eLock Instructions
w #1 and 2 are through holes to mount
the display to the application
w #3 is the through hole to make the
connection between the display and
the interior control module
w #4 through hole is only needed if
the eLock is equipped with wireless
feature (300 Series) “WS-XX-CAB”
200 & 300 Series
CompX Cabinet eLock
Latch Mounting Template
3
TEMPLATE ON
OPPOSITE PAGE
4
200/300 Series — CompX cabinet eLock Instructions
200/300 Series Cabinet eLock — Components
continued
Battery compartment
8
Screws to be used for mounting eLock
battery compartment:
w 2 – #8 x 5/8” philips pan head wood
screw for mounting battery compartment
Note:
Battery compartment should be mounted
within length of battery cable and latch
cable.
1
2
3
4 5
6
7
1.
Door switch connector (door
switch not included)
4.
2.5 mm AC adapter plug-in
(adapter not included)
7.
Latch connector (Latch 1; one
latch is included)
2.
Wi-Fi antenna cable connector
or Ethernet connector (Wi-Fi
connector shown; 300 Series only)
5.
Ground terminal
8.
6.
Dual eLatch connector (Latch 2, if
equipped; one latch is included)
Battery pack cover (6-AA batteries
not included)
3.
Battery cable connector
200/300 Series — CompX cabinet eLock Instructions
5
200/300 Series Cabinet eLock — Instructions
Unit Features:
w Choose 802.11g or Ethernet Networked configurations that
uses the facilities existing infrastructure for actual 2-way
read/write communication
w Each eLock can hold any combination of up to 3,000
Supervisors and Users
w Choose a model to use existing HID Prox, HID iCLASS, or
magstripe card credentials that can be programmed to
operate each eLock
w Remote Notification System with programmable escalating
alerts via SMTP email; SMS text, voice and fax (Networked
eLock & LockView Software required)
w Spring bolt latching mechanism provides automatic
relocking
w Optional second latch drive output (requires additional
hardware)
w Door position switch input (requires additional hardware)
w Membrane keypads with stainless steel domes provides
durable performance and easy cleaning
What’s in the box?
w
w
w
w
w
w
w
w
w
w
w
1 – eLock controller
1 – motorized latch w/latch cable
1 – battery compartment
1 – battery cable
2 – #10 x ½" philips pan head hi-low blunt point (type B)
SEMS mounting screw (used to mount eLock controller on
sheet metal application)
2 – #10 x 17/32" philips pan head hi-low blunt point (type B)
SEMS mounting screw (used to mount eLock controller on
MINIMUM 5/8" thick application)
2 – #8 x 5/8" philips pan head wood screw for mounting battery
compartment
4 – #10 x 1½" philips pan head wood screw for mounting
motorized latch
1 – warranty card
1 – serial code sticker set
1 – in-box instructions
What’s needed?
w 6 – AA alkaline batteries
w Drill
w #2 philips head bit
w ½" drill bit for through hole battery cable
w 3/8" drill bit for through hole Wi-Fi antenna cable
(300 Series Wi-Fi only)
6
w 7/32" drill bit for through holes to mount eLock display unit
w T15 pin-in Torx (6-lobe) bit or driver
Care and Cleaning
The eLock is a battery operated device, therefore, it should
be part of a regular battery maintenance program.
Warning: install the batteries as shown in the battery
compartment. Polarity (+) or (-) must be correct. Replace
batteries as a set. Always use new batteries when replacing
the old set. Do not combine a used battery with a new one.
Only use alkaline batteries; do not mix battery types.
To clean the surface of the eLock, apply non-acid based
cleaner to a clean cotton cloth; do not spray cleaner directly
on the eLock. Wipe down keypad and housing taking care
around the beeper opening and edges of keypads. Wipe
excess cleaner off of all surfaces.
Setting up the eLock
Getting Started Out of the Box
If the eLock is stand-alone 200 Series (direct connection
via USB to LockView Software v4) and will be used in
conjunction with CompX’s LockView Software v4, please
follow the LockView Mode Instructions below.
For Networked (802.11g or Ethernet) 300 Series eLocks,
please follow the CompX eLock Database & Network
Configuration & Install Manual and the CompX LockView
Software Instruction Manual before proceeding.
The eLock is shipped in FACTORY mode.
CONNECTING THE COMPONENTS:
1. Attach one end of the battery cable to the connector on the
back of the eLock controller.
2. Attach the other end of the cable to the battery
compartment.
3. Attach latch cable terminal to Latch 1 connector. (See
diagram for connector locations.)
4. Install 6 AA alkaline batteries. (not included)
200/300 Series — CompX cabinet eLock Instructions
200/300 Series Cabinet eLock — Instructions
INITIAL PROGRAMMING:
1. The first time the eLock is powered up, FACTORY will be
displayed in the upper left hand corner of the LCD.
2. Press “MENU.”
3. Highlight CREDENTIAL MENU and press “NEXT/SELECT.”
4. Highlight ADD CREDENTIAL and press “NEXT/SELECT.”
5. CREDENTIAL TO ADD will be displayed.
continued
CARD CREDENTIAL
If the eLock is equipped with a card reader (HID Prox, HID
iCLASS or a Magstripe)
1. Present a valid card within range of the HID reader or slide
the magstripe card through the magstripe reader.
DUAL CREDENTIAL
If the User or Supervisor requires a dual credential
When in FACTORY mode, the default status level for the first
credential is Supervisor, as Supervisor status is required to
allow access to further manual programming features.
1. Enter a valid PIN and press “ENTER” (for keypad credentials)
or present a valid card (for HID Prox or HID iCLASS or
Magstripe credentials).
There are two status levels; Supervisor and User. Only
Supervisors are, among other things, allowed to ADD,
DELETE, VIEW or EDIT Users and other Supervisors.
2. Enter the second credential (4-14 digit PIN) and press
“ENTER.”
6. Scan first supervisor’s card credential (if equipped) or enter
first supervisor’s 4-14 digit PIN and press “ENTER.”
The Supervisor will be added to slot number 1.
7. To change the slot number, press “UP” to highlight and then
+ / - to move to next available slot; or use the numeric
keypad to enter the desired slot number
Press “NEXT/SELECT” when done.
8. CREDENTIAL NAME ENTRY will appear.
Press 2 - 9 for A - Z; press 1 for - , . , + or _ ; press 0 for
“space”; press and hold 0 - 9 for numbers (the maximum
number of allowed characters is 14).
9. Press “ENTER” when done. STORED will be displayed when
complete.
NOTE: THE SECOND CREDENTIAL MUST ALWAYS BE
A 4 - 14 DIGIT PIN
Methods to begin building
a database of eLocks in
CompX’s LockView Software
Note: Supervisor, User and parameter changes that already
exist in the eLock will automatically be carried into
LockView once the eLock has been enrolled.
For Networked (802.11g or Ethernet) eLocks, please
follow the CompX eLock Database & Network Configuration
& Install Manual and the CompX LockView Software
Instruction Manual before proceeding.
LockView Mode Instructions
Using the various eLock LCD menu options, manual
programming can continue.
(For complete details on how to build a database of users
and eLocks, see the CompX LockView Software Instruction
Manual and CompX eLock Manual Programming Guide)
See CompX eLock Manual Programming Guide for complete
options and instructions.
CompX LockView Software v4 must be installed and the
eLock must be in SETUP mode before continuing.
10. Press BACK/CANCEL to exit.
Operating the eLock
Follow the instructions below to operate the eLock.
Stand-alone eLocks (Direct USB connection to laptop
computer with LockView is required) There are two methods
that can be used to add eLocks to the LockView software.
PIN CREDENTIAL
1. Enter a valid PIN (between 4 - 14 digits) and
Automatic Method
1. With the eLock in SETUP mode, connect the eLock via the
USB cable to the computer on which LockView is installed.
2. Press “ENTER.”
2. Login to LockView.
200/300 Series — CompX cabinet eLock Instructions
7
200/300 Series Cabinet eLock — Instructions
3. After 30 seconds, the below will appear.
continued
5. With the eLock in SETUP mode, connect the eLock via the
USB cable to the computer on which LockView is installed.
6. After 30 seconds, the lock will be updated in LockView. Click
Refresh to prompt the update.
NOTE: After 5 minutes of inactivity, the eLock will exit SETUP
mode.
NOTE: After 5 minutes of inactivity, the eLock will exit SETUP
mode.
4. Click Yes.
5. The below will appear.
Type in the name of the lock.
PASSAGE MODE
(LockView software required) To hold the latch bolt in the
open position indefinitely, there is a setting in LockView
called Passage Mode.
Passage Mode can be assigned to an eLock and/or a
Supervisor/User credential.
In LockView, via the Lock Editor, Passage Mode can be
selected so that every valid User or Supervisor that has
access rights to the eLock can place it in passage mode.
**Once a Lock Name has been chosen in LockView, it can
not be changed. Please be sure the name that is chosen is
the one that will be used in the future.
6. Click Save when done.
7. Go to Lock Editor tab in Lock/User Editor.
8. Left click to highlight the name of the lock and then click Edit
Lock.
9. Verify and/or adjust all other lock parameters. (See LockView
Instruction Manual for complete details.)
10. Click OK when done.
Manual Method
1. Login to LockView.
2. Go to Lock/User Editor; Lock Editor tab and click Add
Lock.
3. Enter the required information: Lock Name; Lock Serial
Number and Setup Code (supplied on green sticker set as
Setup Cd).
In LockView, via the User Editor, Passage Mode can be
selected. Users and Supervisors can place any eLock to which
they have access right into Passage Mode. This is regardless
of whether or not Passage Mode has been activated in the
eLock.
To place an eLock into Passage Mode:
PIN CREDENTIAL
1. Enter a valid PIN (between 4 - 14 digits) and press “ENTER.”
2. Press “ENTER” again. HOLD OPEN will flash; LOCK IS HELD
OPEN will appear in the upper left hand corner of the LCD.
CARD CREDENTIAL
If the eLock is equipped with a card reader (HID Prox, HID
iCLASS or Magstripe):
1. Present a valid card within range of the HID reader or slide
the magstripe card through the magstripe reader.
2. Press “ENTER.” HOLD OPEN will flash; LOCK IS HELD OPEN
will appear in the upper left hand corner of the LCD.
DUAL CREDENTIAL
If the User or Supervisor requires a dual credential:
**Once the Lock Name has been chosen in LockView, it can
not be changed. Please be sure the name that is chosen is
the one that will be used in the future.
1. Enter a valid PIN and press “ENTER” (for keypad credentials)
or present a valid card (for HID Prox, HID iCLASS or magstripe
credentials).
4. Verify and/or adjust all other lock parameters and click OK.
(See LockView Instruction Manual for complete details on
these options)
2. Enter the second credential (4-14 digit PIN) and press
“ENTER”
8
3. Press “ENTER” again. HOLD OPEN will flash; LOCK IS HELD
OPEN will appear in the upper left hand corner of the LCD.
200/300 Series — CompX cabinet eLock Instructions
200/300 Series Cabinet eLock — Instructions
NOTE: THE SECOND CREDENTIAL MUST ALWAYS BE A 4 - 14
DIGIT PIN
To EXIT Passage Mode (re-lock the unit/extend the eLock
latch bolt):
1. Present a valid card within range of the HID reader or slide
the magstripe card through the magstripe reader. EXITING
PASSAGE MODE will flash on the LCD and the latch bolt will
extend.
PIN CREDENTIAL
1. Enter a valid PIN (between 4 - 14 digits)
2. Press “ENTER.” EXITING PASSAGE MODE will flash on the
LCD and the latch bolt will extend.
CARD CREDENTIAL
If the eLock is equipped with a card reader (HID Prox, HID
iCLASS or Magstripe):
continued
DUAL CREDENTIAL
If the User or Supervisor requires a dual credential:
1. Enter the primary valid PIN (for keypad credentials) and
press “ENTER” or present the valid card (for HID Prox, HID
iCLASS or Magstripe credentials). EXITING PASSAGE MODE
will flash on the LCD and the latch bolt will extend.
200/300 Series Cabinet eLock — Manual Programming
Credential Menu
ADD CREDENTIAL
Note: There are two status levels; Supervisor and User. Each
eLock can hold any combination of up to 3,000 Supervisors
and Users.
1.
2.
3.
4.
5.
6.
7.
8.
9.
10.
Only Supervisors are allowed to ADD Users and Supervisors.
Press “MENU.” LOGIN PLEASE will be displayed.
Scan valid credential or enter 4-14 digit PIN and Press
“ENTER.”
Press “DOWN” button to highlight CREDENTIAL MENU and
press “NEXT/SELECT.”
Highlight ADD CREDENTIAL and press “NEXT/SELECT.”
CREDENTIAL TO ADD will be displayed. Scan new credential
or enter new 4-14 digit PIN and Press “ENTER.”
Adding credential will be displayed.
Default status is User. To change status to Supervisor press
the + button.
The new User/Supervisor will be added to the next available
slot number. To change the slot number, press “UP” and then
+/- to move to next available slot; or use the numeric keypad
to enter the desired slot number and press “NEXT/SELECT.”
CREDENTIAL NAME ENTRY will appear. Press 2 - 9 for A - Z;
press 1 for , , + or ; press 0 for “space”; press and hold
0 - 9 for numbers. (Maximum number of allowed characters
is 14.)
Press “ENTER” when done. STORED will be displayed when
complete.
-.
_
200/300 Series — CompX cabinet eLock Instructions
DELETE CREDENTIAL
Note: There are two status levels; Supervisor and User.
1.
2.
3.
4.
5.
6.
7.
8.
Only Supervisors are allowed to DELETE Users and
Supervisors.
Press “MENU.” LOGIN PLEASE will be displayed.
Scan valid credential or enter 4-14 digit PIN and Press
“ENTER”
Press “DOWN” button to highlight CREDENTIAL MENU and
press “NEXT/SELECT”
Highlight DELETE CREDENTIAL and press “NEXT/SELECT”
Credential to Delete will be displayed. All of the occupied
slots along with the name (if one exists) will be listed. If
the status of the credential is a supervisor, an asterisk (*)
appears next to the slot number. Press “MENU” to re-sort
by slot number, alphabetically by name, or showing all
supervisors first.
Press ‘UP” / “DOWN” to scroll by line or +/- to scroll by
page to highlight credential to be deleted and press “NEXT/
SELECT.”
Press “UP” and “NEXT/SELECT” to delete. DELETED will be
displayed when complete.
Press “BACK/CANCEL” to return to CREDENTIAL MENU.
VIEW CREDENTIAL
Note: There are two status levels; Supervisor and User.
Only Supervisors are allowed to VIEW Users and Supervisors.
1. Press “MENU” LOGIN PLEASE will be displayed.
2. Scan valid credential or enter 4-14 digit PIN and Press
“ENTER.”
9
200/300 Series Cabinet eLock — Manual Programming
3. Press “DOWN” button to highlight CREDENTIAL MENU and
press “NEXT/SELECT”
4. Highlight VIEW CREDENTIAL and press “NEXT/SELECT”
5. Credential to View will be displayed. All of the occupied slots
along with the name (if one exists) will be listed. If the status
of the credential is a supervisor, an asterisk (*) appears next
to the slot number. Press “MENU” to re-sort by slot number,
alphabetically by name, or showing all supervisors first.
6. Press “UP”/“DOWN” to scroll by line or +/- to scroll by page to
highlight credential to be viewed and press “NEXT/SELECT.”
7. Press “NEXT/SELECT” to display NAME, SLOT NUMBER, LAST
ACCESS ATTEMPT.
8. Press “DOWN” to display CREDENTIAL TYPE (KEYPAD, PROXCARD
or MAGSTRIPE CARD)
9. Press “DOWN” again to display the ACCESS SCHEDULE
(TIME AND DAY RESTRICTIONS AS SET IN LOCKVIEW).
10. Press “BACK/CANCEL” to return to CREDENTIAL MENU.
1.
2.
3.
4.
5.
6.
EDIT CREDENTIAL
Note: There are two status levels; Supervisor and User.
1.
2.
3.
4.
5.
6.
7.
8.
9.
Only Supervisors are allowed to EDIT Users and Supervisors.
Press “MENU” LOGIN PLEASE will be displayed.
Scan valid credential or enter 4-14 digit PIN and Press
“ENTER”
Press “DOWN” button to highlight CREDENTIAL MENU and
press “NEXT/SELECT”
Highlight EDIT CREDENTIAL and press “NEXT/SELECT”
Credential to Edit will be displayed. All of the occupied slots
along with the name (if one exists) will be listed. If the status
of the credential is a supervisor, an asterisk (*) appears next
to the slot number. Press “MENU” to re-sort by slot number,
alphabetically by name, or showing all supervisors first.
Press ‘UP” / “DOWN” to scroll by line or +/- to scroll by page
to highlight credential to be edited.
Press “NEXT/SELECT” to edit highlighted credential
Press +/- to change Level (Supervisor/User); press “UP/
DOWN” to highlight 2nd PIN. To add a new or change an
existing 2nd PIN, enter a 4 - 14 digit number using the
numeric keypad. Press “ENTER” when done. Confirm the
new/changed PIN by entering it again when prompted. Press
“ENTER” when done.
Press “BACK/CANCEL” to return to CREDENTIAL MENU.
SET/EDIT YOUR 2nd PIN
Note: There are two status levels; Supervisor and User.
10
continued
Only Supervisors are allowed to SET/EDIT YOUR 2nd PIN.
The steps below will make the logged in credential a Dual
Credential Supervisor requiring a 2nd PIN.
Follow the EDIT CREDENTIAL steps to add/change dual
credential status for other Supervisors or Users.
Press “MENU” LOGIN PLEASE will be displayed.
Scan valid credential or enter 4-14 digit PIN and Press
“ENTER”
Press “DOWN” button to highlight CREDENTIAL MENU and
press “NEXT/SELECT”
Highlight SET YOUR 2nd PIN and press “NEXT/SELECT.” (EDIT
YOUR 2nd PIN will appear if a second PIN credential already
exists)
Type new 2nd PIN will be displayed. Enter new 4 - 14 digit
PIN and press “NEXT/SELECT.”
Type 2nd PIN again will appear. Enter the 4 - 14 digit PIN
again and press “NEXT/SELECT.” NEW PIN SET will appear.
Display Formats
Using DISPLAY FORMATS, the following can be adjusted:
HOURS: AM/PM or 24 HOUR
M-F/DATE:
w
w
w
w
w
MON-SUN; MM/DD/YY;
MON-SUN; MMM D ‘YY;
MON-SUN; DD-MM-YY;
MON-SUN; DD-MMM-YY
MON-SUN; YYYY-MM-DD
1. Press “MENU.” LOGIN PLEASE will be displayed.
2. Scan valid credential or enter 4-14 digit PIN and press
“ENTER.”
3. Press “DOWN” button to highlight DISPLAY FORMATS and
press “NEXT/SELECT.”
4. DISPLAY FORMATTING will be displayed.
5. Press “UP”/“DOWN” buttons to select and +/- buttons to
adjust.
6. Press “NEXT/SELECT” when done.
Set Date/Time
Using SET DATE/TIME, the following can be adjusted:
SETUP TIME ZONE (INCLUDING AUTO DAYLIGHT SAVING)
SET DATE (MONTH, DAY, YEAR)
SET TIME (HOUR, MINUTE, AM/PM)
1. Press “MENU.” LOGIN PLEASE will be displayed.
200/300 Series — CompX cabinet eLock Instructions
200/300 Series Cabinet eLock — Manual Programming
2. Scan valid credential or enter 4-14 digit PIN and press
“ENTER.”
3. Press “DOWN” button to highlight SET DATE/TIME and press
“NEXT/SELECT.”
4. DATE/TIME MENU will be displayed.
5. Press “UP”/“DOWN” to scroll and “NEXT/SELECT” to modify.
6. Press “UP”/“DOWN” buttons to select and +/- buttons to
adjust.
7. Press “NEXT/SELECT” when done.
8. Press “BACK/CANCEL” to return to main menu.
Network Test (if equipped)
Using NETWORK TEST the strength and quality of the eLock
connection to the network is displayed. The IP and MAC
addresses are also shown here.
1. Press “MENU.” LOGIN PLEASE will be displayed.
2. Scan valid credential or enter 4-14 digit PIN and press
“ENTER.”
3. Press “DOWN” button to highlight NETWORK TEST and press
“NEXT/SELECT.”
4. NET STATUS will be displayed as well as Str: & Qual:, IP
address and MAC address.
5. Press “CLEAR” to exit.
LCD Contrast
Using LCD CONTRAST, the LCD contrast can be adjusted:
1. Press “MENU.” LOGIN PLEASE will be displayed.
2. Scan valid credential or enter 4-14 digit PIN and press
“ENTER.”
3. Press “DOWN” button to highlight LCD CONTRAST and press
“NEXT/SELECT.”
4. LCD Contrast will be displayed.
5. Enter 1 - 9 on numeric keypad or +/- buttons to adjust.
6. Press “NEXT/SELECT” when done.
7. Press “BACK/CANCEL” to return to main menu.
LCD Backlight
Using LCD BACKLIGHT the brightness of the display can be
adjusted.
1. Press “MENU.” LOGIN PLEASE will be displayed.
2. Scan valid credential or enter 4-14 digit PIN and press
“ENTER.”
200/300 Series — CompX cabinet eLock Instructions
continued
3. Press “DOWN” button to highlight LCD BACKLIGHT and press
“NEXT/SELECT.”
4. LCD Backlight will be displayed.
5. Enter 0 - 9 on numeric keypad or +/- buttons to adjust.
(“0” = OFF)
6. Press “NEXT/SELECT” when done.
Set Beep Volume
Using SET BEEP VOLUME, the audible beep can be
adjusted.
1. Press “MENU.” LOGIN PLEASE will be displayed.
2. Scan valid credential or enter 4-14 digit PIN and press
“ENTER.”
3. Press “DOWN” button to highlight SET BEEP VOLUME and
press “NEXT/SELECT.”
4. Beep Volume will be displayed.
5. Enter 0 - 9 on numeric keypad or +/- buttons to adjust.
(“0” = MUTE)
6. Press “NEXT/SELECT” when done.
7. Press “BACK/CANCEL” to return to main menu.
Reset Net Schedule
A PROPERLY CONFIGURED AND ENABLED NETWORK eLock
IS REQUIRED TO MAKE USE OF THIS FEATURE.
Only Supervisors are allowed to RESET NET SCHED.
Using RESET NET SCHED. the scheduled network check-in
time can be set.
1. Press “MENU.” LOGIN PLEASE will be displayed.
2. Scan valid credential or enter 4-14 digit PIN and Press
“ENTER.”
3. Press “DOWN” button to highlight RESET NET SCHED. and
press “NEXT/SELECT.”
4. NETWORK TIMING RESET will be displayed. The eLock will
follow the programmed or default check-in frequency from
this time of day forward.
For example:
Programmed Update Interval as set in LockView is 12 hours
(twice/day). The time of day was 10 a.m. when the eLock
was initialized.
Therefore, the eLock update time is 10 a.m. and 10 p.m. The
desired update time is 6 a.m. and 6 p.m.
Using the RESET NET SCHED. feature, the above steps should
be followed at 6 a.m. or 6 p.m.
11
200/300 Series Cabinet eLock — Accessories
HID Prox User,
Supervisor Card
®
Magstripe User,
Supervisor Card
HID Prox Tag
®
LockView
Software Kit
®
(1 LockView® CD, 1 USB cable)
Bit
AC Adapter
Screwdriver
Note: product images are not to scale.
HID is a trademark of HID Corporation.
LockView® software
q Add, edit, view and delete users / supervisors
and their credentials
®
q Add, edit and delete CompX eLocks
q Set real time clock
q Time based access restrictions
q Create user groups
q Assign access rights between users / supervisors
q WindowsTM based
and CompX eLocks® in the database
q Set up Escalating Notification System*
q USB or network connection*
q Download, view, save, print, archive and delete
audit trails
q Dual credential access available
q View Compliance Dashboard*
q Dual Latch access available (second latch
required and not included)
* requires network eLock
LockView is a Registered Trademark of CompX International. Windows is a trademark of the Microsoft Corporation. Specifications may vary based on user application.
340 W Broad Street
Burlington, NJ 08016
P: 1(800)TIP-TEMP
F: (609)239-1911
E: [email protected]
12
www.tiptemp.com
advertisement
* Your assessment is very important for improving the workof artificial intelligence, which forms the content of this project
Related manuals
advertisement