- Computers & electronics
- Computer components
- Chassis components
- HDD/SSD enclosures
- Gigabyte
- GZ-PEBX1-S0R/B0R
- Owner's manual
Gigabyte GZ-PEBX1-S0R/B0R
Add to my manuals
1 Pages
The Gigabyte GZ-PEBX1-S0R/B0R is a versatile and durable mobile enclosure designed to enhance the performance and accessibility of your 2.5" SATA HDD. With its aluminum body, it offers superior cooling to ensure smooth operation even during intensive tasks. The enclosure's compatibility with both 3.5" and 5.25" profiles provides flexible mounting options, allowing you to seamlessly integrate it into your existing system.
advertisement
◉
Touch to zoom

GIGABYTE'
ANVIL
2.5” Mobile Enclosure
- Enhanced cooling performance with aluminum body
- Compatible with both 3.5” and 5.25” profiles
- External usage via USB connectivity
- Docking connectivity via SATA interface
- Easy installation
- Compatible with Mac / Windows OS
- Plug & Play and Hot-swap capability
Specifications
HDD Type 2.5"SATA HDD
External Interface USB2.0 / | \
стом CAUTION
Internal Housing Interface SATA
Material Aluminum The followings are not covered by warranty:
Color Black/Silver 1. Using the product incorrectly or in a manner other than the designed purpose.
; i 2. Non-observance of the proper operation provided. E.g. Input higher current than original specs.
Dimensions (DxWxH) 136.5x79.4x16 mm 3. Malfunction caused by interference from other devices.
Weight 122g 4. Incorrect installation of HDD type.
System Support Mac OS 9.x or above 5. Unapproved modification of the product.
, 6. Malfunction caused by natural hazards, earthquakes, lightning, fire or floods.
Linux 2.4.1.0 or above 7. Any loss/damage caused by failure to follow the installation process within the user manual.
Windows ME/ 2000 /XP /VISTA 8. All devices are detached from the casing prior to the transportation of the computer system,
Windows 98 resulting in damages to the casing or other computer related devices.
(if drivers are necessary, please visit GIGABYTE website for downloads) 9. Warranty is only valid for 1 year from date of purchase.
E
Accessories
SATA Cable
USB Cable
USB Power Cable 2.5” HDD
Securing Screws x 4
5.25” Bracket
Securing Screws x 4
3.5” Internal Housing
Securing Screws x 5
01 introduction
1.1. The Anvil is divided into three parts
2.5” HDD
mobile enclosure 3.5” internal housing 5.25” bracket
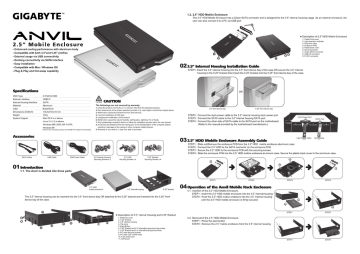
The 3.5” internal housing can be inserted into the 3.5" front device bay OR attached to the 5.25" bracket and inserted into the 5.25” front
device bay of the case.
Metal top cover
5.25” bracket
3.5” internal housing
Flip cover
Eject Button
5.25” Bracket and 3.5” internal housing securing screws
5.25” Bracket and 3.5” internal housing screw holes
PC case securing screws
PC case 5.25” screw holes
10. 4-pin power port
11. SATA port
о оно пою
% Description of 3.5” Internal Housing and 5.25” Bracket
1.2. 2.5” HDD Mobile Enclosure
The 2.5" HDD Mobile Enclosure has a 22-pin SATA connector and is designed for the 3.5” internal housing usage. As an external enclosure, the
user can also connect it to a PC via USB port.
Xx Description of 2.5” HDD Mobile Enclosure
Plastic front cover
Light operation indicator
Aluminum case
Enclosure PCB
Plastic back cover
Securing screws
22-pin SATA connector
USB 2.0 connector
5V DC connector
© о мо в о ю
023.5" Internal Housing Installation Guide
STEP1: Insert the 3.5” internal housing into the 3.5” front device bay of the case OR secure the 3.5” internal
housing to the 5.25” bracket than Insert the 5.25” bracket into the 5.25” front device bay of the case.
3.5” front device bay 5.25” front device bay
STEP2 : Connect the 4-pin power cable to the 3.5” internal housing 4-pin power port.
STEP3 : Connect the SATA cable to the 3.5” internal housing SATA port.
STEP4 : Connect the other side of SATA cable to the SATA port on the motherboard.
(Refer to the manual provided by the motherboard manufacturer.)
4-Pin Power Port
SATA Port
4-pin Power Cable: SATA‘Cable
O3 2.5” HDD Mobile Enclosure Assembly Guide
STEP1 : Slide out/Remove the enclosure PCB from the 2.5” HDD mobile enclosure aluminum case.
STEP2 : Connect the 2.5” HDD to the SATA connector on the enclosure PCB.
STEP3 : Secure the 2.5” HDD to the enclosure PCB with the securing screws.
STEP4 : Slide the enclosure PCB into the 2.5” HDD mobile enclosure aluminum case. Secure the plastic back cover to the aluminum case.
STEP1 STEP2
04 Operation of the Anvil Mobile Rack Enclosure
4.1. Insertion of the 2.5” HDD Mobile Enclosure.
STEP1 : Insert the 2.5” HDD mobile enclosure into the 3.5” internal housing.
STEP2 : Push the 2.5” HDD mobile enclosure into the 3.5” internal housing
until the 2.5” HDD mobile enclosure is firmly secured.
STEP1 STEP2
4.2. Removal of the 2.5" HDD Mobile Enclosure.
STEP1 : Press the eject button.
STEP2 : Remove the 2.5” mobile enclosure from the 3.5” internal housing.
STEP1 STEP2
advertisement
* Your assessment is very important for improving the workof artificial intelligence, which forms the content of this project
Related manuals
advertisement