advertisement

2-3 Setting Up and Using the Hub
Step One: Make sure the fan has power. Press the FAN button on the Hub to test that the fan works. Each button press will cycle the fan through each speed. If you have a multi-speed fan, but the fan only goes through one speed during testing, please check your wiring.
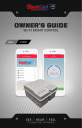
Step Two: Download the QuietCool Smart Control app on your device app store. The QuietCool Smart Control
App is available on Android and iOS.
Support:
Scan this QR code for how-to videos and to download the
QuietCool Smart Control App on your device. Visit our website at www.QuietCoolSystems.com/ articles/wi-fi-smart-control
Step Three: Go into the Wi-Fi settings of your device and find the Hub’s Wi-Fi network. The network will be displayed as (WV-XXXXXXXXXX) in the list of available Wi-Fi networks. The exact name of the
Wi-Fi network is displayed inside the Hub. The default password to connect to the Wi-Fi network is
myfan. Once connected, launch the QuietCool app.
NOTE: Only use one phone at a time to perform setup. Additionally, only provide power to one fan hub at a time during setup.
Step Four: You will see your fan states “Setup Required”. Tap the fan. On the “Setup Fan Controller” page, you will set the name of your fan and the speeds. We recommend naming the fan as the room that the fan was installed in such as “Master Bedroom” or “Living Room”, etc. Set the speed of your fan and tap save. Both the name of the fan and number of speeds can be set later in the Fan
Settings.
NOTE: You can setup the controller in two ways, Access Point Mode or Wi-Fi Station Mode.
Each mode has its benefits. We recommend setting the Hub to Wi-Fi Station Mode to take advantage of all features.
Access Point Mode:
Access Point Mode requires the user to select the fan from their device Wi-Fi networks everytime they would like to control the fan. Only one person can connect to the fan at a time. This method would be used if the user does not have a Wi-Fi router at home. This method also does not allow use of the internet while connected to the Hub. If you select this mode, we recommend you change the default password from
myfan to something different in the Network settings page.
12
Wi-Fi Station Mode:
Wi-Fi Station Mode requires the user to have a Wi-Fi router at home. In this mode the Hub is connected directly to the Wi-Fi router in the user’s home. This allows anyone connected to the home’s Wi-Fi network to control the fan via the QuietCool app.
NOTE: You may need to perform a firmware update before attempting Wi-Fi setup. Tap on the fan on the Device Management page. Tap the Settings gear icon in the upper right hand corner. Then tap, About. From there you can tap Firmware Update. Follow the on screen instructions to update the hub’s firmware.
QUIETCOOLSYSTEMS.COM
Setting the Hub to Wi-Fi Station Mode:
Step One: From the fan page, tap the Settings gear icon and choose the Network option. Tap the Wi-Fi setting and then tap Join to Network. Select your Wi-Fi network in the list of available Wi-Fi networks.
Type in your network password. This is case sensitive and must be typed in correctly. Tap Connect.
Step Two: You will be taken back to the Device Management page. Close out the QuietCool app and go back to your device’s Wi-Fi settings. Wait until you see your device automatically disconnect from the
Hub’s Wi-Fi network and automatically connect to your home Wi-Fi network. You will see the Hub’s Wi-Fi network disappear from the available options. Be very patient at this step.
Step Three: Open the QuietCool app. You should now see the fan in the Device Management screen. Test the fan to ensure operation.
Adding another Fan to the Network
Adding another fan to your QuietCool network is very easy. Start by providing power to the next fan hub.
Step One: Tap the + button or the Add new fan button in the QuietCool app. Then tap the Listen button.
Step Two: On the Hub, click the Join button. You may need to press the button a few times. Within 30 seconds to a minute you should see the new fan on your list of devices and the amber Status LED will show solid. A solid amber light means the second fan was added to the QC network successfully.
Step Three: Tap the new fan that states “Setup Required”. On the “Setup Fan Controller” page, you will set the name of your fan and the speeds. We recommend naming the fan as the room that the fan was installed in such as “Master Bedroom” or “Living Room”, etc. Set the speed of your fan and tap save. Both the name of the fan and number of speeds can be set later in the Fan Settings.
Controlling your Fan
To control your fan, tap the desired fan on the Device Management screen.
On the fan screen, you have multiple options:
Countdown Timer:
The circular scroll-wheel is your countdown timer. Rotate the wheel clockwise to select the amount of time you would like to run your QuietCool fan (from :30 - 8 hours). If you rotate the wheel all the way around, you will reach the HOLD option which will keep the fan on indefinitely until you turn it off.
Changing Fan Speed
Above the time display is where you set your fan speed. If the fan is a single speed fan, there will be no selection (it will state HIGH).
If the fan is a two speed fan, there will be a HIGH and LOW option.
If the fan is a three speed fan, there will be a HIGH, MED, and LOW option.
Once you have set your speed and timer, simply tap START to turn the fan on. These settings can also be adjusted while the fan is running.
1-888-QUIETCOOL
13
advertisement
