advertisement
 External 40x CD | Manualzz")
CHAPTER 8 — Hardware Installation
NOTE: The following section is only for those installing internal drives. If you have an external drive, skip to page 33.
Mounting an Internal Drive
YOUR TASK:
Mount your internal drive inside your computer.
YOUR OBJECTIVE:
A securely positioned drive whose connectors are within easy reach of the various cables that must attach to it.
YOUR METHOD:
Identify the drive bay where you will mount your drive. Remove bay cover. If necessary, use mounting rails to install drive in bay.
Your PC probably looks something like this:
Available bay with cover panel removed.
You can mount your drive in any available bay. You must remove the small panel that covers the bay that you want to use. Typically this is done after you have removed your computer’s cover. The panel can then be popped out by pressing outward lightly (in some older cases you may have to remove screws that hold the panel in place).
You now need to determine if you must install mounting rails on the sides of your drive. To do so, insert the drive into the open bay. If the drive fits tightly with little (or no) clearance on either side of the drive, you will not have to use mounting rails. The drive can be mounted directly into your computer.
CAUTION: Do not mount your drive in your computer using screws other than those supplied by Plextor. You may damage the drive if you insert screws that are too long.
ULTRAPLEX 40X OPERATION MANUAL
29
CHAPTER 8 — Hardware Installation
If you must use mounting rails, install them as shown below:
Be sure not to mistake the inner and outer face of a rail when attaching.
Typically, the smooth side of the rail faces away from the drive’s chassis.
There are four holes provided on each side of the drive. To mount an internal drive in most computers, the rails should be fastened to the lower pair of holes.
In some instances, you may need to fasten the rails to the upper set of holes.
You will find that four screws were supplied with your drive. Use only these screws to attach the mounting rails. Using screws other than those supplied by
Plextor could damage the drive or strip the threads.
Check the positioning of the rails by sliding the drive into the bay before you connect any cables.
Check Your Jumper Settings
Once you have a) mounted the rails; or b) determined that you don’t have to use mounting rails, you are almost ready to finish your drive’s installation.
However, before doing so, check your jumper settings one last time and be sure to record the serial number of your drive for future reference. It may also be helpful to record the “TLA” code found on the back or top of your drive.
If you do not have any SCSI peripherals (e.g., hard disk, scanner, printer, etc.) in your system other than your CD-ROM drive, you should not change the jumpers from their factory setting or change termination.
If you do have other SCSI peripherals as part of your computer system, you may need to change the settings of the SCSI ID and/or reset the termination.
See Chapters 6 and 7 for information on how to change these settings.
30
ULTRAPLEX 40X OPERATION MANUAL
CHAPTER 8 — Hardware Installation
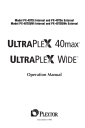
Cable Connections
You must make a minimum of two cable connections to your CD-ROM drive.
A third cable connection need be made only if you are using a soundboard in your computer.
The two cable connections that you must make are:
1) SCSI cable
2) power cable
Audio Connector
Jumpers
SCSI Interface Connector
Personal Computer
SCSI Host Adapter
SCSI Ribbon Cable
Power Connector
Power Supply from Personal
Computer
DC Power Supply
The SCSI cable you will need is determined by both the SCSI host adapter and which device you have, the UltraPleX 40max or the UltraPleX Wide. The
UltraPleX 40max uses a standard 50-pin flat ribbon cable. The UltraPleX Wide uses a 68-pin “wide” connector and ribbon cable. If you already have one other SCSI peripheral (such as a hard disk) and your existing cable has only two connectors, remove the cable and replace it with a cable with additional connectors. Connect the SCSI host adapter to a connection on either end of the cable. Connect the two peripherals to the other two connectors (one at the middle connector and one at the end of the cable). Refer to Chapter 7 of this manual for setting the termination of the devices.
CAUTION: It is possible to accidentally plug your SCSI ribbon cable upside down into both your drive and SCSI interface board. Accordingly, be sure you match the red stripe along one side of the SCSI cable to pin 1 on the interface board (if shown) and pin 1 on the drive
(as shown on the next page). Each connector on the 50-pin ribbon cable has a “key” in the middle. This key should fit into a slot in the middle of each connector of the interface board, your
UltraPleX CD-ROM drive, and any other SCSI peripherals. Each connector on the 68-pin cable is shaped in such a way that it will not allow an incorrect connection. Additionally, ensure there are no kinks or nicks in the cable and that the length does not exceed
1.5 meters.
ULTRAPLEX 40X OPERATION MANUAL
31
CHAPTER 8 — Hardware Installation
Double-check your work; you must ensure the side of the SCSI cable with the red stripe is matched to Pin 1 on the interface board and on the drive.
#1
To Pin #1
Either end of the cable may be connected to the CD-ROM drive or the SCSI interface board
Pin #1
The easiest way to install your SCSI cable is to plug it into the SCSI connector on the rear panel of the drive before you insert the drive into your computer.
Then you can thread the cable through the front of the open bay you plan to use and back toward the SCSI interface board. Connect the cable to your SCSI interface board and finish mounting your drive in the proper position. The drive should slide smoothly into the bay. If it does not, check for obstructions in the bay and ensure the side rails (if needed) are attached properly.
You now need to make the power connection. In most computers, you will find additional power connectors that are ready for your use. Check the cable running from your power supply to your hard disk and see if it has extra connectors on it. If so, you can plug one of these into the power connector found on the rear panel of the CD-ROM drive.
If you do not find any additional connectors available (either because they were not supplied or they are all in use), you will have to buy a “splitter” or a
“Y-connector.” These can also be found at most computer stores. If you are in
32
ULTRAPLEX 40X OPERATION MANUAL
advertisement