advertisement

| Configure | 462
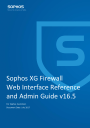
Figure 433: Add Syslog Server
Note: You can configure maximum five syslog servers.
3. Click Save.
Once you add the server, go to the System > System Services > Log Settings page and enable all those logs, which are to be sent to the syslog server in the section Log Settings.
Data Anonymization
This page allows you to enable/disable data anonymization and select authorizer administrators, also to de-anonymize all the user identities - Username, IP Address, MAC Address and Email Address in all logs /activities / reports.
View the report from Configure > System Services > Data Anonymization.
Once Data Anonymization is enabled, the Device anonymizes all the user identities. It means user identities in all the logs and reports are displayed in encrypted form.
To view the actual details, IT Administrator has to de-anonymize the same. To de-anonymize, approval from one of the authorizers configured on the Configure > System Services > Data Anonymization page is required.
Data Anonymization Setting
Enable data anonymization for the IT administrator to view or download user-specific activities, logs or reports. Apart from the IT administrator, at least one independent authorizer with the administrative privileges is required.
Once enabled:
1. All the user identities - username, IP address (IPv4 / IPv6), MAC address and email address in all logs /activities / reports are anonymized.
2. If an IT administrator wants to de-anonymize above mentioned user details, approval is required from at least one of the Authorizers.
3. Similarly, to disable data anonymization, approval from at least one of the Authorizers is required.
Note: To enable/disable data anonymization if you are logged in as one of the Authorizers, approval from at least one of the other Authorizers is required.
This section provides the following options:
Enable Data Anonymization
Click to enable Data Anonymization.
Select Authorizer
• Administrator List displays all the administrators.
• Click the check-box given under Select Authorizer menu to select the administrator. All the selected administrators are displayed under Selected Authorizer list.
| Configure | 463
Exceptions
This section allows to de-anonymize all the user identities - Username, IP Address, MAC Address and Email Address in all logs /activities / reports.
Depending on whether you want to de-anonymize the user identities in all logs /activities / reports or in particular log /activity / report, there are two ways to de-anonymize the user identities:
• From Data Anonymization page
• From Log Viewer page or Reports module
Follow the steps below to de-anonymize all the user identities - Username, IP Address, MAC Address and Email
Address in all logs /activities / reports:
1. Select Username(s) to be de-anonymized from user(s) listed under the User parameter.
2. Specify IP Address(s) (IPv4 / IPv6) to be de-anonymized.
3. If required, specify MAC Address(s) and Email Address(s) to be de-anonymized from Advanced Settings section.
4. Click Apply. An Authorization Window shall pop-up. Given below are the parameters and their description:
a. User Name: Select the Authorizer configured from Configure > System Services > Data Anonymization page.
b. Password: Specify password for the selected Authorizer and click OK.
5. Once approved, user identities in all logs and reports are decrypted and displayed with the actual user details.
| Configure | 464
Figure 434: Exceptions
From Log Viewer page or Reports module
Follow the steps below to de-anonymize a particular user identity in a particular log /activity / report:
1. To access the Log Viewer page, go to
. Else, you can view a report containing anonymized (encrypted) user identities from the Reports module.
2. Click the icon against an anonymized (encrypted) string. A new window titled De-Anonymize shall pop up.
Given below are the parameters and their description:
a. Anonymized String: Displayed the encrypted string. This is the string you want to decrypt.
b. De-Anonymized String: Displays the decrypted user identity i.e. actual user identity detail.
Note: This field is displayed blank until you specify password for the selected Authorised Username and click OK. Once approved, user identity in the log / report is decrypted and displayed with the actual user detail.
c. Authorised Username: Displays the Authorizer list configured from Configure > System Services > Data
Anonymization page. Select the desired Authorizer from the drop-down list.
advertisement
Key Features
- Firewall rules
- Web filtering
- Intrusion prevention
- VPN
- Wireless management
- Email security
- Advanced threat protection
Related manuals
Frequently Answers and Questions
What is the purpose of Sophos XG Firewall?
What are the key features of Sophos XG Firewall?
How do I access the Sophos XG Firewall web interface?
How do I configure basic firewall rules?
How do I enable web filtering?
What is the difference between a user rule and a network rule?
How do I create a VPN tunnel?
advertisement