advertisement

Hercules HWGEXT-54-LB
7. If you wish, set the shared printer as the default printer, then click Next.
8. Click Finish to close the Wizard.
You can now use the network printer thanks to your WiFi connection. For more information on sharing a printer, please refer to your printer’s manual.
3.11.5.
Windows 2000: Modifying a workgroup name
It may happen that you need to change the name of your workgroup (advanced users only). To do so, proceed as follows:
1. Click Start/Settings/Control Panel. Double-click
System.
2. In the System Properties window, select the
Network Identification tab.
3. Click the Properties button.
4. In the Computer name zone, enter a name sufficiently distinctive that it can easily be recognized in the list of computers for the workgroup (mycomputer, wifi-computer or julie, for example).
5. In the Workgroup zone, enter a name for the group
(HOME, OFFICE or HERCULES, for example).
The workgroup name must be identical (be sure to respect the case of letters) for all computers you wish to link together in a network.
6. Click OK. A Windows message indicates that the task has been carried out successfully and that you must restart the computer.
7. Repeat this procedure for each computer.
User Manual – 55/82
advertisement
Related manuals
advertisement
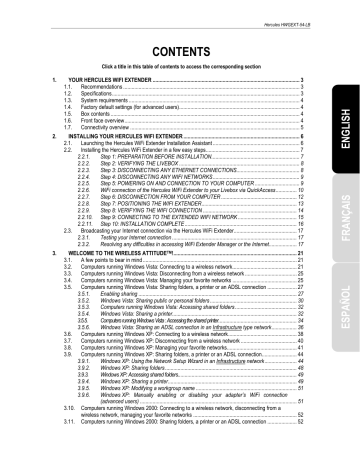
Table of contents
- 3 YOUR HERCULES WIFI EXTENDER
- 3 Recommendations
- 3 Specifications
- 4 System requirements
- 4 Factory default settings (for advanced users)
- 4 Box contents
- 4 Front face overview
- 5 Connectivity overview
- 6 INSTALLING YOUR HERCULES WIFI EXTENDER
- 6 Launching the Hercules WiFi Extender Installation Assistant
- 7 Installing the Hercules WiFi Extender in a few easy steps
- 7 Step 1: PREPARATION BEFORE INSTALLATION
- 8 Step 2: VERIFYING THE LIVEBOX
- 8 Step 3: DISCONNECTING ANY ETHERNET CONNECTIONS
- 9 Step 4: DISCONNECTING ANY WIFI NETWORKS
- 9 Step 5: POWERING ON AND CONNECTION TO YOUR COMPUTER
- 10 WiFi connection of the Hercules WiFi Extender to your Livebox via QuickAccess
- 12 Step 6: DISCONNECTION FROM YOUR COMPUTER
- 13 Step 7: POSITIONING THE WIFI EXTENDER
- 14 Step 8: VERIFYING THE WIFI CONNECTION
- 15 Step 9: CONNECTING TO THE EXTENDED WIFI NETWORK
- 16 Step 10: INSTALLATION COMPLETE
- 17 Broadcasting your Internet connection via the Hercules WiFi Extender
- 17 Testing your Internet connection
- 17 Resolving any difficulties in accessing WiFi Extender Manager or the Internet
- 21 A few points to bear in mind
- 21 Computers running Windows Vista: Connecting to a wireless network
- 25 Computers running Windows Vista: Disconnecting from a wireless network
- 25 Computers running Windows Vista: Managing your favorite networks
- 27 ndows Vista: Sharing folders, a printer or an ADSL connection
- 27 Enabling sharing
- 30 Windows Vista: Sharing public or personal folders
- 32 Computers running Windows Vista: Accessing shared folders
- 32 Windows Vista: Sharing a printer
- 34 Computers running Windows Vista : Accessing the shared printer
- 36 Windows Vista: Sharing an ADSL connection in an Infrastructure type network
- 38 Computers running Windows XP: Connecting to a wireless network
- 40 Computers running Windows XP: Disconnecting from a wireless network
- 41 Computers running Windows XP: Managing your favorite networks
- 44 ndows XP: Sharing folders, a printer or an ADSL connection
- 44 Windows XP: Using the Network Setup Wizard in an Infrastructure network
- 48 Windows XP: Sharing folders
- 49 Windows XP: Accessing shared folders
- 49 Windows XP: Sharing a printer
- 51 Windows XP: Modifying a workgroup name
- 51 (advanced users)
- 52 wireless network, managing your favorite networks
- 52 Computers running Windows 2000: Sharing folders, a printer or an ADSL connection
- 52 Creating a workgroup in Windows
- 53 Windows 2000: Sharing folders
- 53 Windows 2000: Accessing shared folders
- 53 Windows 2000: Sharing a printer
- 55 Windows 2000: Modifying a workgroup name
- 56 Windows 2000: Sharing an ADSL connection in an Infrastructure network
- 57 (advanced users)
- 58 WIFI EXTENDER MANAGER FOR ADVANCED USERS
- 58 Opening the doors of WiFi Extender Manager
- 60 Protecting access to WiFi Extender Manager
- 61 Navigating within the WiFi Extender Manager interface
- 61 Consulting information about your WiFi network
- 62 Connecting to a WiFi network
- 64 Limiting access to your WiFi network to certain WiFi computers and devices
- 66 Personalizing the general settings for your WiFi network
- 68 Securing your WiFi network
- 71 A toolbox with multiple facets
- 71 Restarting the Hercules WiFi Extender
- 72 Restoring your original settings
- 72 Updating the firmware
- 73 Loading and saving your configuration settings
- 74 Other advanced options
- 74 Configuring the internal DHCP server
- 75 Cloning your PC's MAC address
- 76 Changing the Hercules WiFi Extender password
- 76 Product information
- 77 GLOSSARY
- 80 TECHNICAL SUPPORT
- 80 WARRANTY
- 80 ENVIRONMENTAL PROTECTION RECOMMENDATION